Reviewing the Cadence Accessories I Didn’t Think I Needed

I’ve been pretty sick this week, and I don’t want to throw together a less than informative makeup review. So instead, I’m writing about something that just makes me happy to talk about. If you’ve been following me for a long time, you already know I love Cadence Capsules. I was reviewing them on my old blog before this Substack even existed. And I feel like I’ve had enough experience with the Parcels and Pill Stacks to do an actual review on them. I was pretty convinced I was going to tell you they were unnecessary, and I wasn’t even sure they’d work for me because I use too much skincare and take too many pills. But it turns out I love them all.  

In this post, all links are affiliate links (thank you for your support!), but all opinions are my own. If you happen to be buying anything from Cadence, you can use YOURGREENFRIEND for 15% off, and I always appreciate y’all using my codes, but as always, absolutely no pressure. 

Cadence Capsules – The Capsules are still the product I would recommend if you were going to buy one thing from Cadence. I use them for basically anything I don’t want happen to have a mini of already somehow, and mine have survived years of travel and being thrown around in suitcases and backpacks. I also keep two of the Small Capsules in my backpack all the time with two medications I take as needed. So in case you were wondering if you need the Pill Stacks just for a bunch of one pill, you don’t, and a regular Small Capsule already does that really well. 

Cadence Small Parcels – Before I started using the Parcels, I traveled with one big toiletry bag that somehow managed to take up a bunch of space without actually holding very much. There were too many pockets (I know, pockets are great for a makeup bag, but I’m over pockets for skincare). I honestly could never remember where anything was, not everything fit, and I would put products into extra plastic bags because I didn’t want anything to leak all over the inside.

Two Small Parcels neatly packed

Now I use two Small Parcels instead – one for morning and one for night. I’m honestly never going back to one big bag. I’m sure this has a lot to do with travelling with our toddler (LOVE HIM SO MUCH) which has made our travel very different. We almost always end up sharing a room with him, so I can’t always turn on the lights or go back and forth between the room and the bathroom (seriously, he goes to bed at 6pm). It’s also impossible to dig through a giant bag looking for something I forgot without waking him up. So, I really like having exactly what I need exactly where I think it is. I also do have medium and large Parcels, which I also love, but I didn’t end up using them on the last few trips.

the Parcels open

My morning Parcel has body sunscreen, vitamin C, a moisturizing serum, two face moisturizers, eye cream, face sunscreen, tweezers, hair ties, and lip balm. My nighttime one has a cleansing balm, cleanser, another eye cream, retinol, serum, a couple of moisturizers, and my Bloomeffects Royal Tulip Moisturizing Nectar (truly a must have when I’m travelling and really needs to be in a leak proof container).

all the skincare I packed

Yes, I travel with multiple moisturizers and two eye creams. My skin is really dry and gets even drier when I travel, and this system means I can honestly bring as much moisturizer as I want. And everything really does fit easily. The Small Parcels are super easy to squish into leftover space, but also manage to fit a lot into them, which is especially helpful when so much of our suitcase space belongs to the little man. 

The way they open also means I can easily see everything and grab what I need without having to dig through. And not that this has been an issue yet, but the inside is super easy to wipe down, so I’m not worried about ruining a toiletry bag if something eventually leaks.

Cadence Pill Stacks – I really thought I was taking one for the team buying these to review. I take seven pills in the morning and six to nine at night depending on the day, and some of them are pretty big pills. I already own a bunch of those plastic seven day AM/PM pill organizers that works fine, so why would I spend this much on another pill container and are my pills even going to fit?

I bought just a bunch of inserts because I already own an unreasonable number of Capsules and Extenders from years of buying Cadence products (no regrets!). I actually love that you can just buy bits and pieces of the system because I can save a bunch of money not buying more capsules and extenders just to try this out. For our last seven day trip, I used Pill Stack inserts in Medium Capsules so each one had an AM and one PM set. All seven of my morning pills fit, and all of my nighttime pills fit too, which I really didn’t expect. 

Two Pill Stacks in Medium Capsules

Normally I take my weekly organizer, pull out a few days, and put some in my backpack while the rest stays in my suitcase so I’m not separated from everything if our luggage gets lost or we get delayed somewhere. The cheap little plastic cases work, but I have had them open inside my bags, which is not awesome when 1) I really need to take all the pills and can’t lose them and 2) I have a toddler with grabby hands. My husband brought regular pill containers on the same trip and his opened and spilled pills into his backpack. You know whose pills didn’t end up everywhere? Mine. The capsules really don’t leak or pop open. 

They also have weight and *feel fancy* so it feels like I’m doing something nice for myself. I take a lot of medication every day and so I’m going to interact with a pill container every morning and every night. I love that this makes the whole thing feel less clinical and a little more fun. I like the colors, I like stacking them together, they’re really fun to play with (yay magnets!), I like making whatever configuration I need, and I just like using them. I also have long nails, so twisting open a Capsule is more comfortable than prying open the little plastic compartments on a normal weekly case which makes these easier to fill and get pills out of. I only had enough Pill Stack inserts set up for four days of the trip, so I still brought my regular plastic organizer for the other three. They worked completely fine, but did just make me less happy. 

What the Pill Stacks look like (I promise my pills fit – all of them)

I’ve actually started keeping an extra AM/PM setup permanently in my backpack because on the rare occasions I go into the office, I’m extremely likely to forget my medication. Now, I just have a backup sitting there that’s also *fancy*. 

With the extender for four Pill Stacks

I totally get it if you’re reading this and your first thought is “yup, no, I don’t need that.” A cheap pill organizer does the same job. And you’re right! But I’ve learned that I really enjoy upgrading mundane things that I use constantly rather than spending the same amount on some theoretically luxurious thing I never use. I’m also a person who doesn’t invest in shoes or clothes or lots of other things, so I’m very happy to splurge in the “make taking my medicine feel less bad” category of my life. 

Obviously, Cadence products really are expensive. That said, I really don’t have another major complaint about them because everything I’ve bought has held up so well. My Parcels have been on a ton of trips and still look almost new, and my Capsules have survived years and years of use. I tested all of the not Capsules products expecting to tell you they were a waste of money, and I honestly I just really like the Parcels and the PIll Stacks. I’m probably going to buy more of the Pill Stacks if I’m honest. 

What’s something completely unnecessary you’ve bought that made a boring part of your life better?

As always, some products may have been gifted, but all reviews/opinions are completely my own and unsponsored.
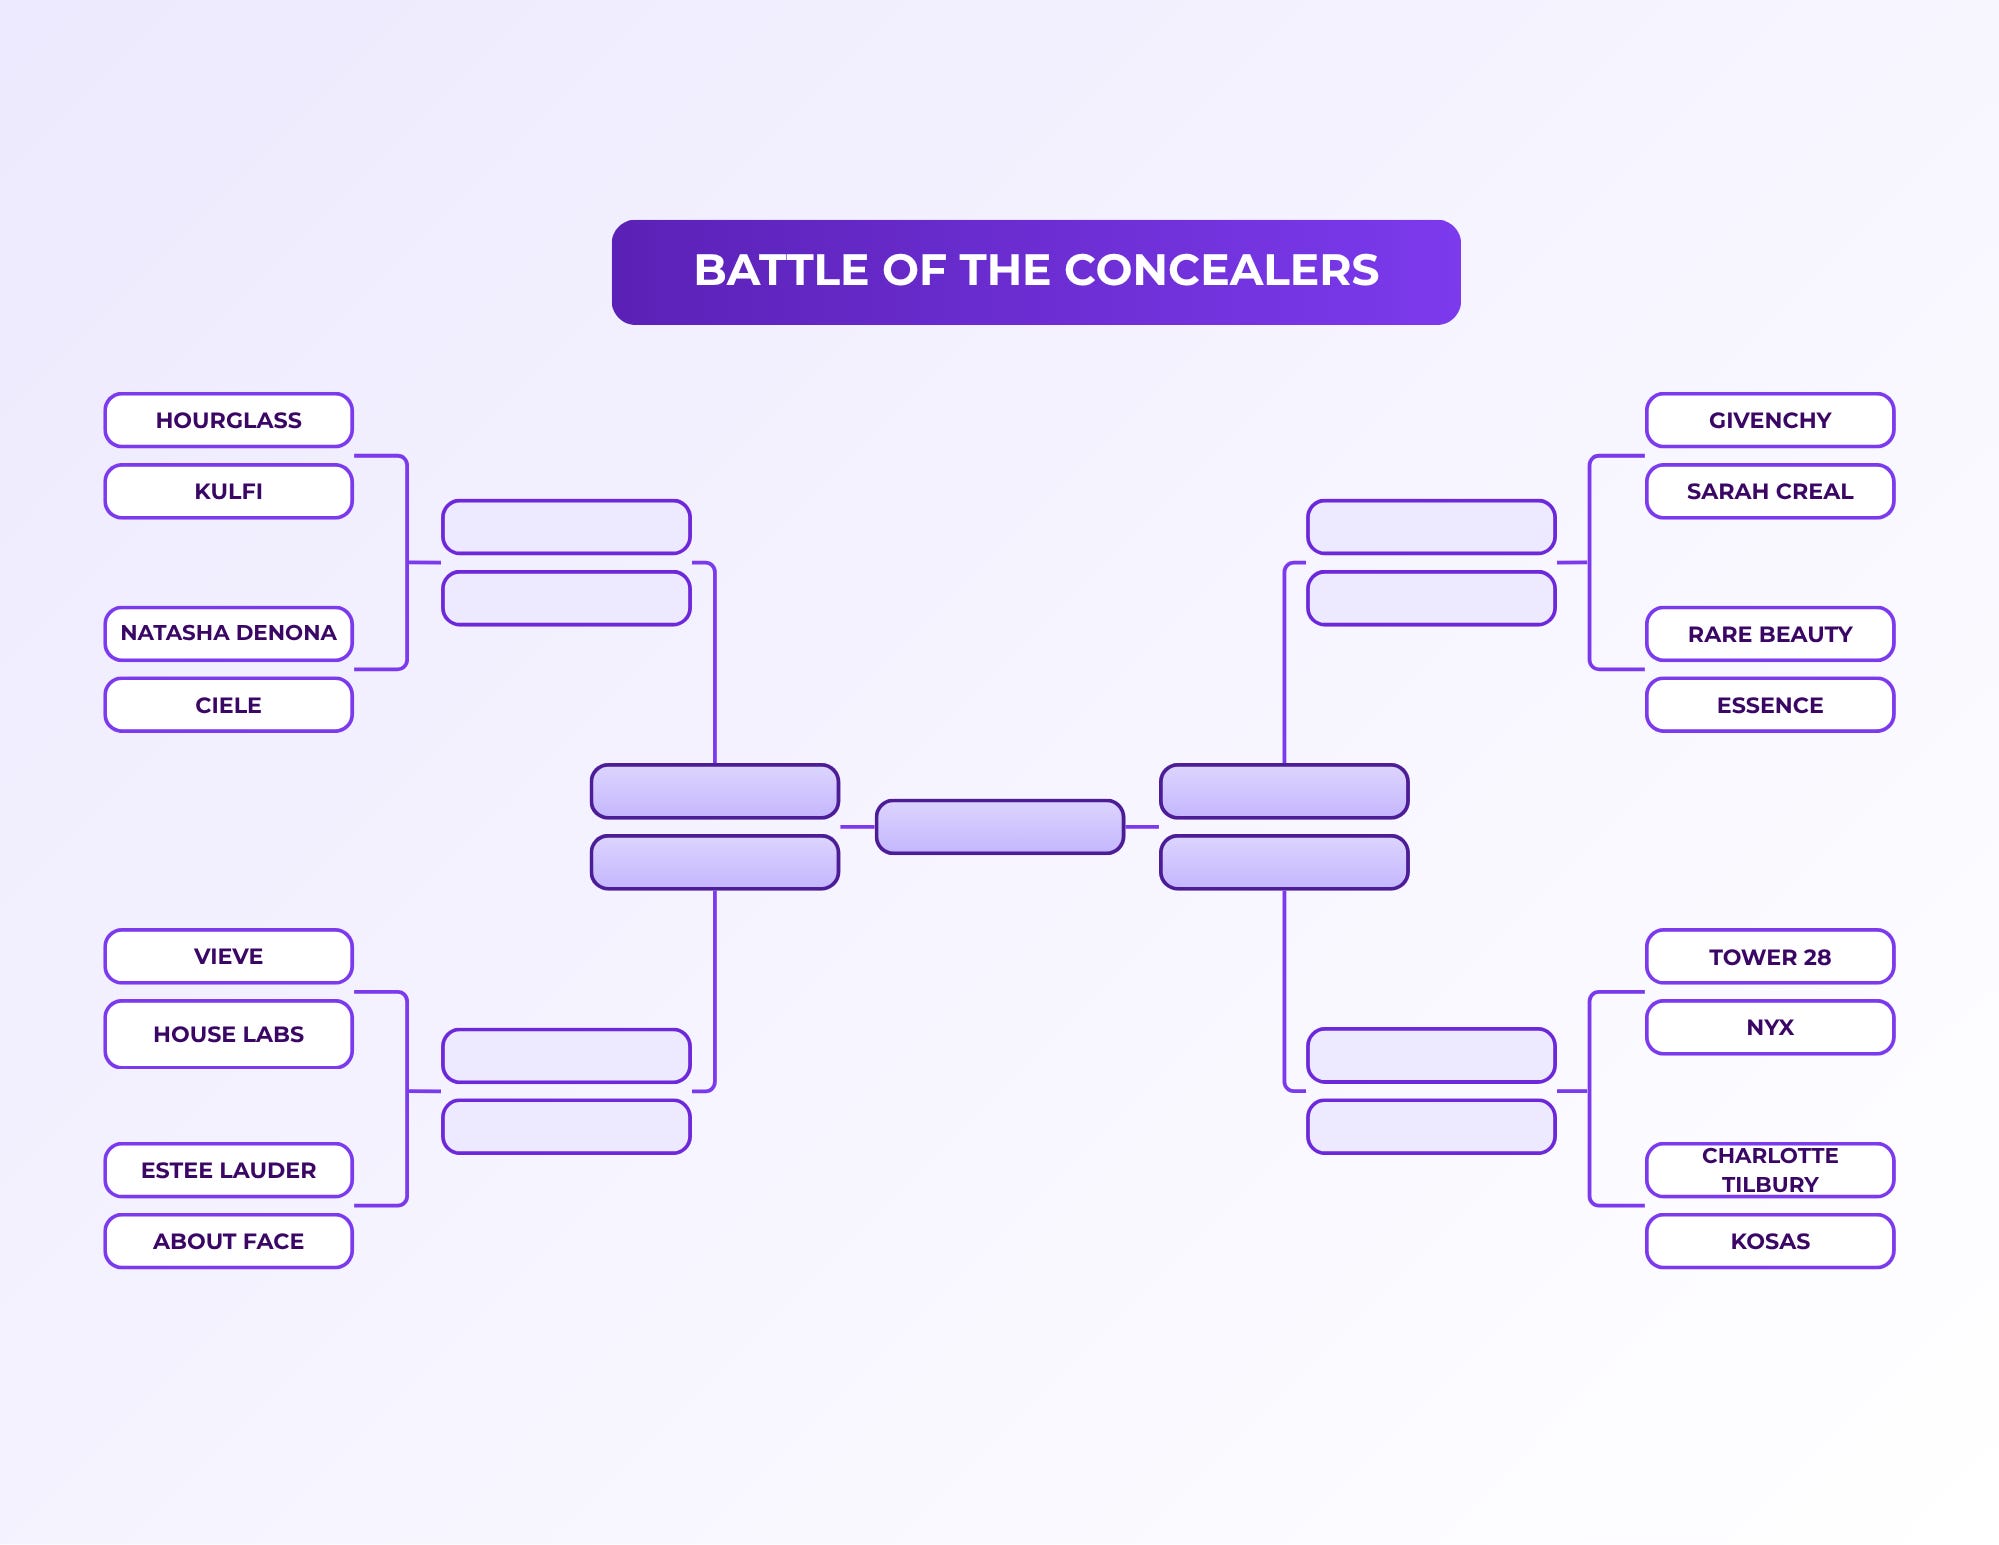
Battle of the Concealers: Round 1, Matches 1 & 2

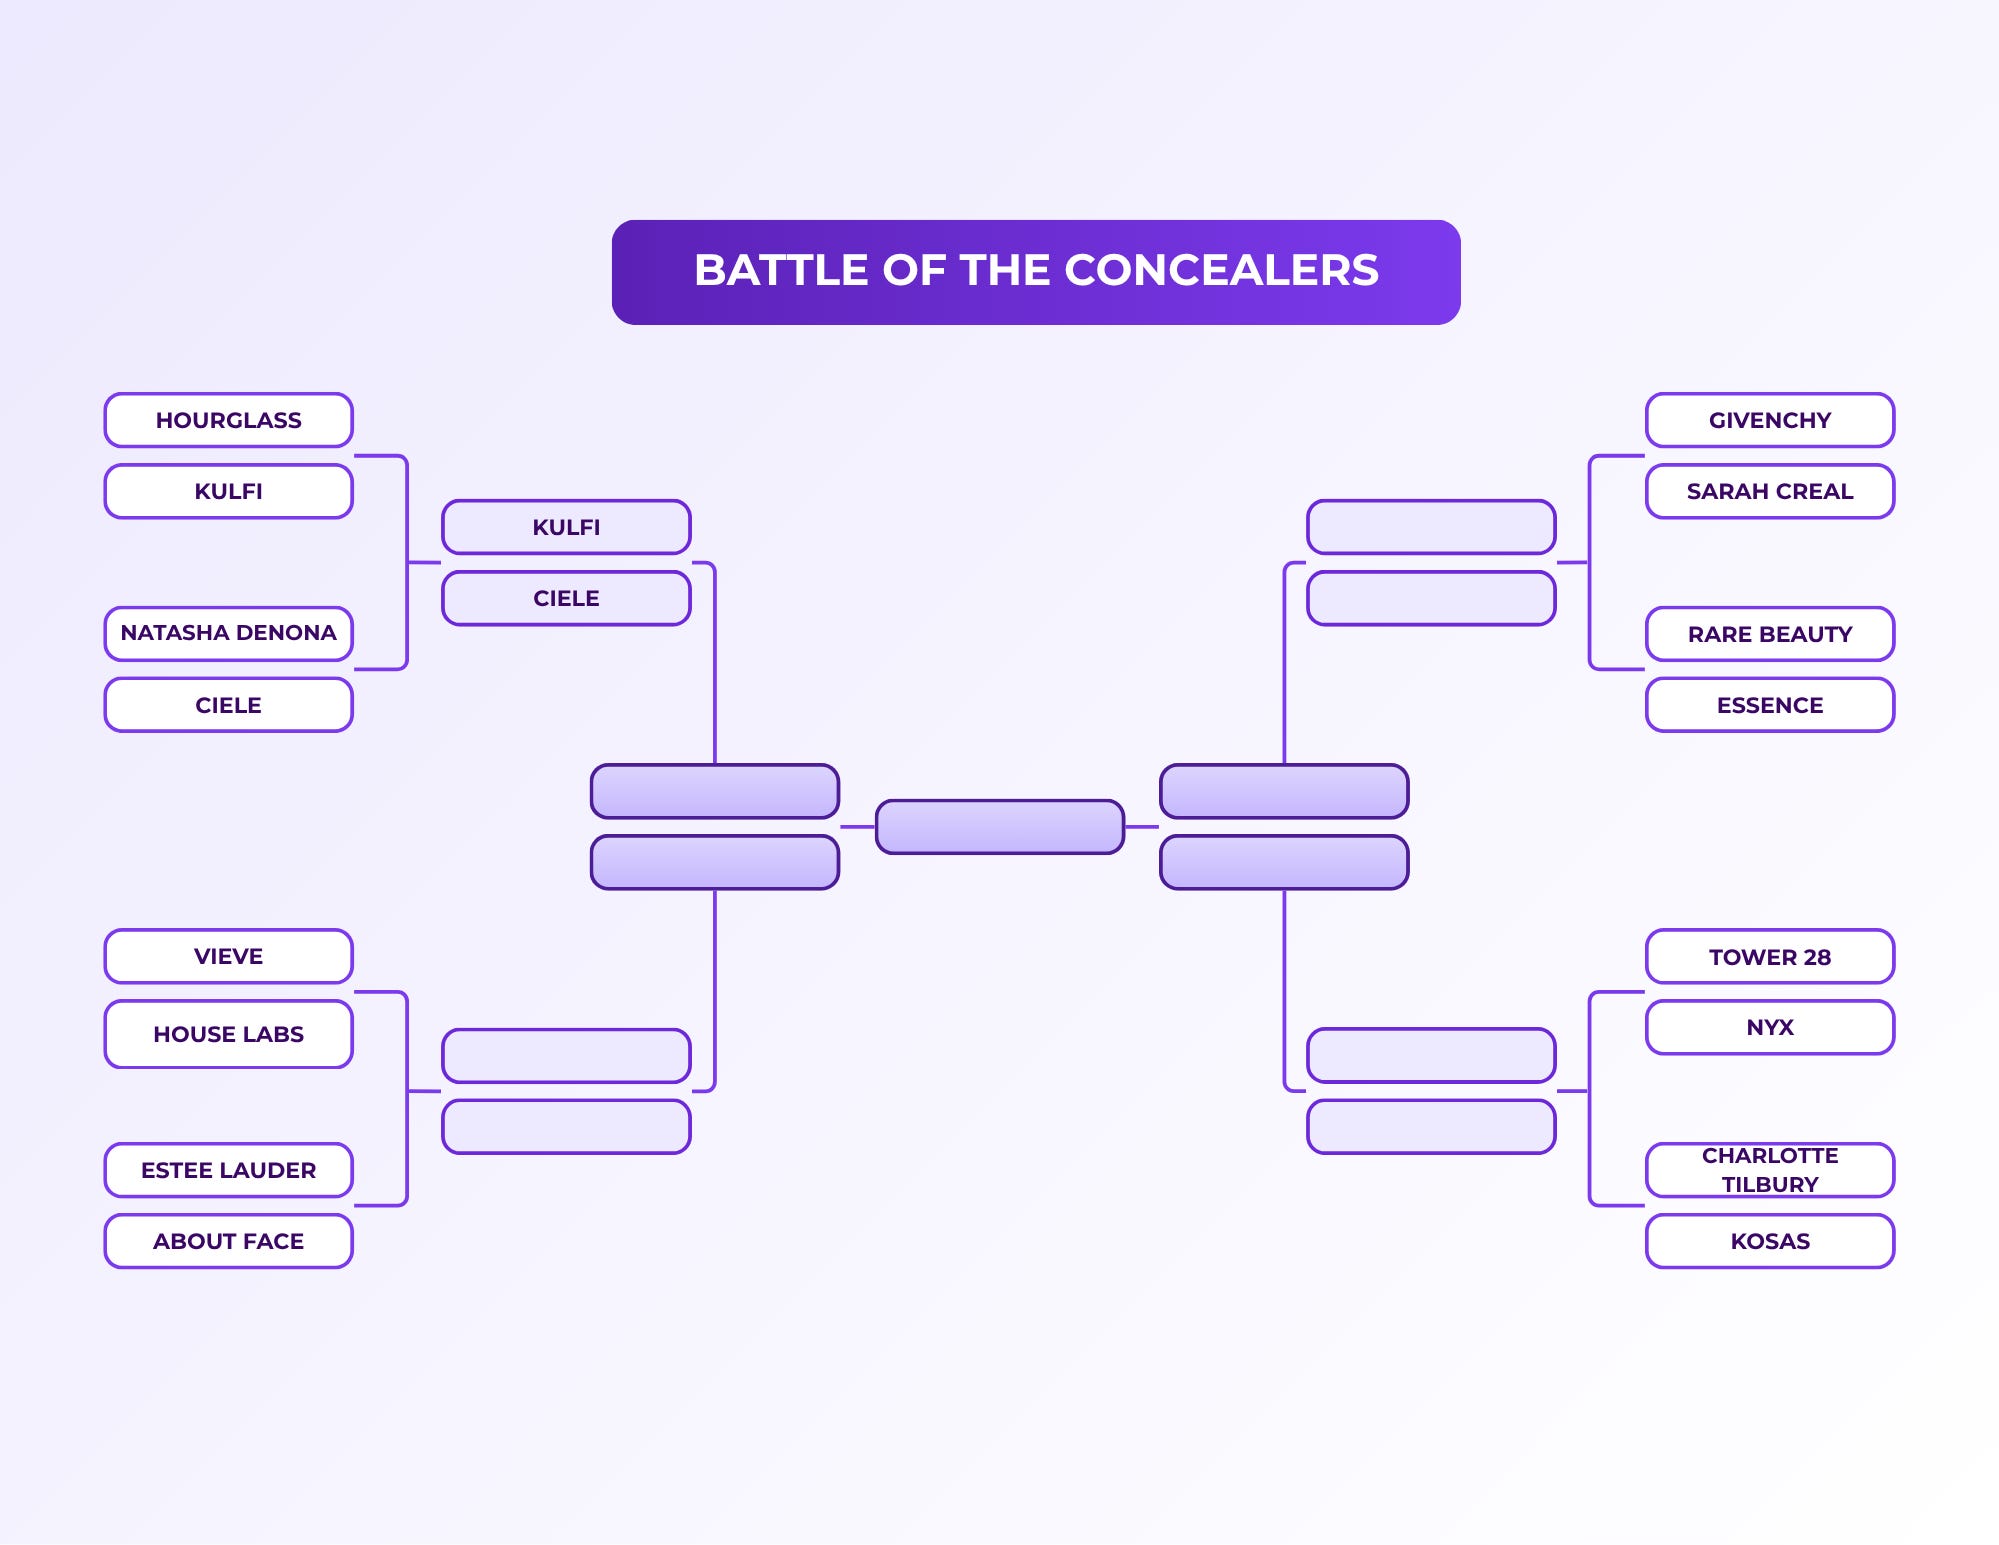
I’m finally doing another makeup tournament, and the one y’all requested the most was concealer. I started with 16 concealers I’ve been testing, some for years and some much more recently. To get down to 16, I took out any cream or stick concealers, and then fought with myself until I narrowed down to 16. As always, I’m happy to do follow ups with anything I didn’t include here or anything that’s launched since that you’re super curious about! Important reference for concealers – I have dry 35+ year old skin that has fine lines. If you have oily skin, you might love the ones that lose specifically because they don’t work as well on my dry skin.

The way I put this bracket together was that I had everyone in my Substack chat vote for their favorites, and the concealers that got the most votes were paired against the ones that got the least (or none). For the actual tests, I wore one concealer on each side of my face, both under my eyes, to spot conceal, and as foundation on different days. I kept the rest of my makeup the same. I also switched sides for each match just in case. I’ve been posting (way too) close up pictures in my Substack chat and having everyone vote on which side looks better without telling them what they’re looking at.

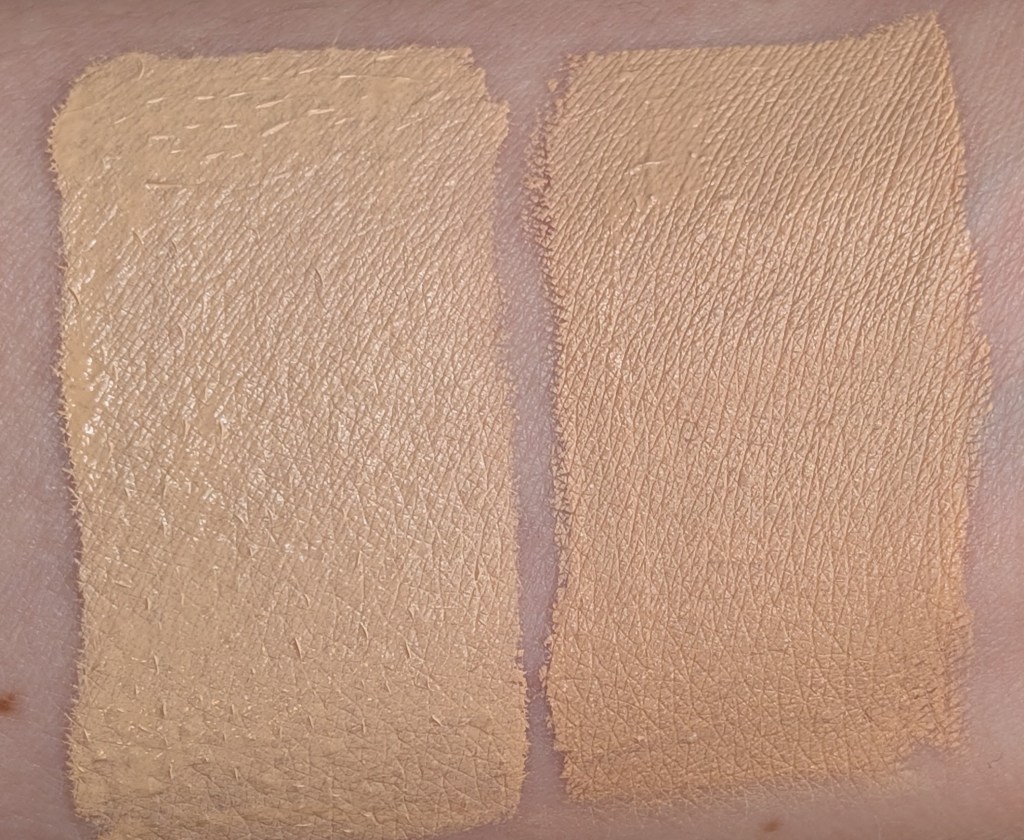
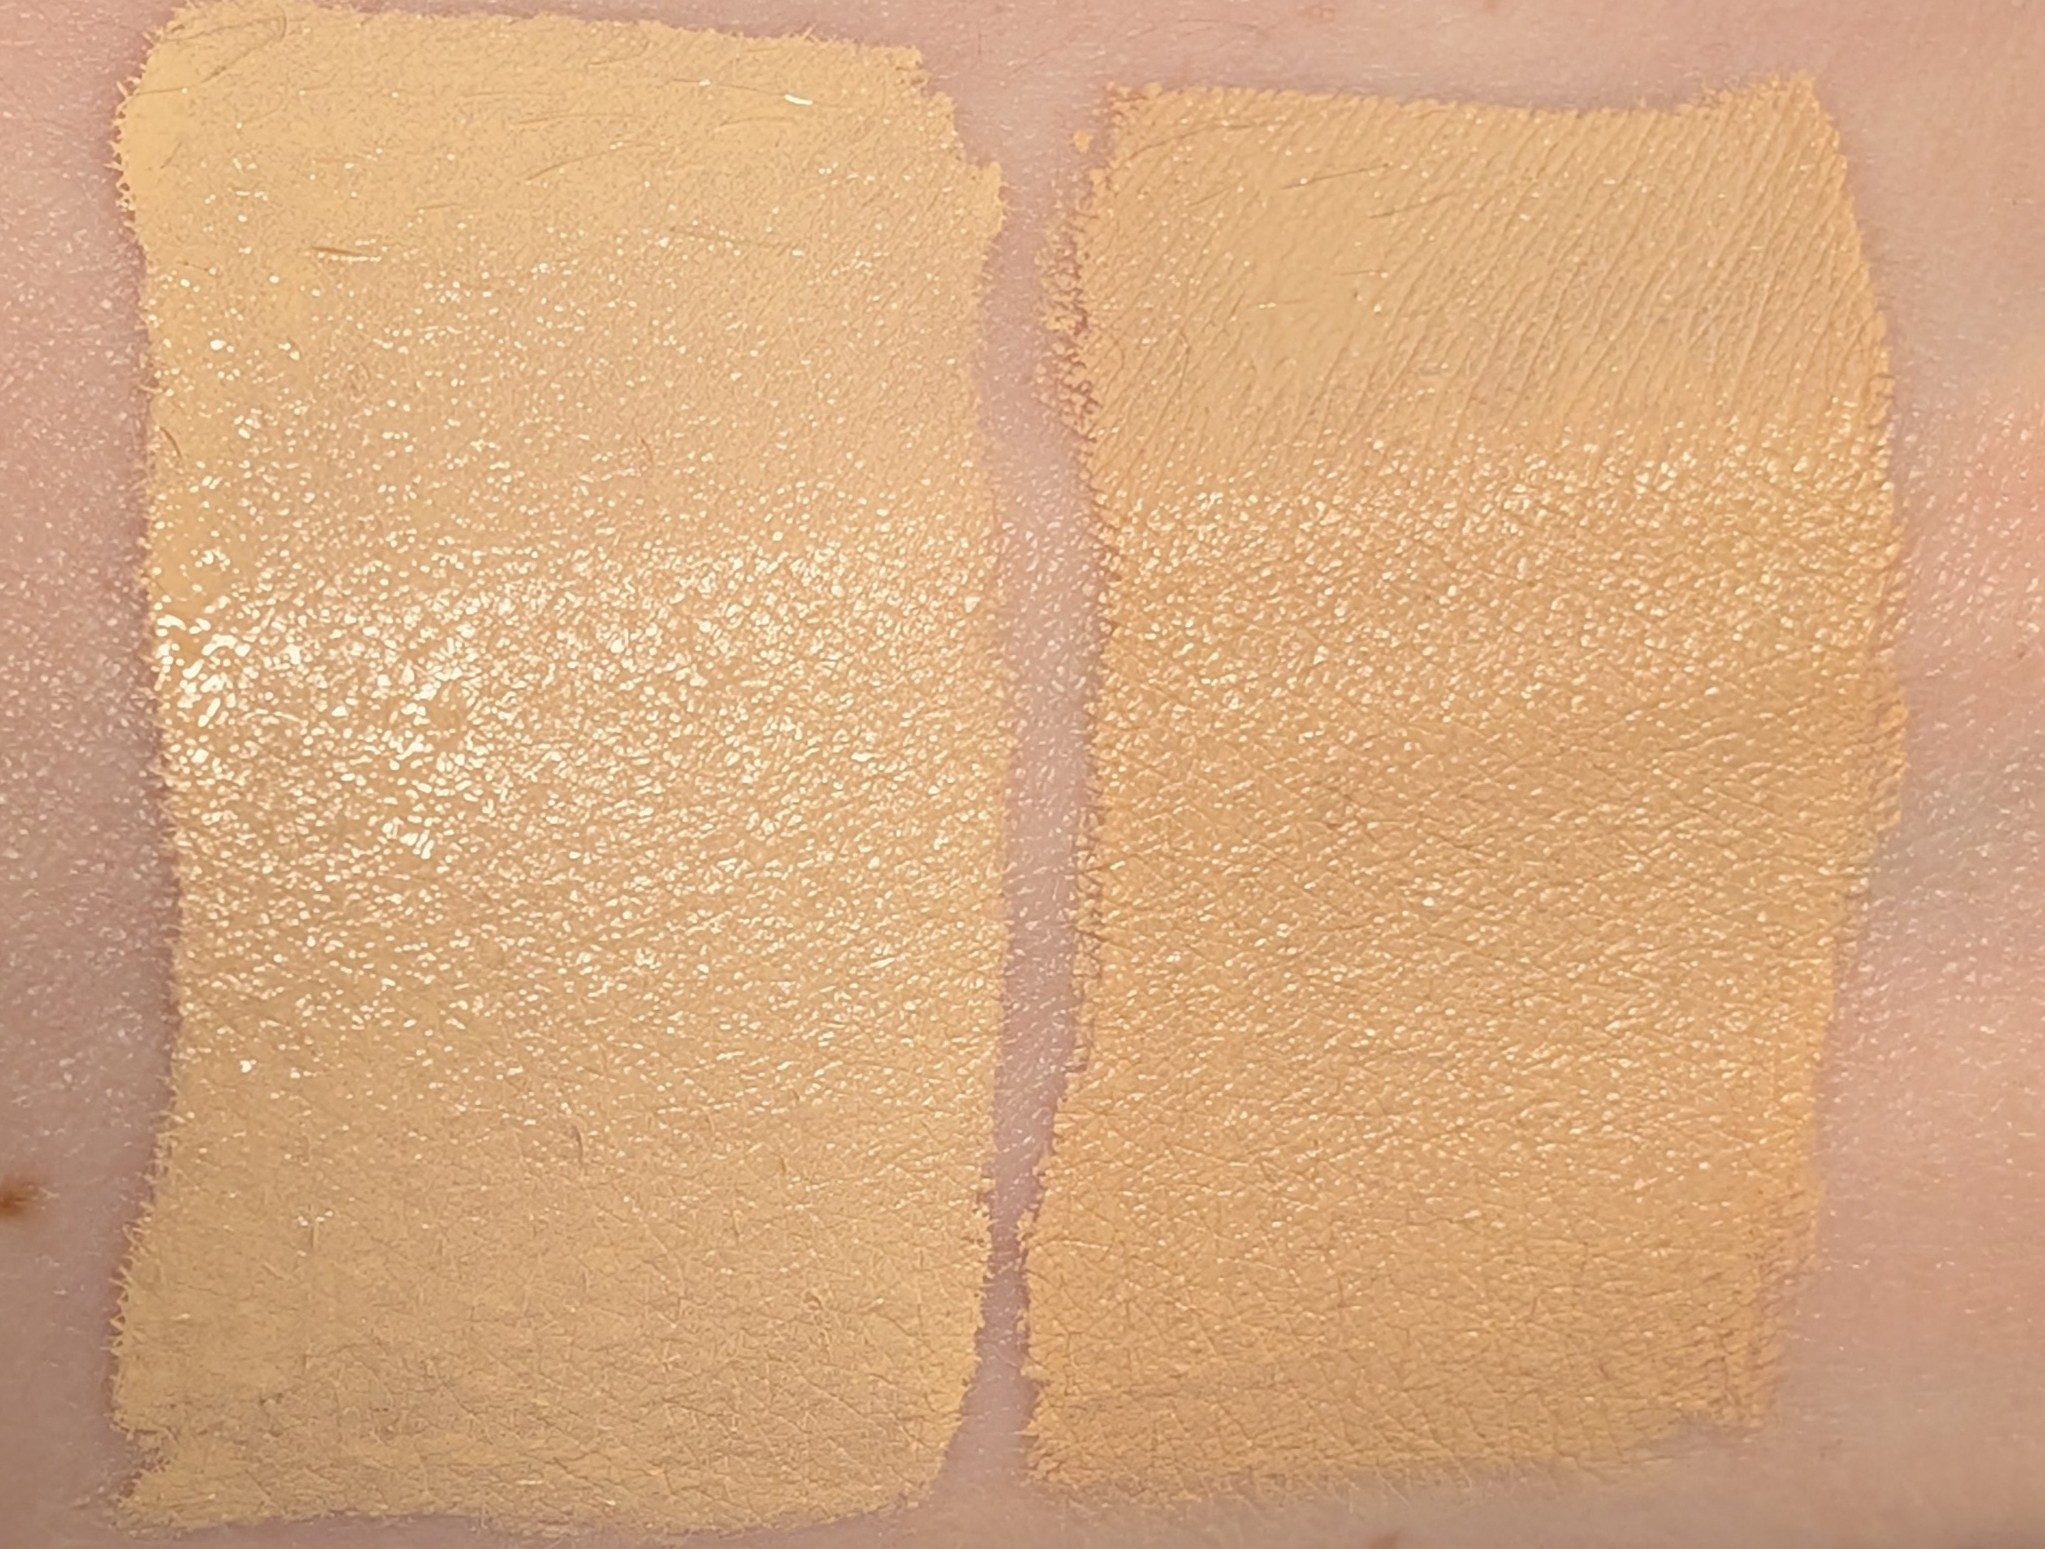
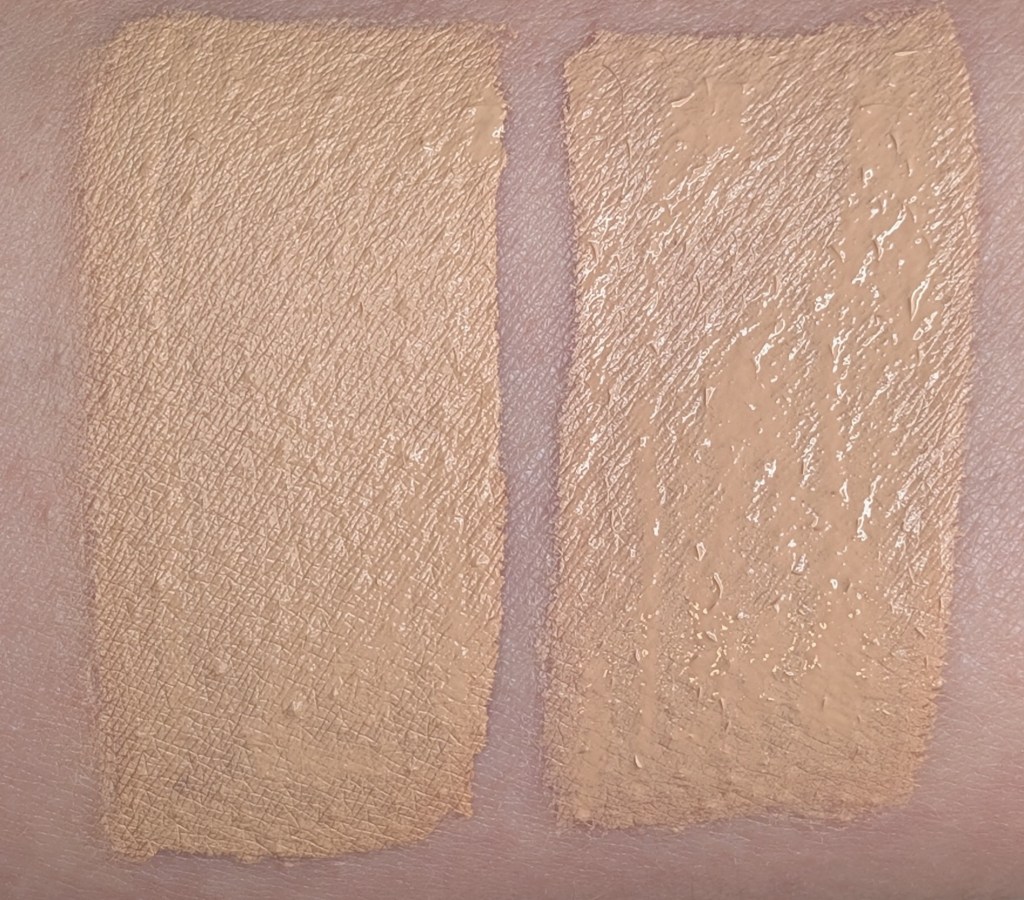
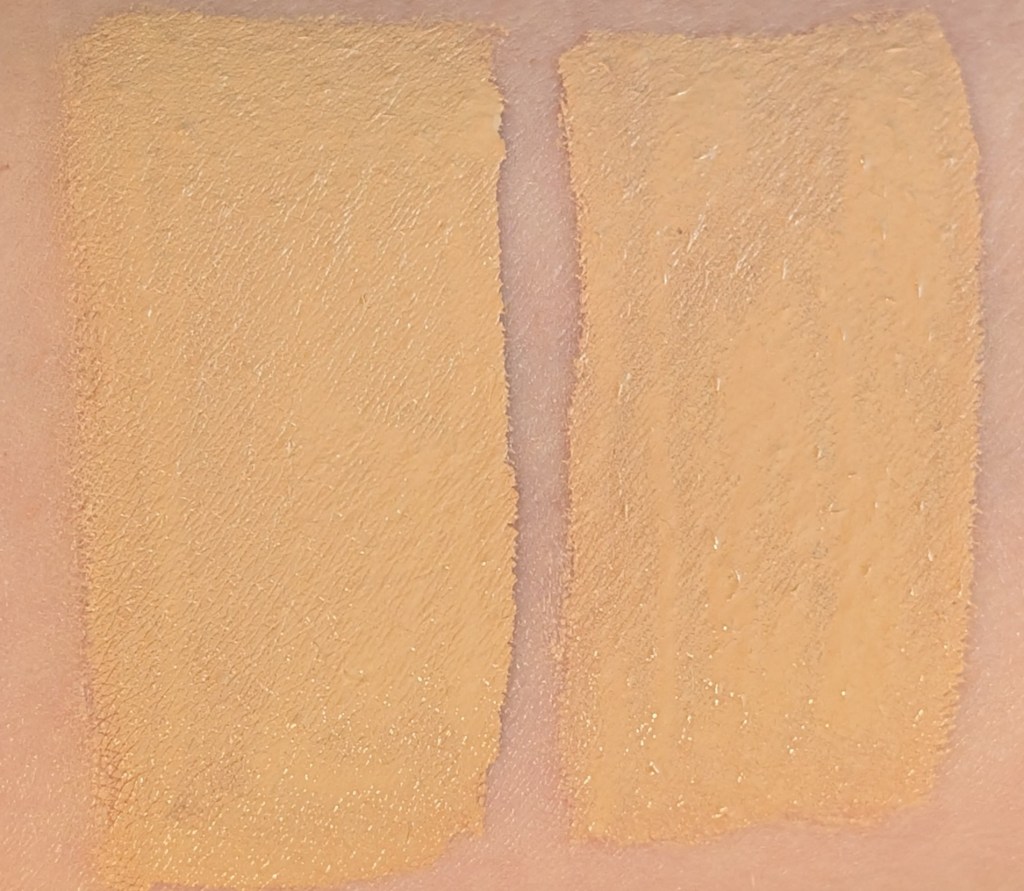
In this post, all links are affiliate links (thank you for your support!), but all opinions are my own and I bought all these products myself. Swatches are under a ring light to show true to color (photo #1) and then standard lighting to show the formula a little better (#2) for all the products.

And finally, introducing the concealer bracket:

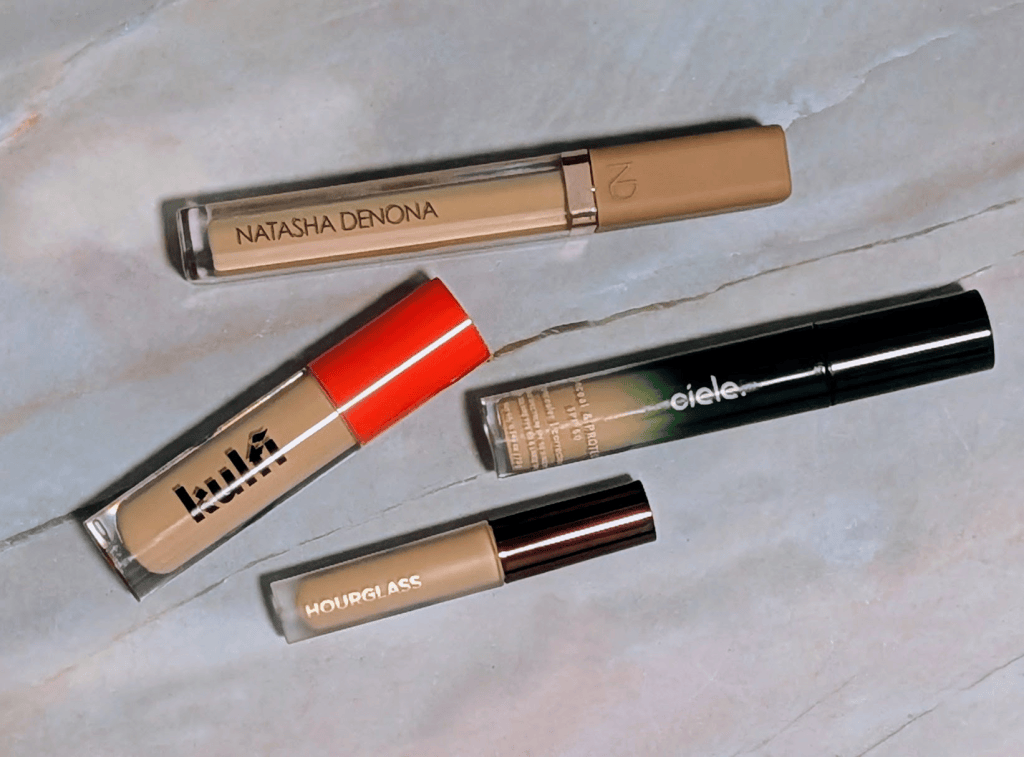
Round 1, Match 1: Hourglass Vanish Airbrush Concealer in Oat 3 vs. Kulfi Main Match Concealer in Mitai Soul – Hourglass was the concealer with the most votes, but Kulfi is one of my personal favorites, so I was super excited to see what happened with this first match up.

Shade wise, Hourglass Oat 3 is one of the very few lighter concealer shades I’ve found that’s actually labeled olive which I was super excited about, but I did get the mini because I bought so many concealers for this. On the Kulfi side, I actually have two shades of the Kulfi concealer because I do really love the formula, but Mitai Soul is the same depth as Oat 3 so I decided to have them go head to head. Hourglass is every so slightly more yellow/olive while Kulfi Mitai Soul is peachier on me but they both still definitely work.

By itself, Hourglass had great coverage and looked really nice, but in comparison to the Kulfi, it just didn’t look as good. The Kulfi also stretched way more, so if you’re someone looking to use a concealer as foundation, it works way better for that. The Hourglass also looked and felt a little drier and less skinlike than the Kulfi.

Every time I showed this pairing in my Substack chat, Kulfi won unanimously. They said it looked smoother and less textured, especially around my nose. I also made my husband vote in person without telling him which was which, as is tradition, and he picked Kulfi every time too. The Hourlgass didn’t look bad by any means (and like all concealers in this tournament, if it’s your favorite, keep on using it!), but the Kulfi definitely looked better and will be moving on!

Round 1, Match 2: Natasha Denona Hy-Glam Brightening & Hydrating Crease Proof Serum Concealer in Y2 vs. ciele conceal & PROTECT SPF 50+ in 04N – Natasha Denona was another one that got a ton of votes from my chat and faced off against one of my personal favorites, the Ciele conceal and protect. Shade wise, Natasha Denona Y2 is lighter, brighter, and more yellow on me. Ciele 04N is a little deeper and peachier in the arm swatches, but looks closer to my actual skin tone (on my face, not my arm) than the Natasha Denona once they dry down.

Similar to what happened in the first match, the first time I wore them side by side, Ciele just looked better. My chat was actually super surprised, and I ended up testing these two together so many times just in case. I switched sides, used different skincare and primers, whatever I could think of.

Every single time the Ciele side looked much smoother and less textured. Natasha Denona looked a little heavier and drier, and the Ciele sat much better on my skin and stayed looking really nice throughout the day. Despite how much my chat loves the Natasha Denona concealer, they picked the Ciele every time I shared this match up.

I still like the Natasha Denona concealer, and if I were wearing it by itself I don’t think I would say there was anything wrong with it. But I tested these so many times and got the same result every time, so I’m confident that Ciele moves on!

Next up is Vieve vs. Haus Labs and Estee Lauder vs About Face!

I Bought A Bunch of Lisa Eldridge’s Olive Edit So You Don’t Have To

I’m a yellow-green (very green), slightly saturated olive. A lot of products that are technically olive still pull too gray, too orange, too peach, or just slightly off on me. So when someone shared that Lisa Eldridge had a whole olive edit that you can sort by depth and saturation level with a ton of her products categorized, I knew I needed to do a haul for y’all. I grabbed all of the olive skin tints, a couple lipsticks, 4 of the new blush sticks, a concealer pencil, a balm highlighter, and a few eyeshadow singles to test. 

In this post, all links are affiliate links (thank you for your support!), but all opinions are my own and I bought all these products myself. Swatches are under a ring light to show true to color (photo #1) and then standard lighting to show the formula a little better (#2) for all the products.

Quick note on swatches: my arm is not the same color as my face, and I’m using arm swatches mostly to show undertone, depth, and how the shades compare to each other but rest assured these really blend into my skin if I say it’s a great match. 

Lisa Eldridge Seamless Skin Enhancing Tint in T1.5, T5, and T9 – I’ve loved this formula for years. My original shade was T4, which was good but not quite right, and I still wore it constantly because the formula is exactly what I want from a skin tint. It’s lightweight, easy to rub in with just your fingers, super flattering, and weirdly durable for something that looks this natural. I remember testing this when I was pregnant, and it survived through many, many long and rough days and still looked amazing. 

I originally started this time with the shade T5, because I figured T4 but olive would work the best. T5 is definitely olive, but it’s much more cool olive than Iam. It has that gray-green, desaturated quality that works for a lot of olives, but my skin is more yellow-green and saturated. I can get away with it because the formula is sheer, but it’s definitely not my perfect shade.

T1.5, T5, and T9
T1.5, T5, and T9

A lot of people suggested mixing T5 with T9 because T9 has a warmer olive undertone, and so I bought T9. T9 is so much deeper than my skin that even though the undertone is better in some ways, it can read orange on me because it’s just too dark (though the undertone is still much better than some other foundations I’ve tried).

Then other people told me to try T1.5, which is the lightest and only other olive skin tint. It’s too light and bright for me on its own, especially in the summer, but it turned out to be the key to making the others work. My best match is T1.5 mixed with T5, which gets me closest to the right balance of lightness and green without going grey or orange. You can barely see it on my face. T1.5 mixed with T9 also works surprisingly well on my face, though I’d still be tempted to add a tiny bit of blue. T5 mixed with T9 with a light blue color corrector also does work, so all of these will get used. 

T1.5, T5, and Mixed
T1.5 and T9 mixed; T5 and T9 mixed

That all said, my favorite thing about this experiment was finding out that T1.5 fixes almost any base product. I’ve mixed it into foundations that were a little too dark, a little too orange, or both, and suddenly they looked right. I also like using it as a first layer, almost like a skin-perfecting primer, before putting another foundation on top and every shade looks great now. If Lisa wants to send me a giant bottle of the tint in 1.5, I would definitely not say no.

Lisa Eldridge Velatura Balm Dewy Lip and Cheek Stick in Cinnamon Bun, Hellebore Heaven, Rose Madder, and Meeting The Ex – I started with Cinnamon Bun and Hellebore Heaven and liked them so much that I picked up Rose Madder and Meeting The Ex too. Cinnamon Bun, Hellebore Heaven, and Rose Madder are all on the Lisa Eldridge olive page for light-medium saturated olives. Meeting The Ex isn’t but I’m formally requesting it be added. The formula is incredibly easy to use on both lips and cheeks. They’ve become one of my go to lip balms when I just want a little color but I want it to be easy and just look nice. On my cheeks, I especially like tapping these on top of powder when I want to bring some glow back. They don’t last all day, but they’re so easy and pretty that I don’t really mind.

Cinnamon Bun, Hellebore Haven, Rose Madder, and Meeting the Ex

Cinnamon Bun, Hellebore Haven, Rose Madder, and Meeting the Ex

Cinnamon Bun is one of my favorite blonzer shades. It’s warm, but not Cheeto orange, and gives me that rusty red-brown “I went outside and got a little color” flush. It’s just super easy to throw on and look put together. Hellebore Heaven is my favorite of the four. It’s a beautiful everyday berry that I know will work in winter, spring, fall, and even for a summer berry look. It gives me that olive-friendly berry flush without turning muddy or weirdly red. Rose Madder and Meeting The Ex are pretty close, and I don’t think you need both. Rose Madder is more neutral and almost warm coral pink on me. It’s nice, but it’s the one I’d give up first. Meeting The Ex is brighter, cooler, and more baby blue pink, and I actually like it better. I think warmer olives look really good in brighter cool pinks, especially when neutral pinks turn weirdly warm or flat.

Lisa Eldridge Pinpoint Concealer Micro Correcting Pencil in 5.5 – This is my favorite spot concealer product. I’ve especially been using it around the outside of my lips after seeing Lisa Eldridge show that trick as a way to naturally create a “lifted lip look”, and now I do it constantly. It just cleans everything up and makes my lips stand out more. I also reach for this if I have one tiny spot or one tiny area I want to perfect. I really like this concealer for when I need more control and just want something to seamlessly blend into my skin. I have some swatches here, but it really does blend into my skin so well.

Lisa Eldridge Luxuriously Lucent Lip Colour in Meet Me In Berlin and Rouge Experience Refillable Lipstick in Toasted – I know lips are Lisa Eldridge’s thing so you might be surprised to only find two here. I used to own a ton of her lipsticks, but most of them expired by now, and I also realized that a lot of shades I thought worked on me didn’t actually look as good as I thought they did. For this review, I bought Meet Me In Berlin and Toasted because both are recommended on the olive page, and they were the ones I was the most suspicious of. They looked like the kind of colors that could go orange on me very quickly or stay a pretty beige.

Meet Me in Berlin and Toasted

Swatched next to MAC Alone Time (old version), you can see why I was nervous. Alone Time (again, original version, I’m looking for dupes!) is more muted, gray-purple, and grungy, which is my favorite kind of lip product. Meet Me In Berlin and Toasted are both warmer and more tan, but they still have enough rosy terracotta that they don’t turn completely orange.

Alone Time, Meet Me In Berlin, Toasted

Meet Me In Berlin is still a product I throw on without thinking too hard, and the formula is a super comfy balmy formula that you can build up if you want. The Rouge Experience formula is easy to wear even though it’s much more of a traditional satin lipstick than the balm texture of the Luxuriously Lucent Lip. It does have a really pretty soft sheen still and wears really comfortably during the day. The packaging also makes it one of the most luxurious feeling lipsticks I own, though I have it on good authority you can make do with just the refills or one case and refills.

Lisa Eldridge Eyeshadow Singles in Chrysina, Ablaze, and Posh – I own way too much eyeshadow to justify buying more full palettes or a bunch of liquid shadows unless y’all request it (like how Makeup by Mario is launching new liquid eyeshadows and I will be picking a couple up to test). So for this review, I bought a few singles from the Lisa Eldridge palettes recommended for olives, Betty and Desert Gleam. I picked up Chrysina, Ablaze, and Posh, and all three are in the smooth, sparkly, shimmery formula I love. Honestly, if Lisa made a whole palette of this exact finish, I would probably buy it. 

Chrysina, Ablaze, and Posh

Chrysina is a sheer golden-green topper. It barely has a base, so I can put it over basically anything when I want the look to feel a little more at home on my olive skin. It’s pretty and useful, but because it’s sheer and toppery, it reminds me of a lot of other shades I already own. Ablaze is the most classic warm shade of the three. It’s coppery and bronzy, and I like it, but I wish it had a little more rose in it to work better with my skin. Posh is easily my favorite. It’s a mauve purple shimmery brown, and it’s exactly the kind of everyday shade I want. It has more pinky taupe to it than Ablaze, which is why it works better for me.

Lisa Eldridge Elevated Glow Balm Concentrate in Butterfly Light – I spent an unreasonable amount of time trying to photograph my swatch of Butterfly Light, and I’m sorry, but I just couldn’t do it. I tried photos, videos, indoor light, outdoor light, and it just wouldn’t show up in any kind of useful way. The best way I can describe it is: if you took my arm color, made it pinker/blushier, and added a little shine, that’s Butterfly Light. It’s pretty, and I’m not upset that I bought it. It gives a soft rosy highlight, and I like tapping it on when I want a little more glow. The packaging is also lovely. But it’s definitely just a highlighter balm. It’s sheer, shiny, and a little balmy on the skin.

Of everything I bought for this review, this is the one I’d give up first. If you’re already placing an order and want a soft rosy highlight balm, I don’t think you’d hate it, and I know a couple folks that really love it . But I wouldn’t buy it again over the highlighters I already have (and to be fair to Lisa, it’s not on the olive edit page anyway!).

Have you tried Lisa Eldridge’s olive recommendations yet?

I’ve Been Hunting for Grungy and Fun Lip Products, and MAC Had Them the Whole Time

I’ve been testing a lot of lip products because I’m always looking for shades that are interesting, a little grungy, and not secretly orange. A shade can be described as cool nude, mauve, taupe, plum, brown, berry, or purple, and then somehow it turns into a warm peachy/orange on my face. So I keep buying blue glosses, purple adjusters, cool browns, blackberry lipsticks, and anything that looks like it might help me get the lip color I wanted in the first place.

It turns out MAC has actual blue, purple, blackened, grungy, makeup artisty colors, which I love. But they also have easy everyday shades that actually stay the color they’re supposed to be on me. Cool pinks that don’t turn coral. Mauves that don’t turn peach. Browns that don’t go orange. Glosses that add shine without warming everything up too much. *I did also grab some really cool and interesting lip products from Yesstyle that y’all recommended so more reviews coming soon.

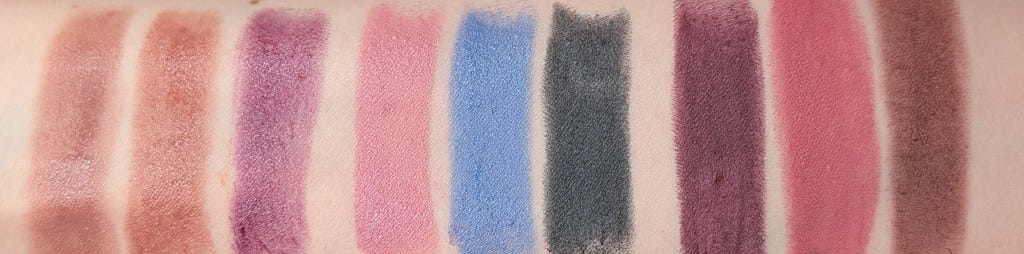
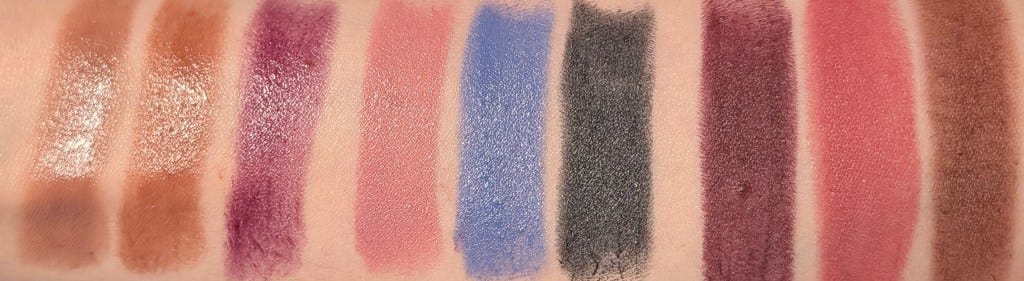
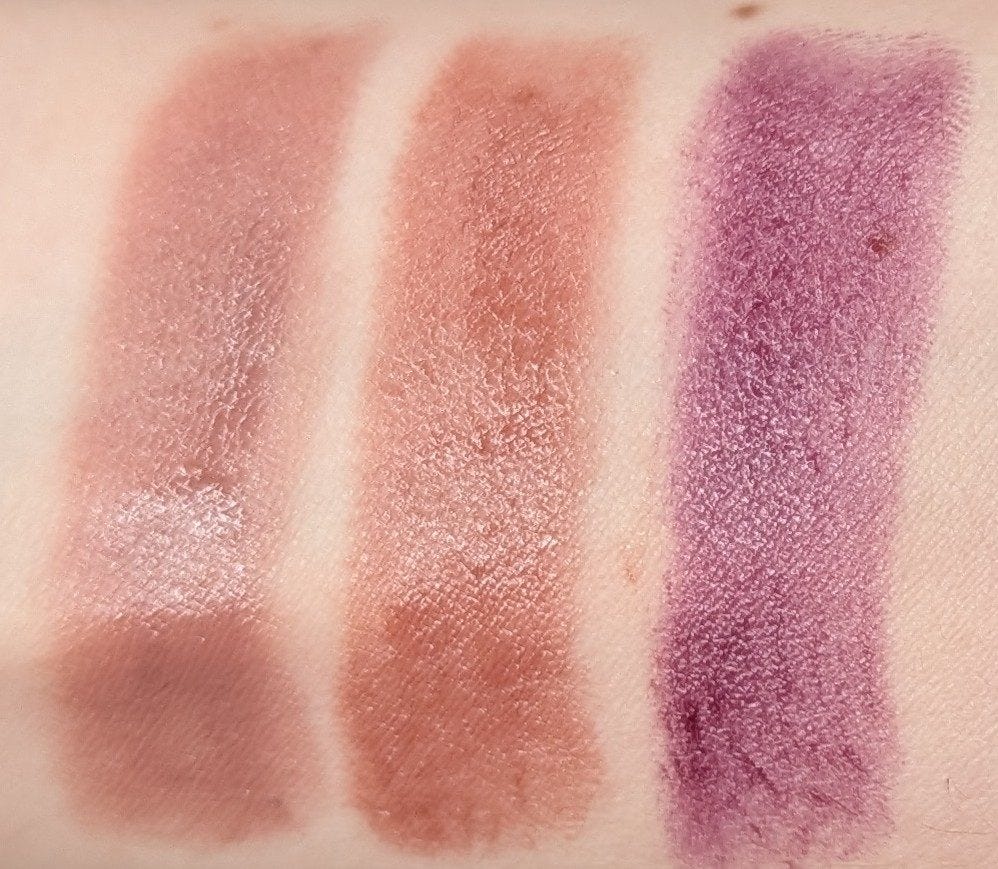
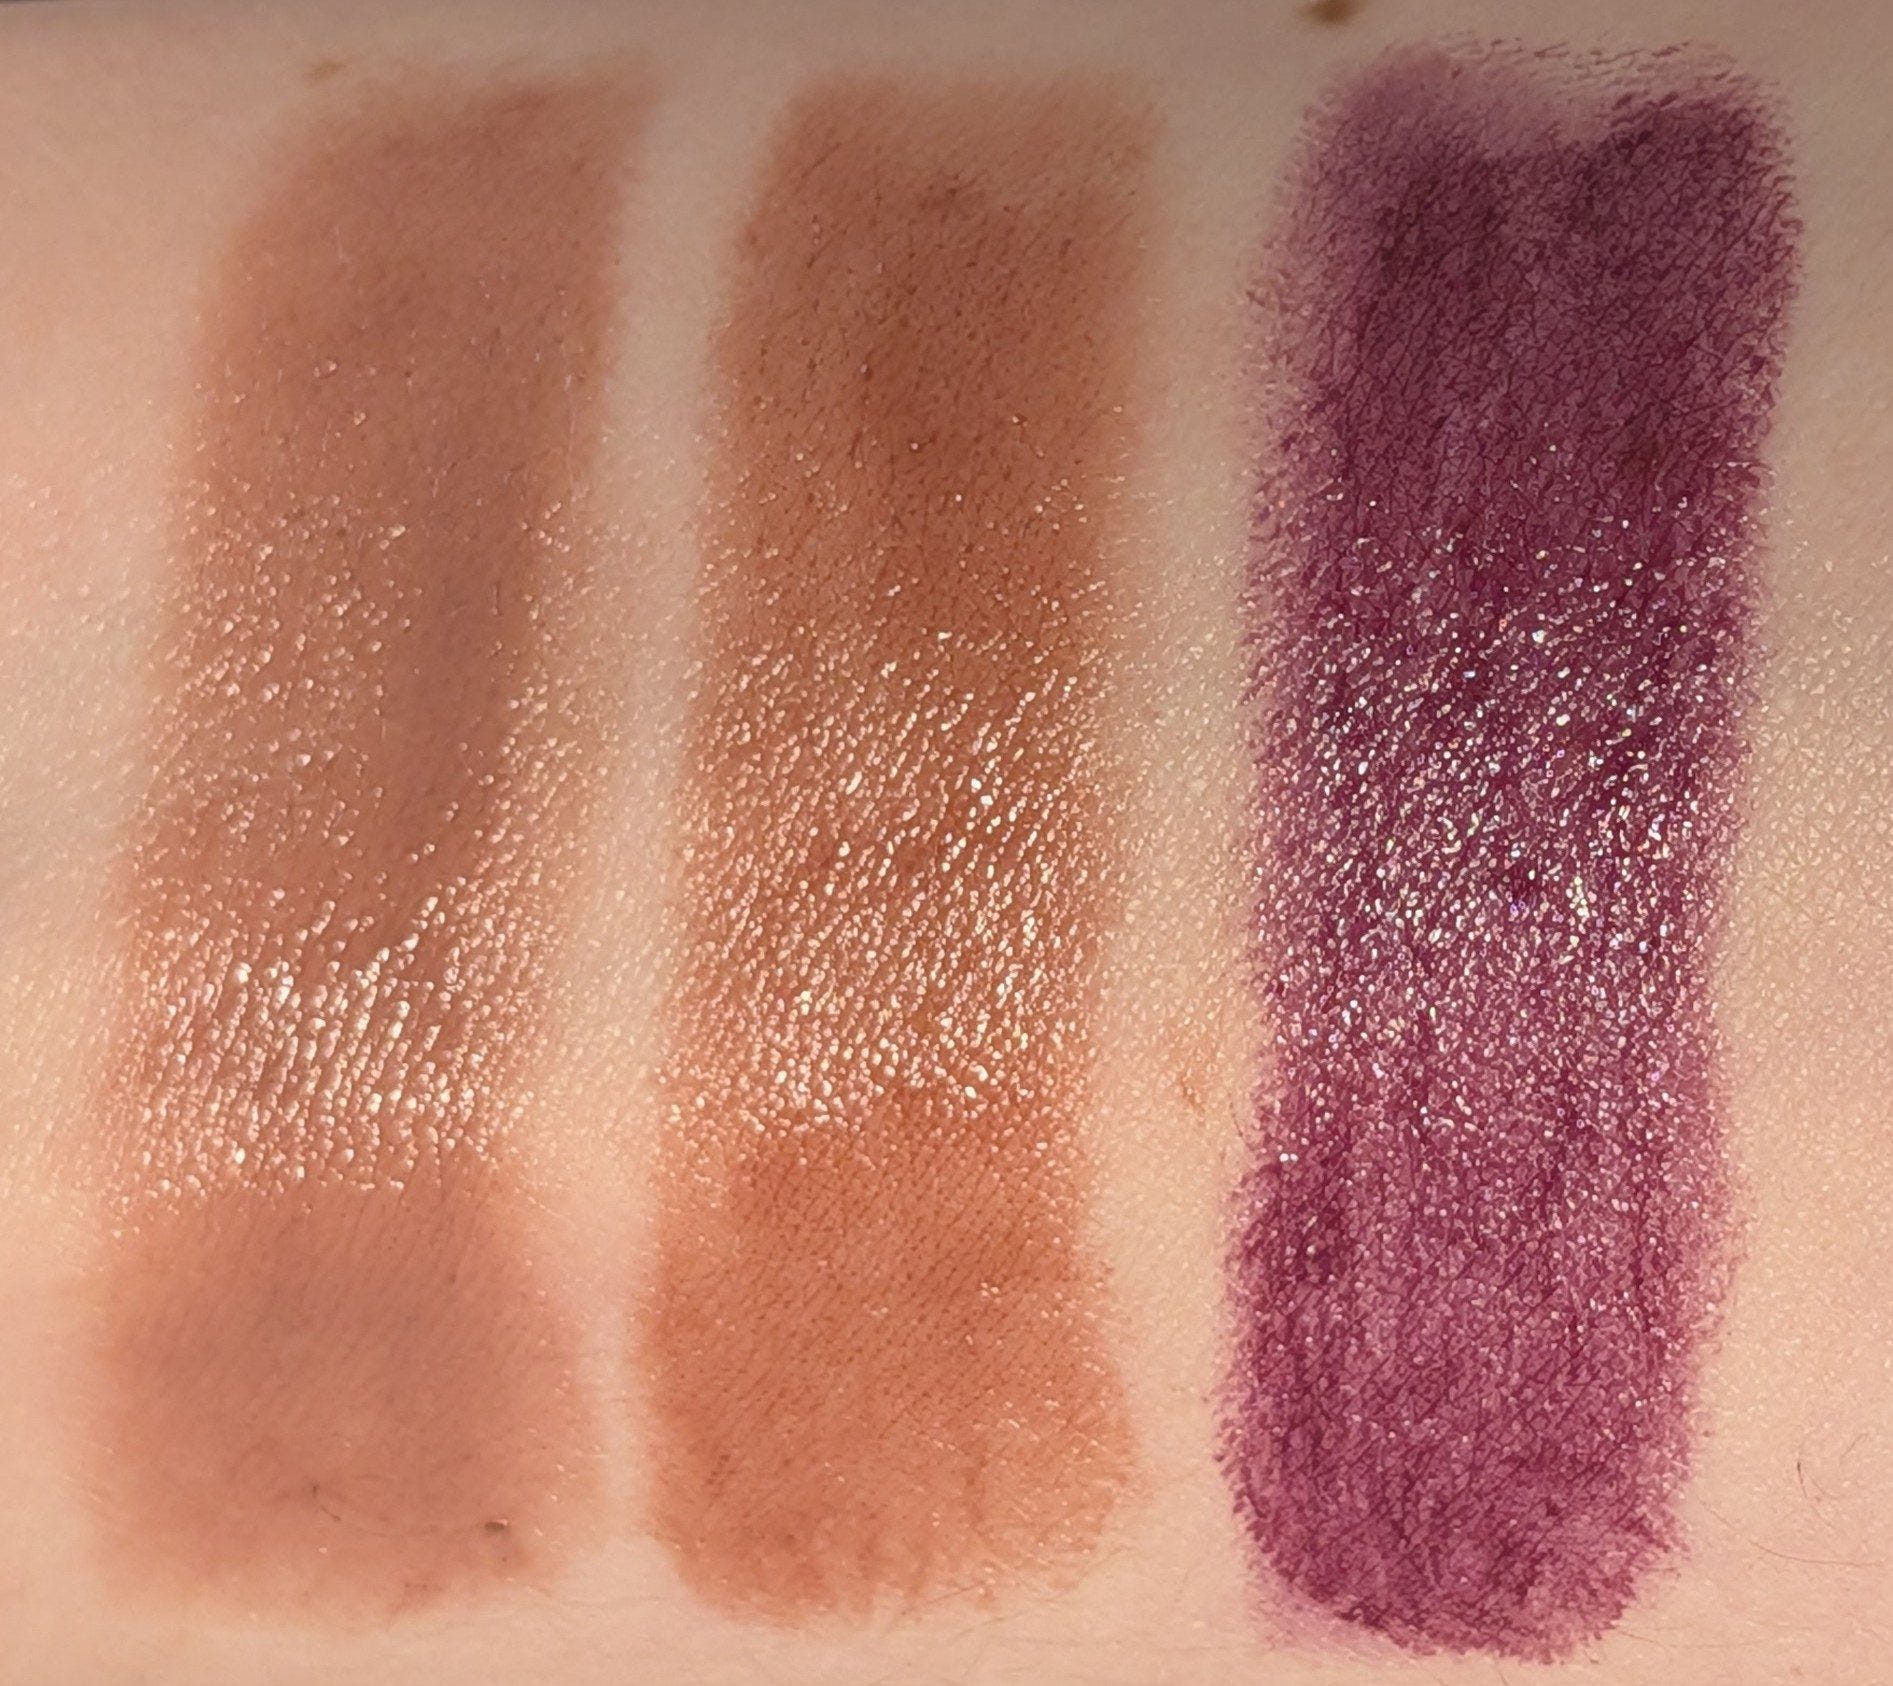
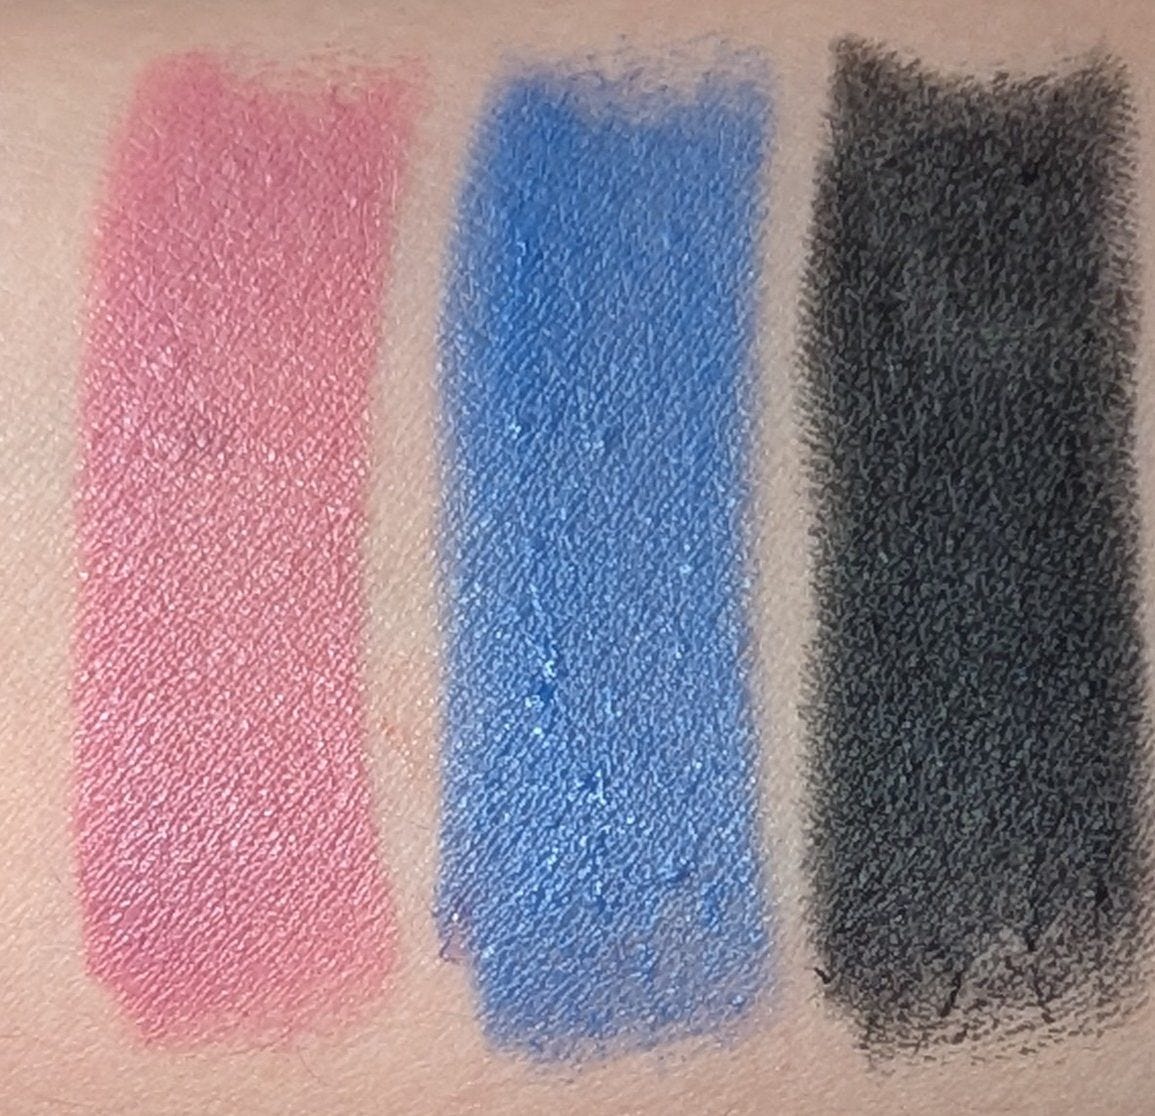
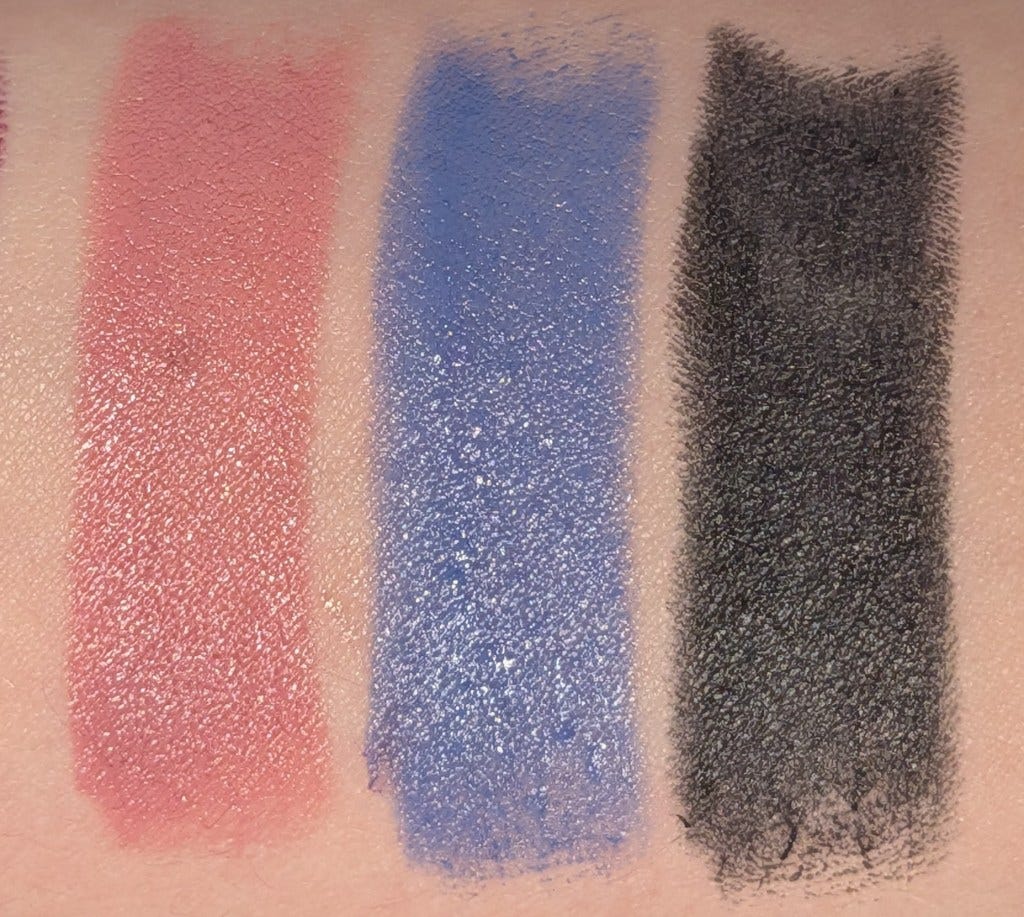
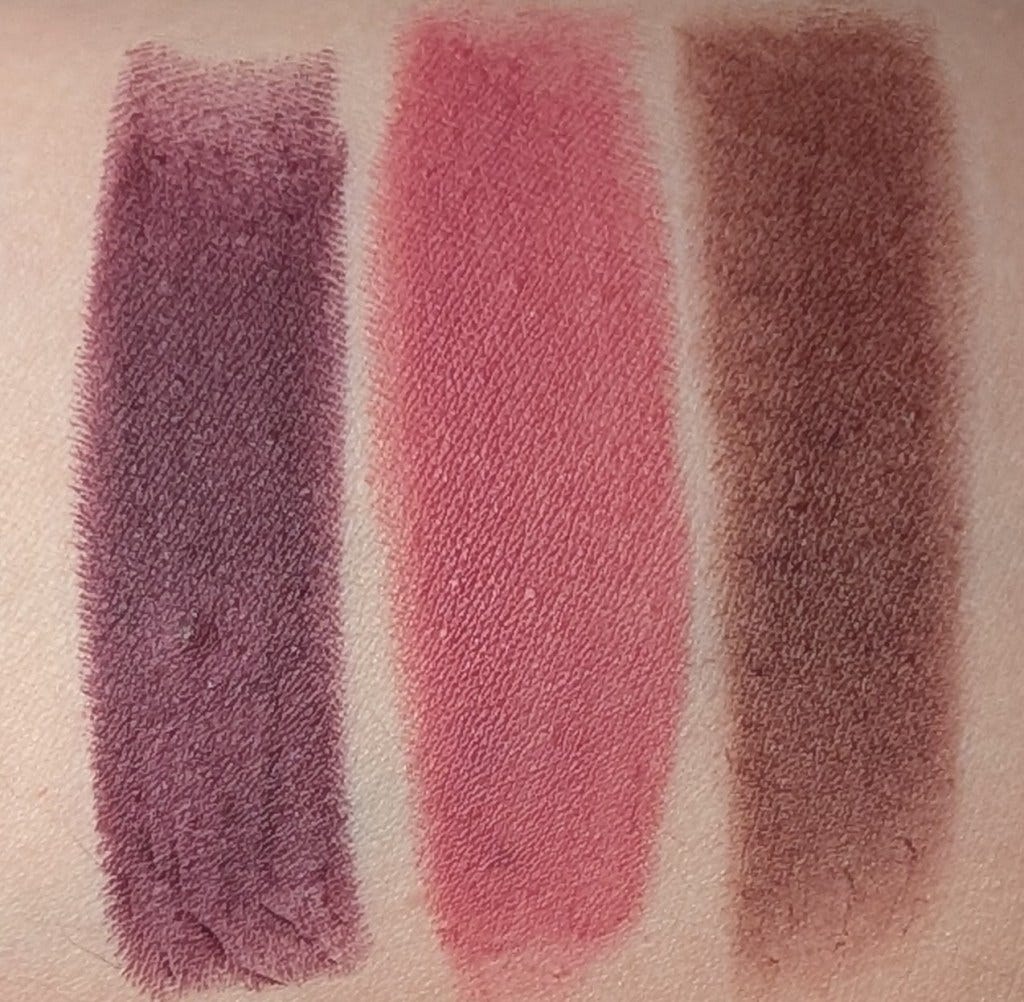
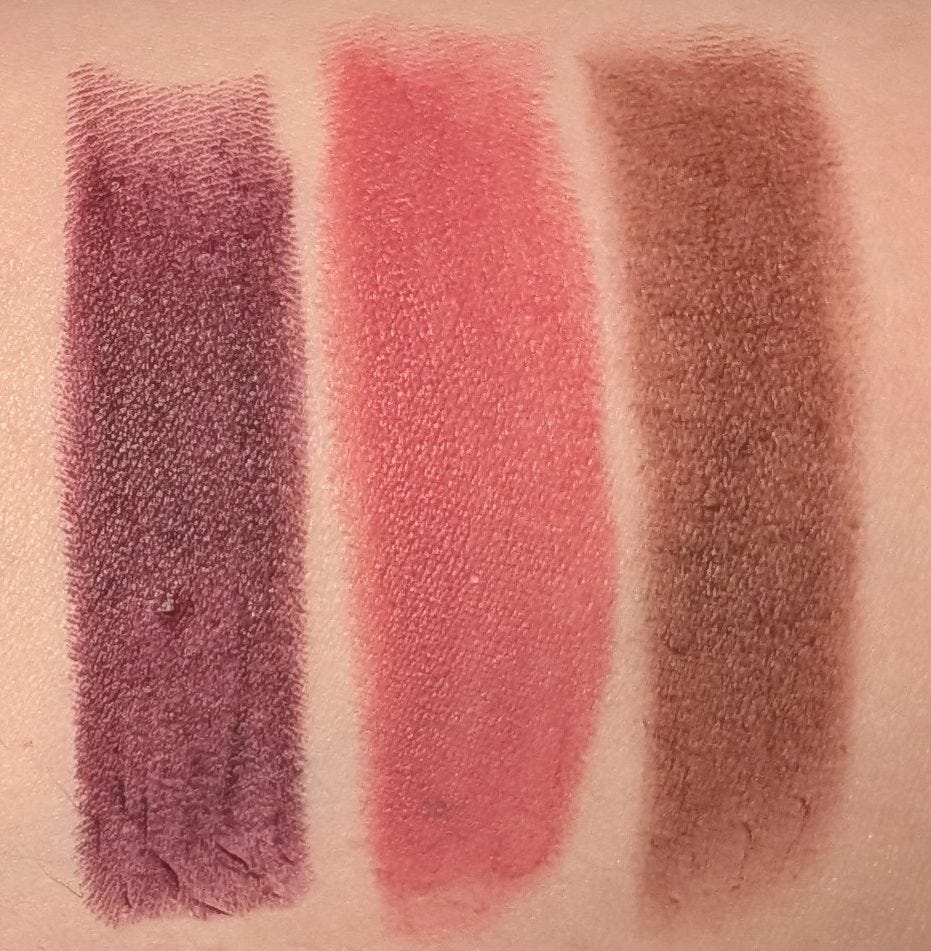
In this post, all links are affiliate links (thank you for your support!), but all opinions are my own. Swatches are under a ring light to show true to color (photo #1) and then standard lighting to show the formula a little better (#2) for all the products.

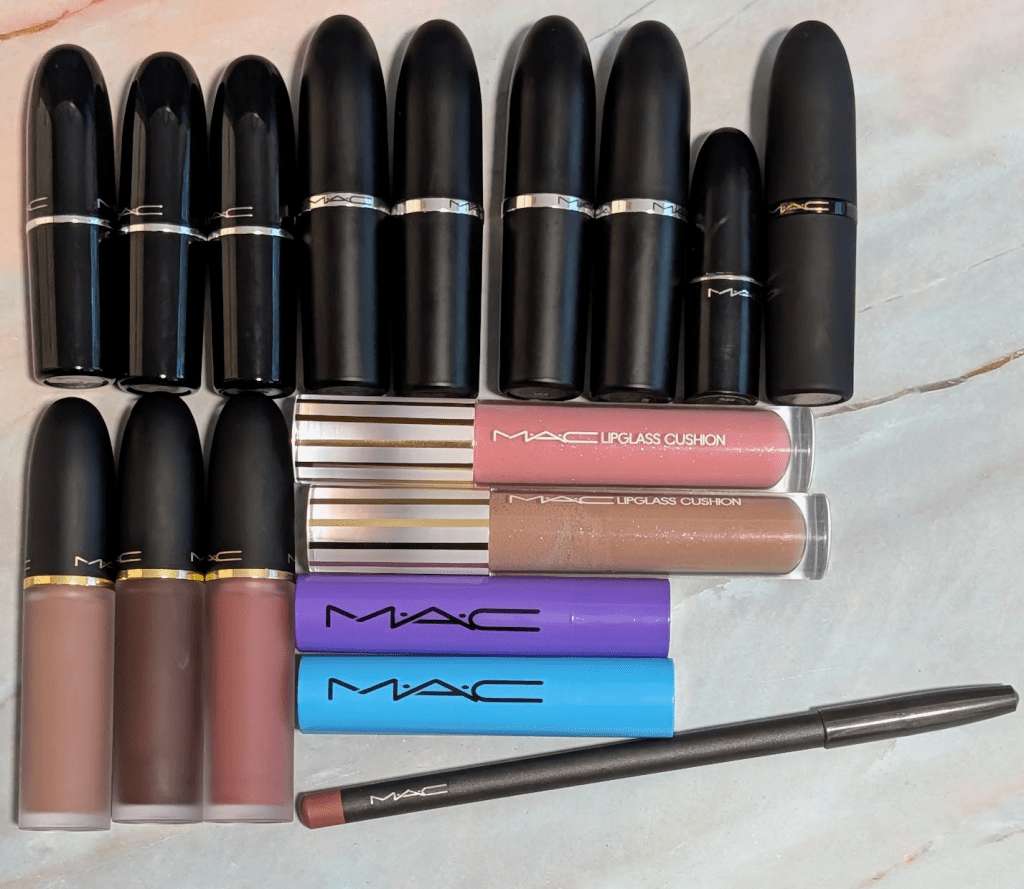
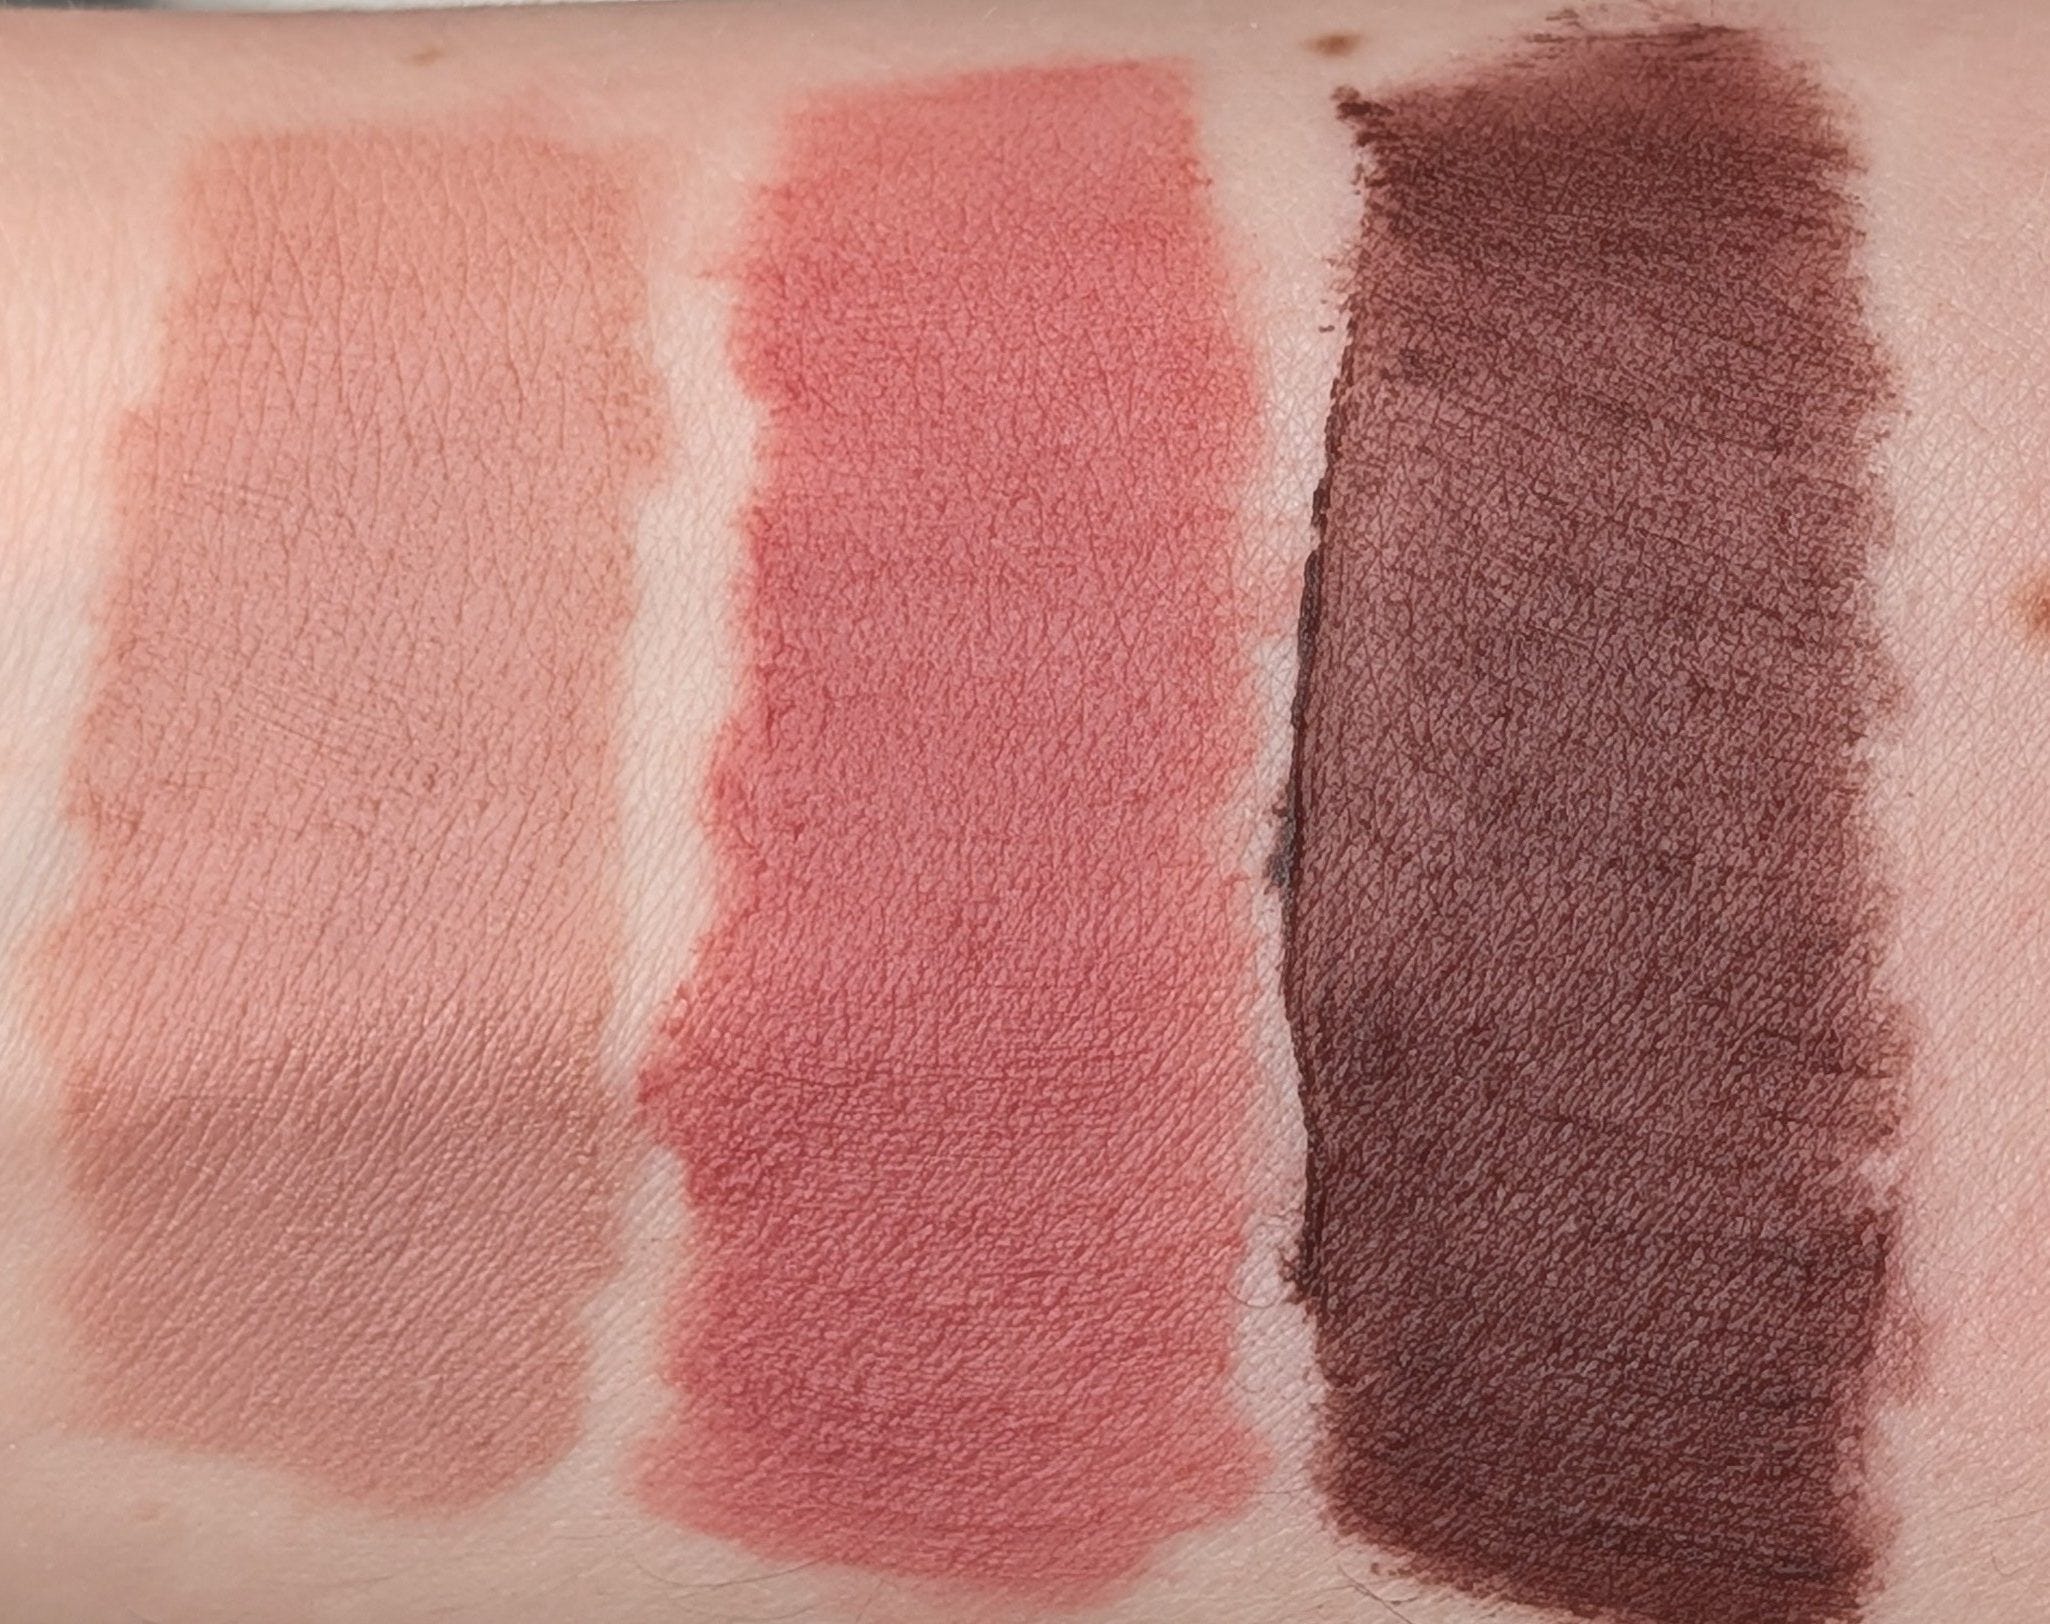
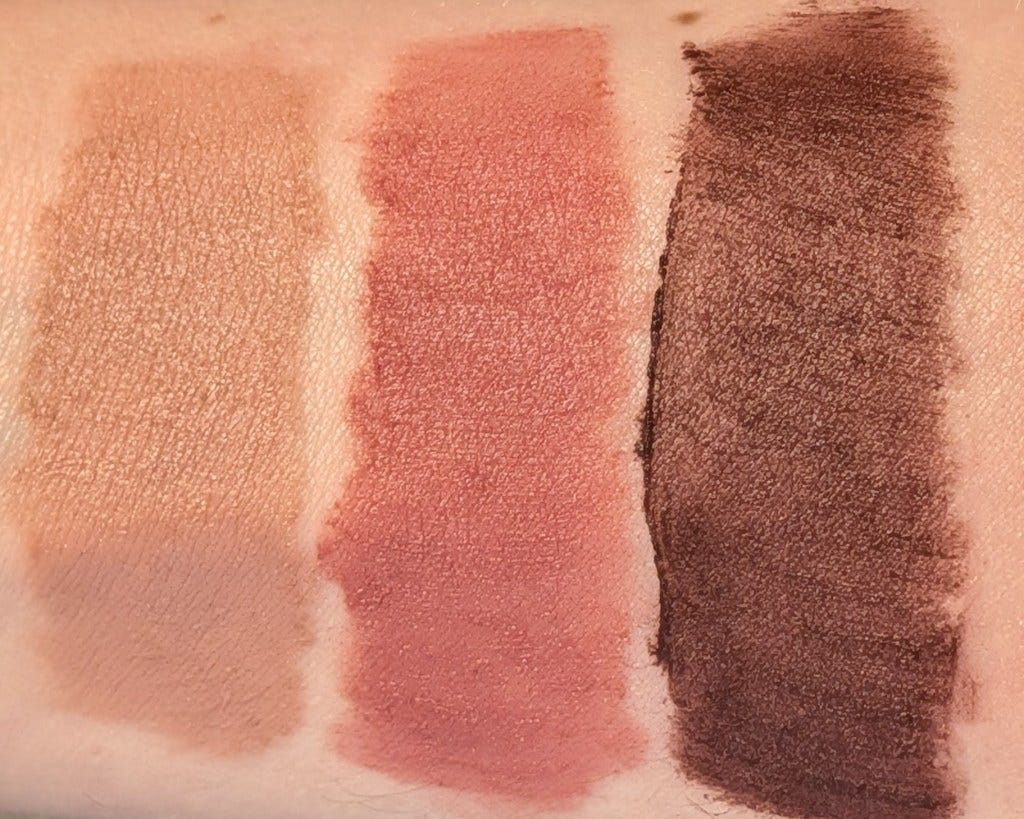
Here are all the bullet lipsticks together just so you can see the formulas and colors all together in both lightings.

Lustreglass Sheer-Shine Lipstick in Alone Time, Signature Move, and Succumb to Plum – This is my favorite MAC lip formula and the one I reach for the most overall. It’s balmy and glossy, but it still gives enough color that it feels like a real lipstick. It’s easy to throw on, it makes my lips look better, and it wears surprisingly well for something this comfortable. I also recently compared Alone Time to the Clé de Peau Cocoa Dahlia lipstick, and they were shockingly close. So if you want that sheer, balmy, shiny, expensive feeling lipstick effect, I would absolutely look at MAC Lustreglass before spending $70 on Clé de Peau.

Alone Time is the best mauvey brown I’ve found. It stays mauve on me instead of turning orange, even in different lighting, and it has that grungy tan mauve quality I’m always looking for. This is one of the MAC lip products I reach for the most. Signature Move is similar to Alone Time, but a little more brown and a little warmer. It has more red in it, and it can lean slightly more orange by comparison, though it’s still very wearable. I like it, but if I were only choosing one, I’d choose Alone Time. Succumb to Plum a deep, saturated cool plum that actually stays cool toned. It’s the boldest of the Lustreglass shades I have, but the formula keeps it glossy and soft enough to wear all the time. This is the one I reach for when I want something darker, more blackberry, and more interesting without going all the way to black lipstick.

M·A·Cximal Sleek Satin Lipstick in Pink Peppermint and Tilted Denim and M·A·Cximal Silky Matte Lipstick in Caviar – These are my go to adjuster shades. I use them less as traditional lipsticks because they’re really amazing problem solvers. If a lipstick is too orange, too yellow, too bright, too dark or too light, or just not quite right on me, these are the shades I start tapping on top.

The M·A·Cximal Sleek Satin formula feels like the most traditional lipstick formula of all of these. It’s full coverage, very pigmented, and comfortable, with a little bit of shine so it doesn’t look flat. It’s not as balmy or glossy as Lustreglass, but it gives much more opacity. Caviar is in the M·A·Cximal Silky Matte formula, so it’s flatter and more matte than Pink Peppermint and Tilted Denim. In the swatches, you can see the satin shades have a little bit of shine, while Caviar is much more matte.

Pink Peppermint is described as a dusty lavender, but on me it reads more like a cool pink with a little purple in it. I use this all the time to transition lipsticks that are too yellow, too orange, or too dark. It’s my quick fix shade when I don’t want to do a whole mixing experiment, because it makes almost everything look better.

Tilted Denim is blue, but it has some lavender/periwinkle tones in it, so it works really well as a cooling adjuster. When I have a lipstick where I like the general tone but it pulls too orange, especially with reds, I can tap on a little Tilted Denim and mix it in. It’s not an everyday lipstick shade on its own for me, but as an adjuster it’s so incredibly useful.

Caviar is a black with some green/blue/olive in it, and I use it when something is too bright or needs more depth. A tiny amount tapped in can make a lipstick look cooler, moodier, and more like the deep blackberry, purple, blackened lip colors I’m always trying to find. I also like wearing it lightly with gloss over top because it gives that sheer blackened lip effect without needing a separate lipstick.

M·A·Cximal Silky Matte Lipstick in Smoked Purple and Mehr and Powder Kiss Hazy Matte Lipstick in Good For You – These are the matte lipsticks I wear as actual lipsticks. MAC has a lot of matte lipstick formulas, and these three feel very different. As I mentioned with Caviar, the M·A·Cximal Silky Matte formula is matte, full coverage, and almost drying. For some reason, Mehr formula feels creamier and more traditional satin lipstick that just dries down a little matte than Smoked Purple and Caviar, maybe because it’s a mini. Either way, I’m not sure I agree with their description that these are “creamy” but they are a comfortable matte. The Powder Kiss Hazy Matte formula gives a very soft, blurred, diffused effect that’s really trending right now without being too drying.

Smoked Purple is a gorgeous deep cool purple that actually stays purple on me with no orange at all. If I want a true dramatic deep purple lip, this is the one. Mehr is a classic for a reason. It’s a really easy cool toned pink with a bit of blue in it, and it actually stays cool on me. Good For You is a cool toned brown that stays brown instead of turning orange, which makes it basically the perfect 90s brown lipstick for me.

Powder Kiss Lip + Cheek Mousse in It’s Personal, Velvet Teddy, and Rekindled – This is one of my favorite soft focus, blurring matte liquid formulas. It works well on lips and cheeks for a super quick and easy monochromatic look. It has such a pretty diffused finish without feeling dry or reminding me of a flat liquid lipstick. It’s much softer and easier to wear than the liquid lipsticks of yesteryear.

It’s Personal really surprised me. Everyone said it was the perfect light beigey pink nude, and even though it’s described as cool, I assumed it would somehow still turn orange on me. But it actually stays a really pretty light beigey pink. In very warm light, it can go more beigey brown, but it never turns into that bright neon orange Cheeto dust I hate. Especially if you’re a fair olive and want an easy nude in this formula, this is the one I’d absolutely recommend.

Velvet Teddy is a super easy to throw on cool toned pink. It’s simple, flattering, and very wearable, especially if you like having a dependable muted pink around. It doesn’t go orange, it doesn’t feel too warm, and it’s just pretty.

Rekindled is a dark purple brown, and it definitely brings more drama. It’s grungy, moody, and really pretty, especially if you like deeper lip colors or have more contrast. I wouldn’t call it the easiest everyday shade (you can see in the swatches I had a little trouble getting it to blend cleanly), but if you want a purple brown that’s grungy and still pretty, this is great. Just be a little careful applying – I’d recommend putting some on the back of your hand and then using a brush.

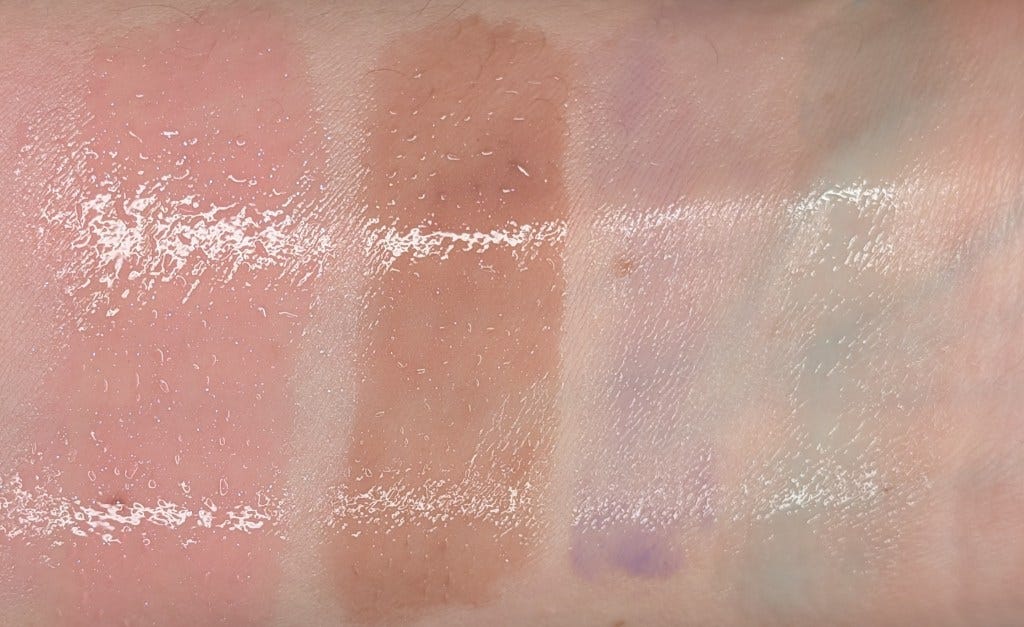
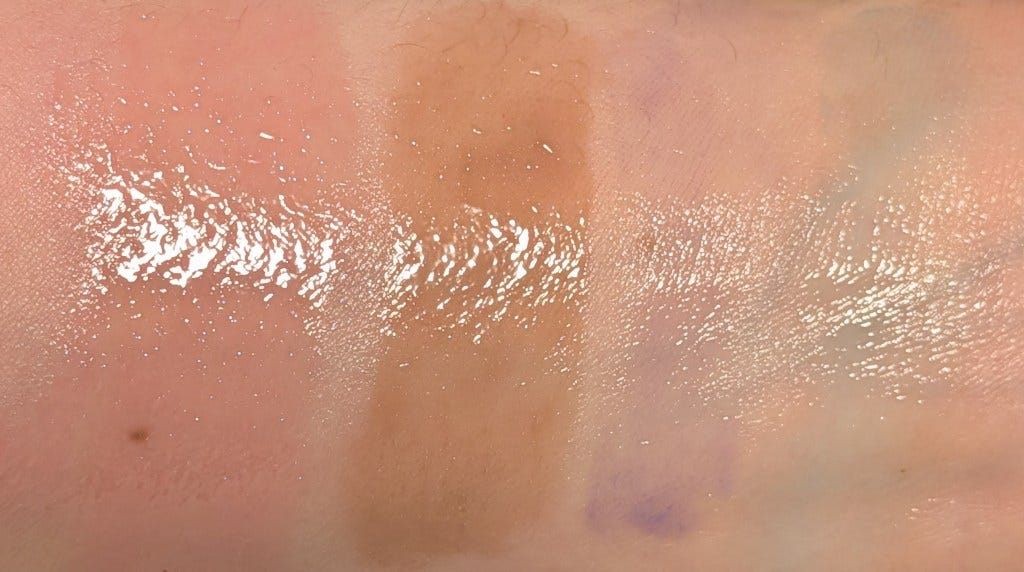
Lipglass Cushion High-Pigment Lip Oil in Yum Yum and Dressed To Dazzle – This formula is so, so good. It has solid pigment payoff without being too much for a gloss, it’s high shine, and even though it’s described as a lip oil, it feels more like a cushiony liquid lip balm. It’s comfortable, moisturizing, and glossy without being sticky. Both shades I have also have these pretty iridescent sparkles running through them, but they’re still smooth instead of obvious gritty glitter. I’ve used both of these a ton already even when I was trying to test other things (oops!). I’m honestly about to buy Pulse and Mauvement as I’m looking at the listing for these so let me know if you want me to report back!

Yum Yum is a classic cool toned pink with a purpley blue sparkle, and it’s so easy to wear. I like it on its own, but I also use it to top off lipsticks that are a little off, especially if I want to cool them down slightly or brighten them up without changing them too much. It’s pretty, fun, and one of those glosses I can throw on without thinking. Dressed To Dazzle is described as a taupe lilac with iridescent pearls, but on me it reads more like a rosy brown than a lilac. That said, it’s beautiful and extremely wearable. If I want an easy beige-y glossy lip, this is the one I reach for all the time.

Squirt Plumping Gloss Stick in Violet Beta and Nova – These are the other glossy balm type products I have from MAC, and I mostly bought them because they come in fun colors that actually stay that color. Instead of using a clear balm or clear gloss for moisture and shine, I like being able to add a little purple or blue to tone down lip colors that pull too yellow, too orange, or too warm. As a very green olive person, it’s one of the things that I’m always looking for more of.

Violet Beta actually looks purple. I can wear it alone because I like cool toned lips, but it’s also useful layered over lipsticks that need a little cooling down. It adds shine and moisture while also making other colors more wearable for me. Nova really does show up blue and doesn’t turn pink or do anything weird – it’s just blue. Like Violet Beta, I can wear it alone, but I mostly like having it as a glossy blue adjuster instead of reaching for a clear balm. It’s great when something is too yellow or orange and I want to shift it cooler without doing a full lipstick mixing situation.

The main thing to know is that these are definitely tingly and plumping. That sensation doesn’t bother me personally, but I would skip these if you hate plumping glosses or if your lips are dry and sensitive.

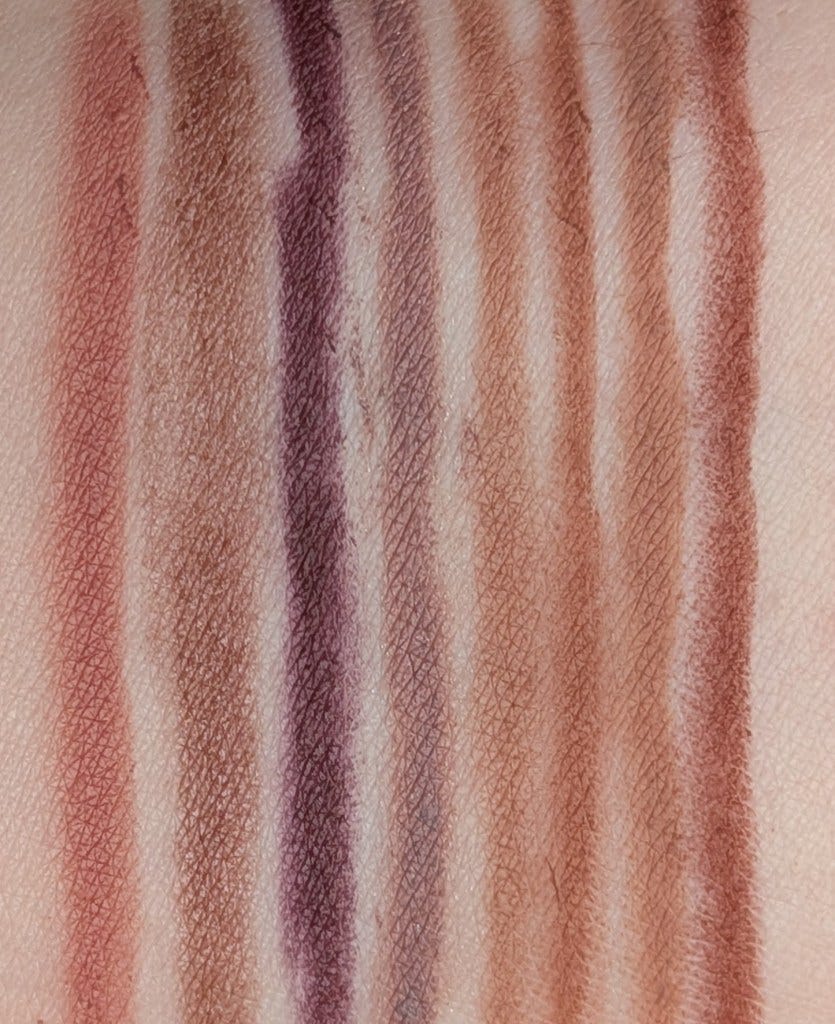
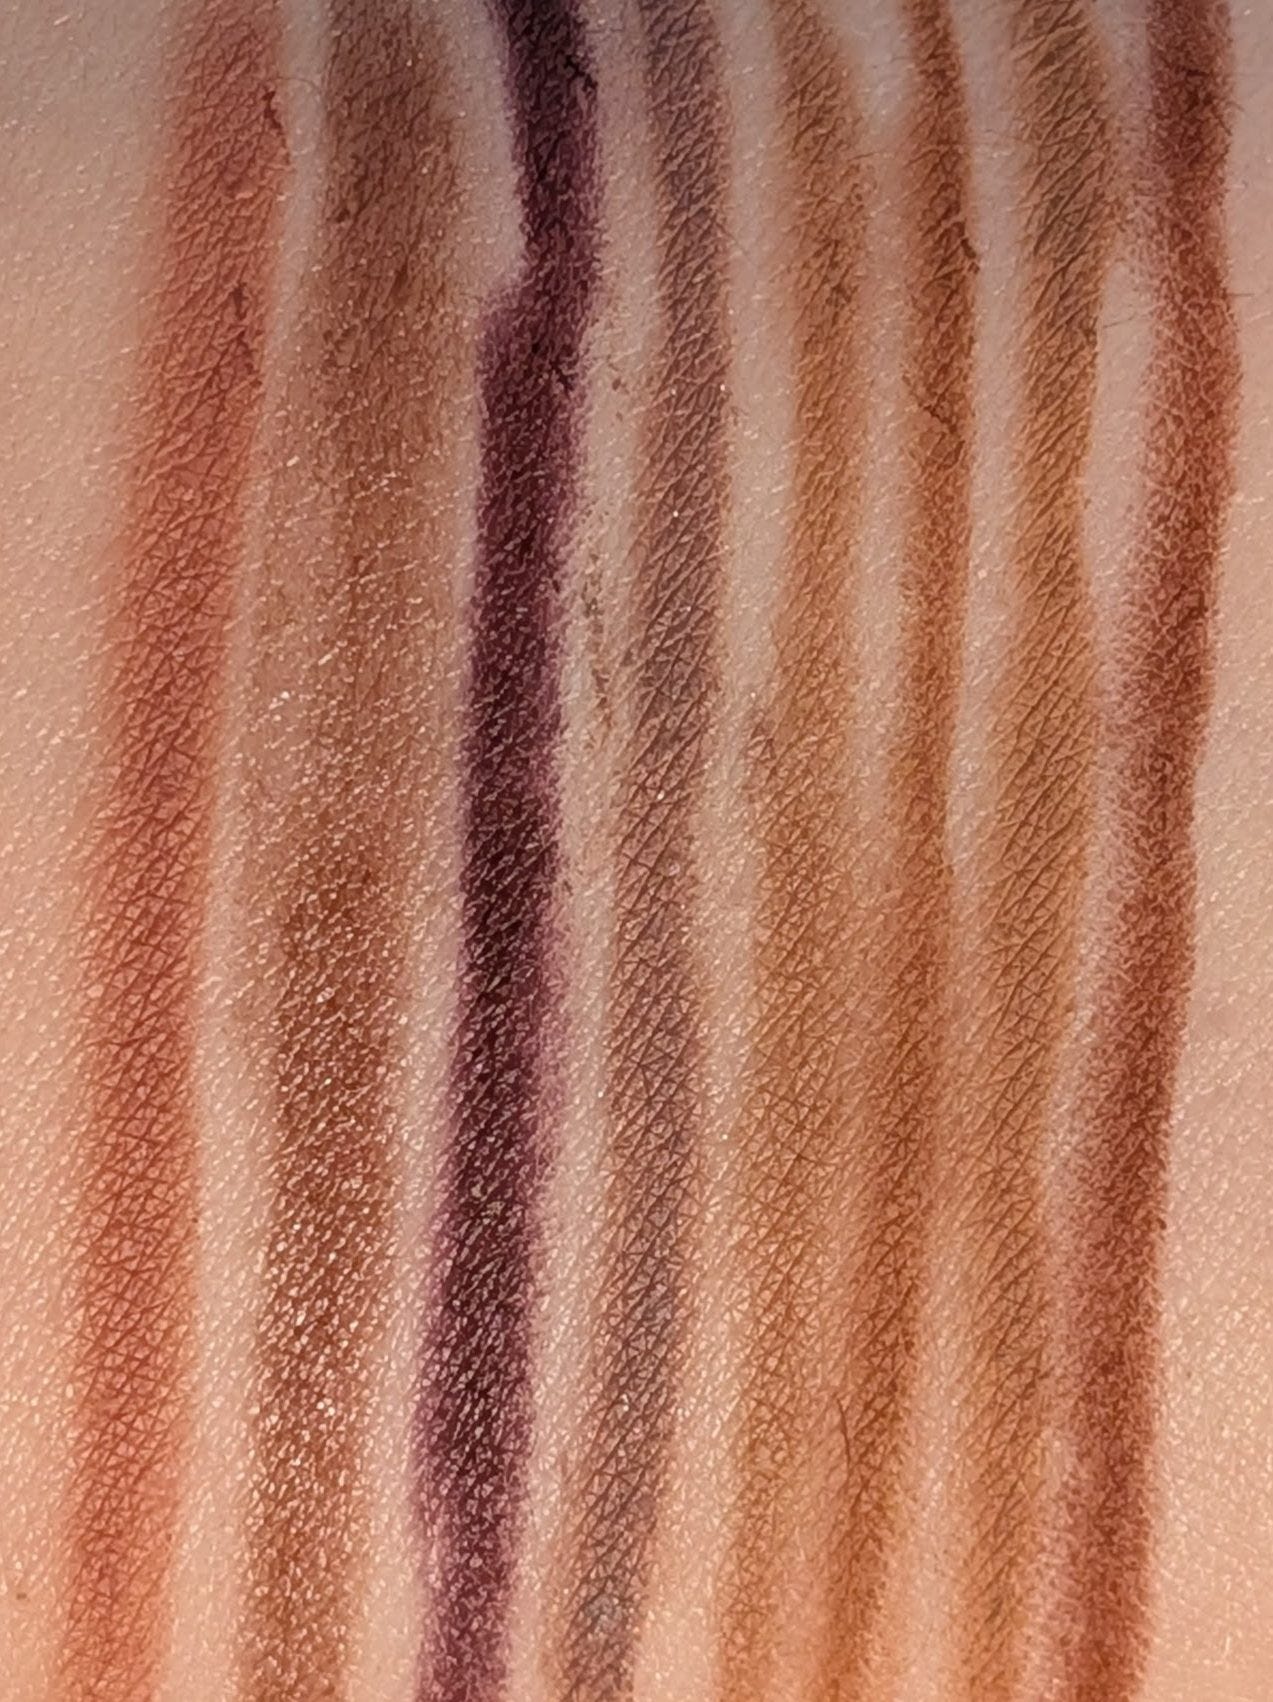
Lip Pencil in Whirl – I’m including this mostly for completeness because it’s the only MAC lip liner I have. I swatched it next to the other lip liners I reach for most (in this order): Merit Brownstone, Merit Bauhaus, Maybelline Gone Greige, Thrive Kackie, Glossier Buff, Ravie Almond, and Ravie Mocha.

Next to those, Whirl is much pinker. If you collect grungy brown, rusty beige, cool contour, or purple lip liners and you want something that reads more like a true pink, Whirl is your girl. I tend to prefer cooler browns because they actually add shape to my lips, so this one wasn’t quite what I wanted. I thought it would be deeper and more contoury because it’s described as a “dirty rose”, but on me, it’s just pink.

The formula is fine and very much in line with a classic lip pencil. If MAC lip liners are on sale and you already know you want a shade, I don’t think it’s bad. But personally, the Merit lip liner formula is still my favorite because it’s easier to use, blends out nicely, sets, and doesn’t get as dry as some traditional liners. If I lost Whirl, I wouldn’t replace it, but if I lost my Merit lip liners, I absolutely would.

What fun lip products should I check out? As always, all reviews/opinions are completely my own and unsponsored.
I Tried 6 “Olive-Friendly” Powder Blushes From YesStyle Under $20

A lot of affordable makeup is pretty fantastic, and I don’t spend enough time talking about it. So for May, I’m dedicating the entire month to posts about products under $20. I specifically picked 13 YesStyle blushes that looked like they had a real chance of being olive-friendly and were all under $20 to test. I originally planned to put all of them into one big affordable YesStyle blush roundup, but once I started writing, it became very clear that 13 blush reviews in one post was too much. So I’m going to do the powder blushes today, and then this weekend or early next week, I’ll post the liquid, cream, and cushion blushes. I promise there will still be all the other affordable May posts so we’ll just have an extra post. In this post, all links are affiliate links (thank you for your support!), but all opinions are my own. 

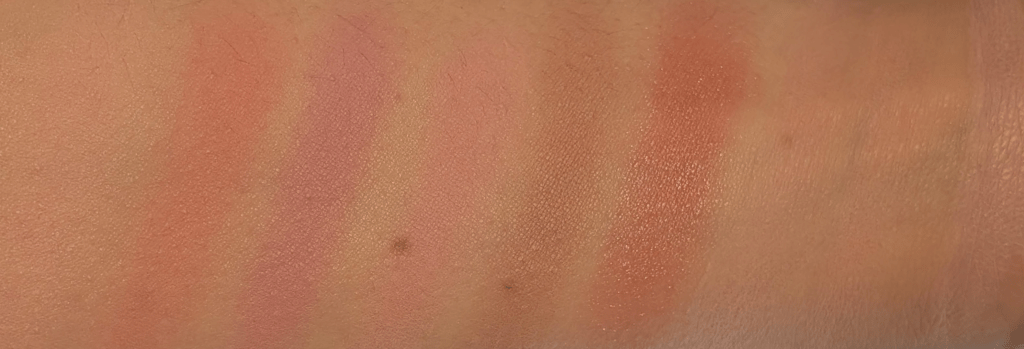
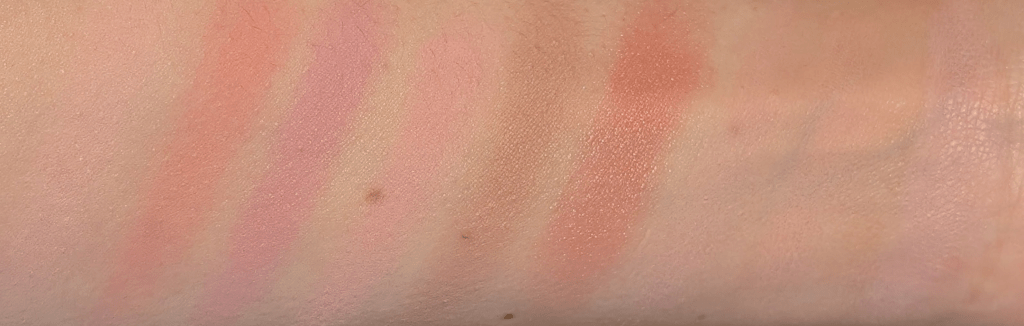
Swatches are in the same order from left to right as the order of blushes are reviewed in the post. I tried two different lighting conditions, and the second photo is truer to the actual colors of the blushes, but I think you can see the formula better in the first. Feedback always welcome!

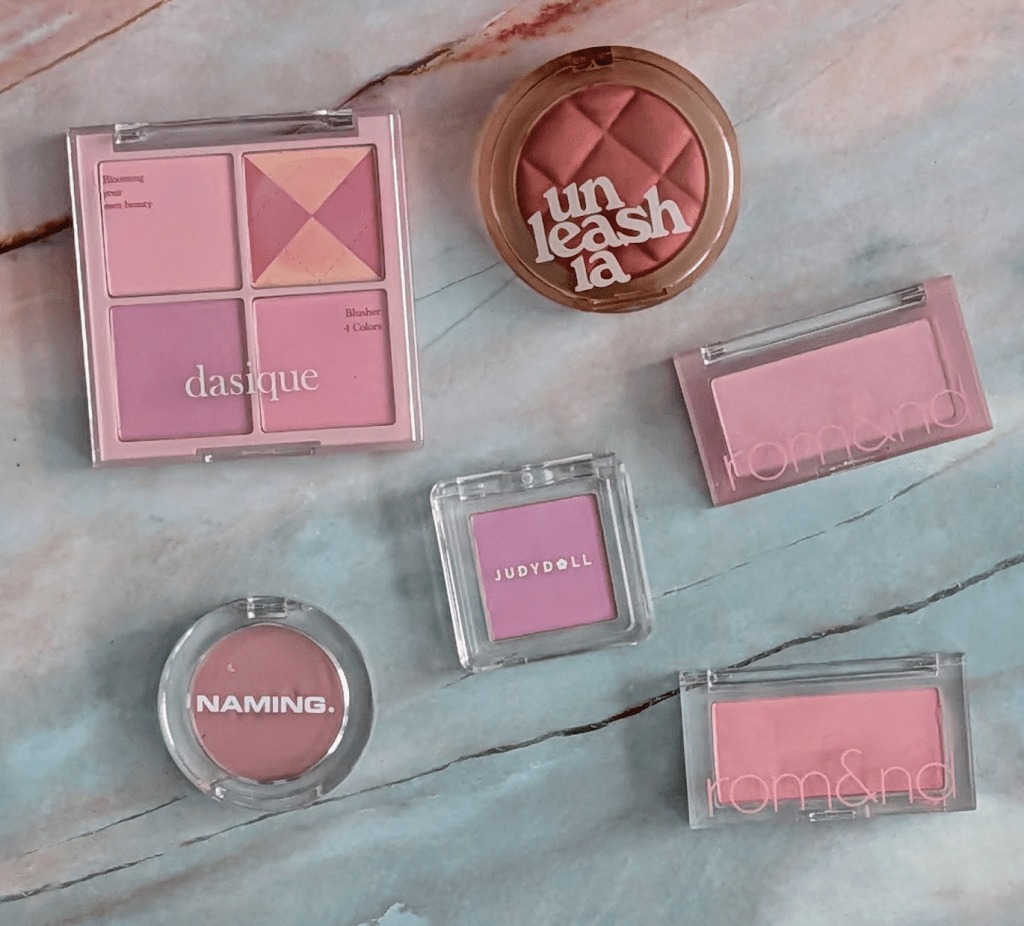
dasique Blending Mood Cheek in 05 Violet Knit – These are the powder blushes I reach for the most out of these 6. The formula is so smooth and blurring and has what I’d call a skin-finish matte texture. It’s very soft and blurred, but not flat or dry. There’s a pale lilac I use more as a blush topper, a warmer pink that gives a pretty almost peachy pop (although if you’re less green, it’ll probably be just pink), a cooler purple that actually stays purple on me instead of turning pink, and a bright cool pink that is my my perfect everyday brightening blush. My camera kept pulling the warmer pink so much more peach/orange than it looks in real life, but the difference between the warmer pink and cooler purple is much clearer in person. I can use one shade, mix them, or shift the tone depending on the rest of my makeup, and it’s the rare blush quad where I actually use every shade. 

NAMING Fluffy Powder Blush in Taro – I’ve talked about this one before in my beige makeup for olive skin post, and it still holds up as one of my favorite beige blushes of all time. The formula is also excellent. It’s smooth, easy to blend, and very hard to mess up. Compared to the dasique quad, this has a little more of a satin finish, but you probably wouldn’t be able to tell the difference unless you were really looking for it. This is the kind of shade I can wear when I don’t want my blush to compete with the rest of my makeup, but I still want my face to look finished. If I had to pick one single powder blush from this group of 6 to keep, it would probably be this one because the color is so perfect.

Unleashia Dough Dough Waffle Blush in No. 3 Jammy Grape – This is not the blush I’d pick if you want something matte, because it is definitely shimmery. There are no obvious flecks or chunky sparkle on my face, but it’s definitely more of a blushlighter. It’s smooth, glowy, and sheeny in a way that makes my skin look really nice but it’s not matte or blurred. Jammy Grape is a brighter pinky-purple shade, and it gives me more of that spring/summer pop of color. It’s also the most pigmented of this group of blushes here, so I don’t have to build it as much to get it to show up. Even with the extra pigment and sheen, I still find it easy to use because the formula is so smooth and blends out without getting patchy. This is the one I reach for when I want my blush to be brighter, glowier, and more noticeable.

rom&nd Better Than Cheek in C02 Blueberry Chip and N02 Vine Nude – I have both C02 and N02, and you don’t need both unless you’re looking for pale blushes with slightly different undertones (I know at least one of you is, and if you’re reading this, then yes, you specifically do need both). They’re also really hard to see in the swatches with my current skin depth, but I promise they’re very pretty in person. The formula is really nice but texturally, these are a little less smooth and blurring than the dasique and NAMING blushes. They still have that soft, airy, pale powder blush look, but if your main goal is “as blurred and smoothing as possible,” these would not be my first choice. If you are very fair  and your biggest issue is blushes looking too pigmented too fast, these are perfect. The tones are so pretty and soft and really easy to build up slowly. I also really like them for blending out another blush or giving that Dior Rosy Glow style blush topper effect. When I first got these, I used them both all the time, especially in winter as a very pale blush. 

Judydoll HOT Pretty Blush Powder in 68 – This is a really pretty pale cool pink, and it also gives me that Dior Rosy Glow type of effect that’s bright and fresh. The Judydoll formula and the rom&nd formula are almost exactly the same, and I would happily reach for any of them for this type of color. As we’ve moved into spring and warmer weather, I’ve definitely been reaching for this one more than the rom&nd. It works as a topper, but I can also wear it by itself when I want a fun lilac-y pink cheek that still looks like it belongs on my face. Warmer pinks work well on me because I’m a warm olive and I personally like that almost-peachy (not cheeto) look in the warmer months, but if you want to stay in that cool pink/lilac/purple blush family, this is the one I’d pick. *I can’t find this shade on YesStyle right now but it is on Stylevana for about $5.

What other products would you like me to review? Let me know if there’s anything else you’d like to see here, and thanks for reading! As always, some links may be affiliate links that support the blog, but all reviews/opinions are completely my own and unsponsored. 
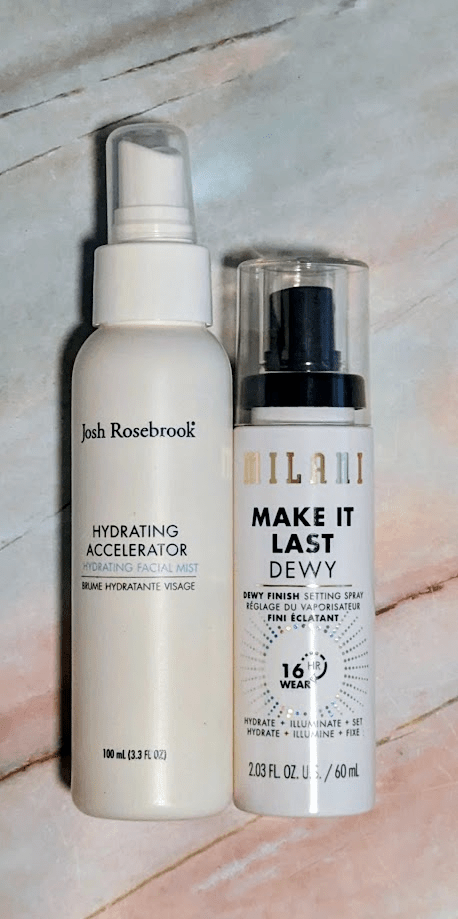
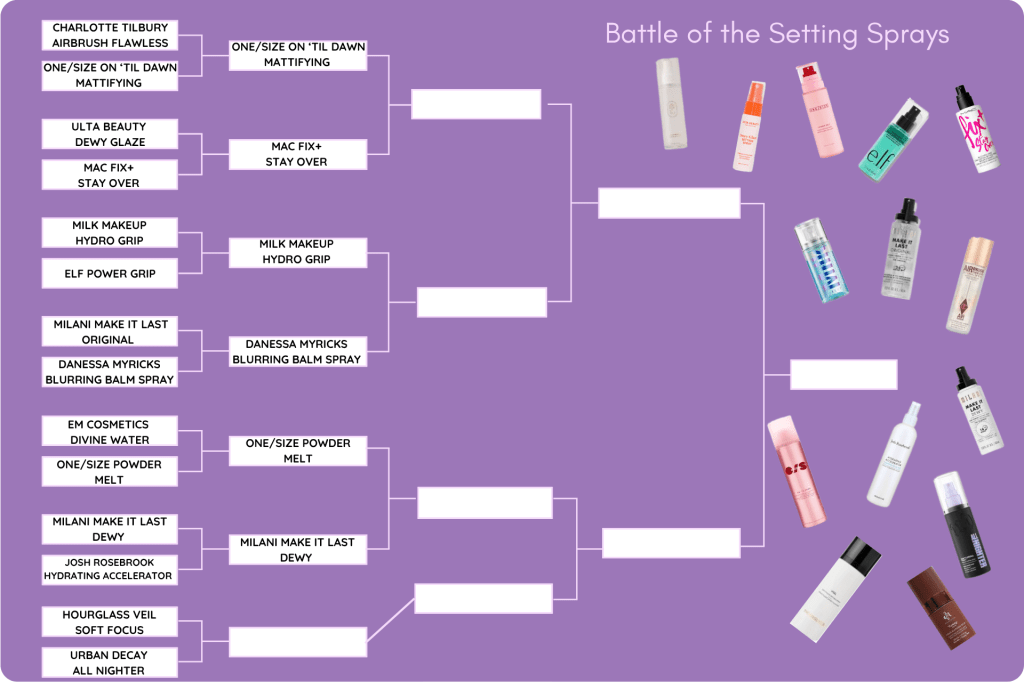
Setting Spray Showdown Round 1, Match 6: Milani Make It Last Dewy Setting Spray vs Josh Rosebrook Hydrating Accelerator

This is the sixth match of the first round in my setting spray showdown series, where I’m testing popular formulas side by side to see what actually makes a difference in real life. I’ll be doing the same makeup, with the same lighting, for at least 16 hours for each test. I’ve also been testing all of these setting sprays for months before doing these elimination rounds. For this round,  I tested the Milani Make It Last Dewy Setting Spray tested against the Josh Rosebroook Hydrating Accelerator. In this post, all links are affiliate links (thank you for your support!), but all opinions are my own.

The Josh Rosebrook Hydrating Accelerator feels more like a skincare prep spray than a traditional setting spray, but I’ve seen it recommended as a multipurpose product that works well to set makeup too. The Milani Make It Last Dewy is more of a classic setting spray but with a glossy, “glass skin” finish. When I first sprayed them, it definitely felt like hydrating spa experience vs “a normal setting spray.” After they each dried down, both sides looked equally smooth and dewy, and my skin felt comfortable and hydrated. Neither blurred or mattified (as expected) which was a nice break for my dry skin.

By the afternoon, there were no major differences in how the sprays felt on the skin. Both sides still looked glowy and neither felt sticky or dried out. Where the difference started to show was in makeup longevity. My blush and bronzer looked better on the Milani side whereas they had faded a bit on the Josh Rosebrook side already. I also asked my husband to take a look, and he said the Milani side looked slightly better, which matched what I was seeing up close. From far away, I’m not sure you could tell a difference. I was especially impressed that the Milani spray held up to the Josh Rosebrook in terms of staying dewy and hydrated and was also impressed that the Josh Rosebrook was holding up against a setting spray for the most part.

At the end of the night, both sides still looked good overall. My skin didn’t feel tight or dry, and neither spray caused any serious patchiness or makeup breakdown like some other sprays have. That said, the Milani side continued to outperform when it came to makeup staying power. The blush, bronzer, and complexion products were still going strong on that side, while the Josh Rosebrook side had continued to fade even more throughout the day.

Who’s moving on?
The finish on both sides ended up being fairly similar, and I would gladly keep using both of them for a natural, slightly glowy, and hydrated look throughout the day. That said, the Milani helped my makeup last much better over the course of the day, while matching the dewy finish of the Josh Rosebrook. It promises a 16 hour wear, and I’d say it holds up. I will absolutely keep using the the Josh Rosebrook Hydrating Accelerator as a skincare mist and prep step, but (as probably expected), it didn’t quite hold up as a setting spray. Milani moves on!

What other products would you like me to review? Let me know if there’s anything else you’d like to see here, and thanks for reading! As always, some links may be affiliate links that support the blog, but all reviews/opinions are completely my own and unsponsored. I also received the Josh Rosebrook spray from the brand, but have bought at least 6 bottles of it myself before that. One of my favorite skincare brands!