Natasha Denona I Need a Cool Is the Neutral Palette I’ve Been Looking For

I have a problem with neutral eyeshadow palettes where I look at them and think “oh look, a normal brown”, and then I put them on my face and everything is orange. As an example, I Need a Nude is much peachier on me than I thought it was going to be and I Need a Tan is extremely warm (as expected, I know, I shouldn’t have bought it). Unsurprisingly, I Need a Gold also has plenty of shades that go orange. I was really hoping I Need A Cool would be the neutral palette for me from Natasha Denona, and it turns out that it is. Since I won’t come back around to this, saying upfront that the Xenon palette is my all time favorite cool-toned Natasha palette, but it’s a very different kind of palette than I Need a Cool. 
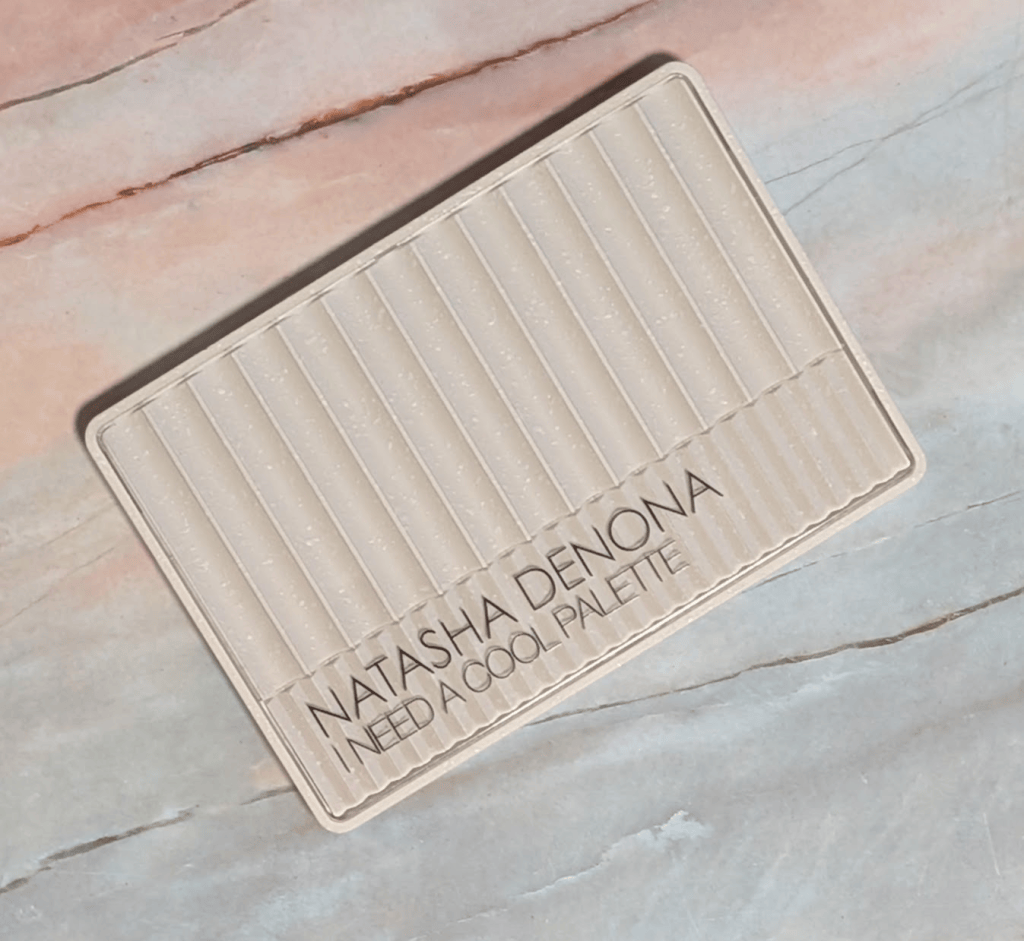
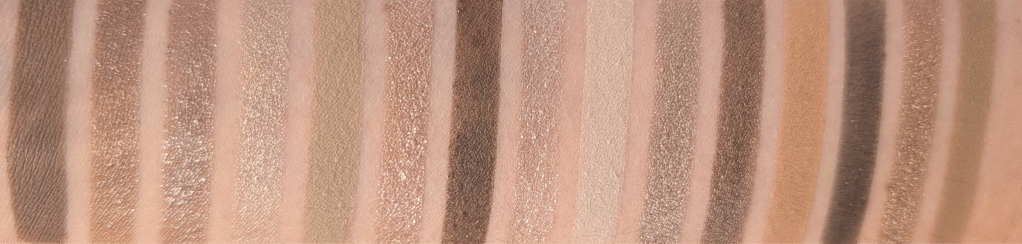
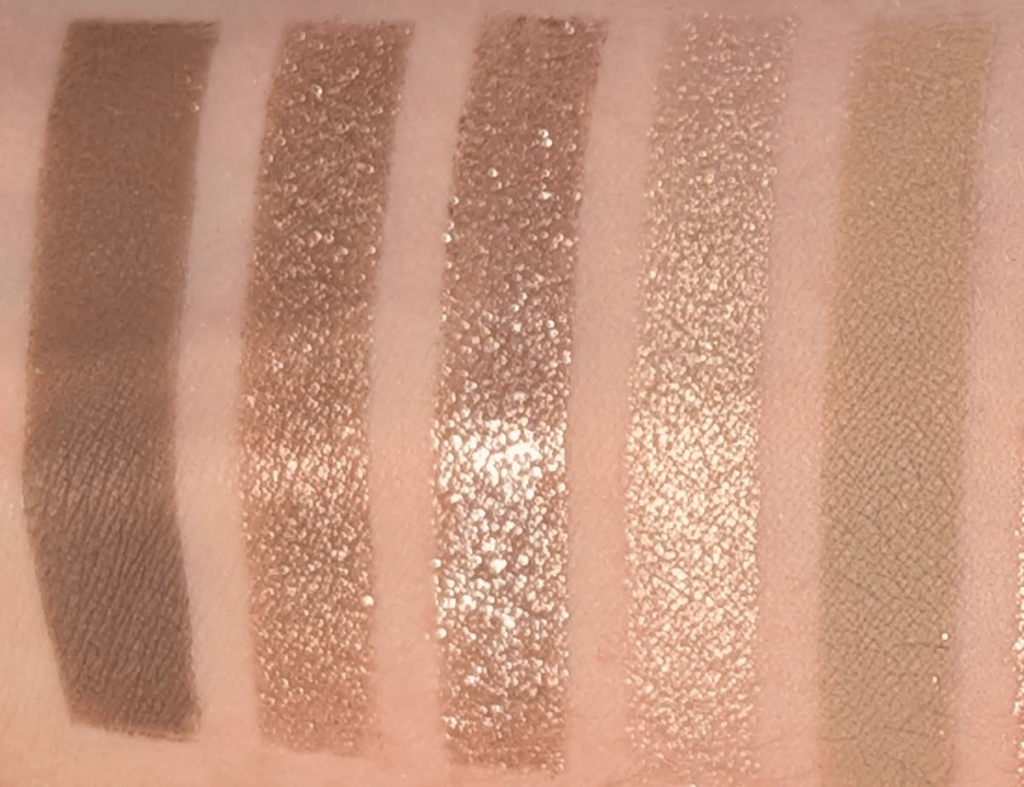
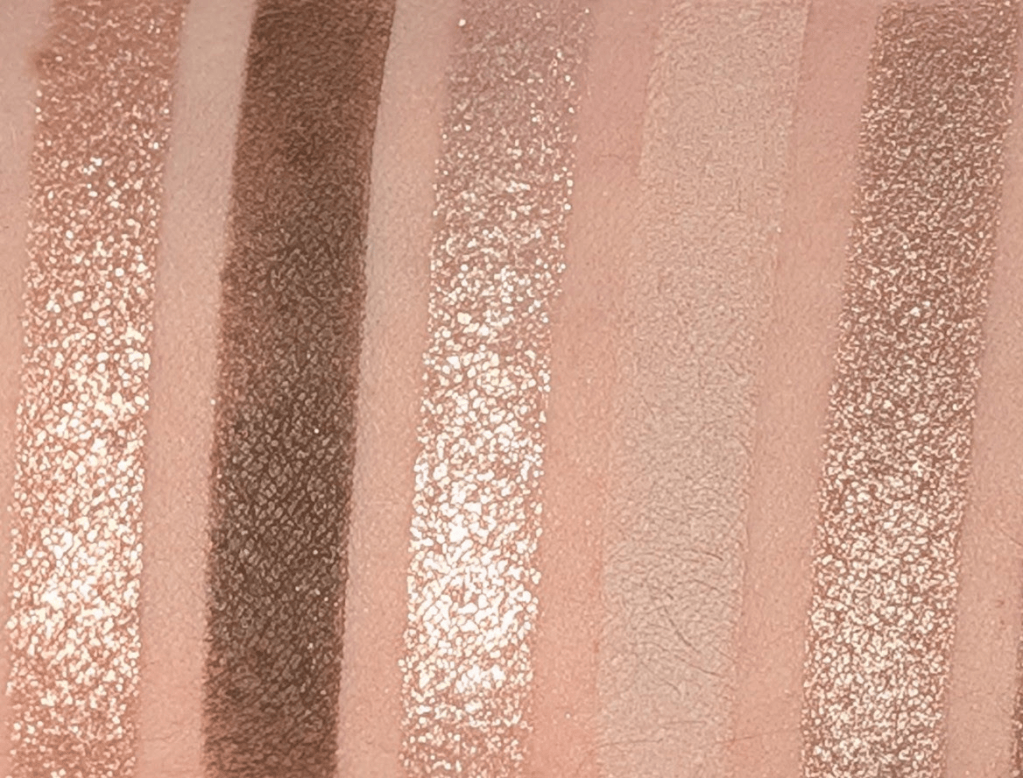
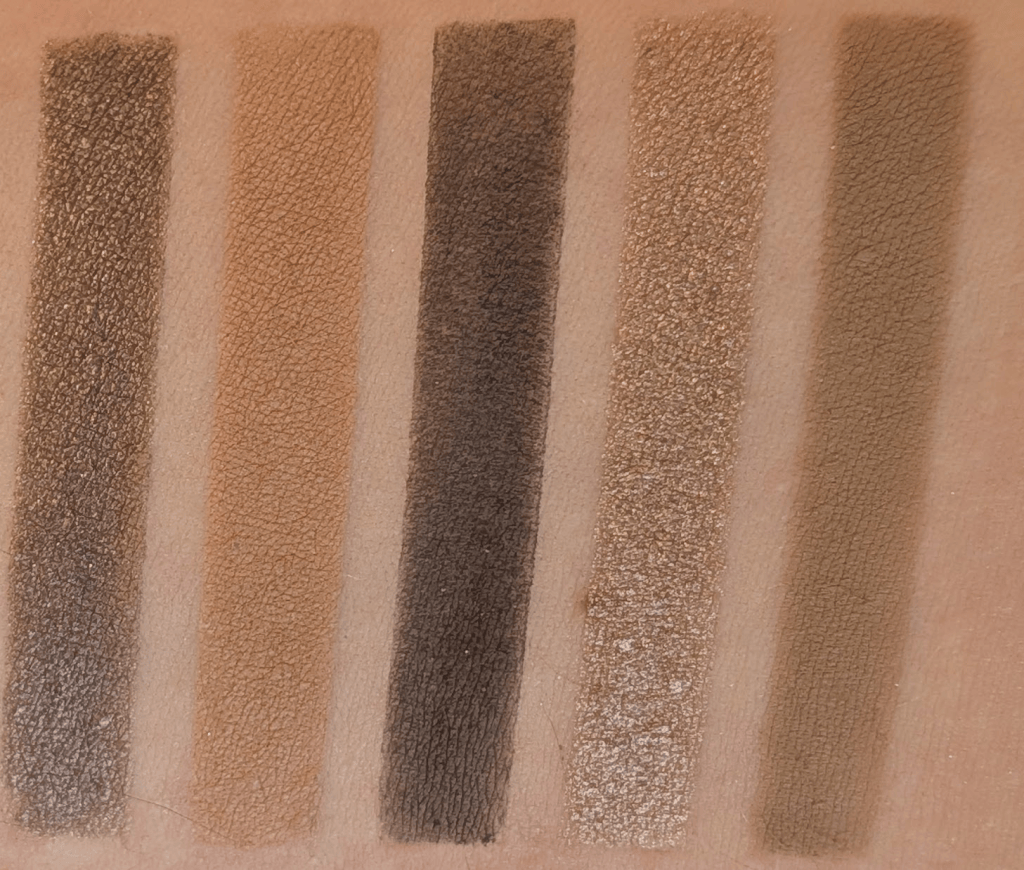
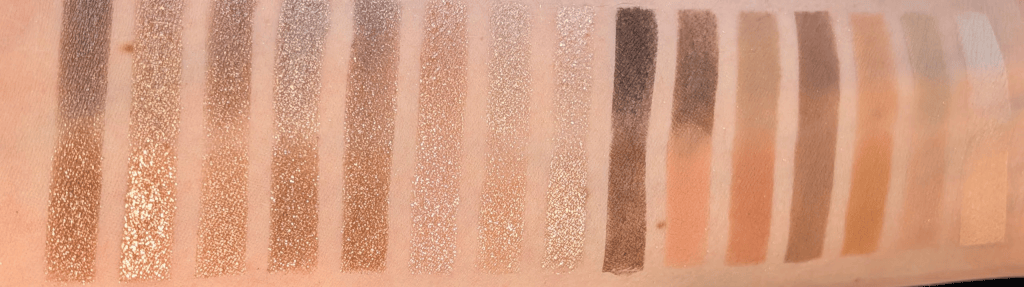
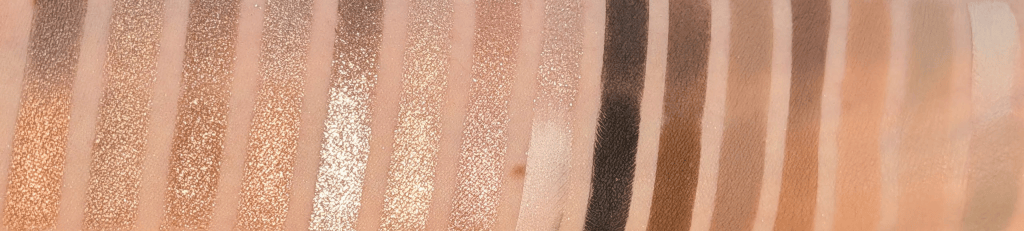
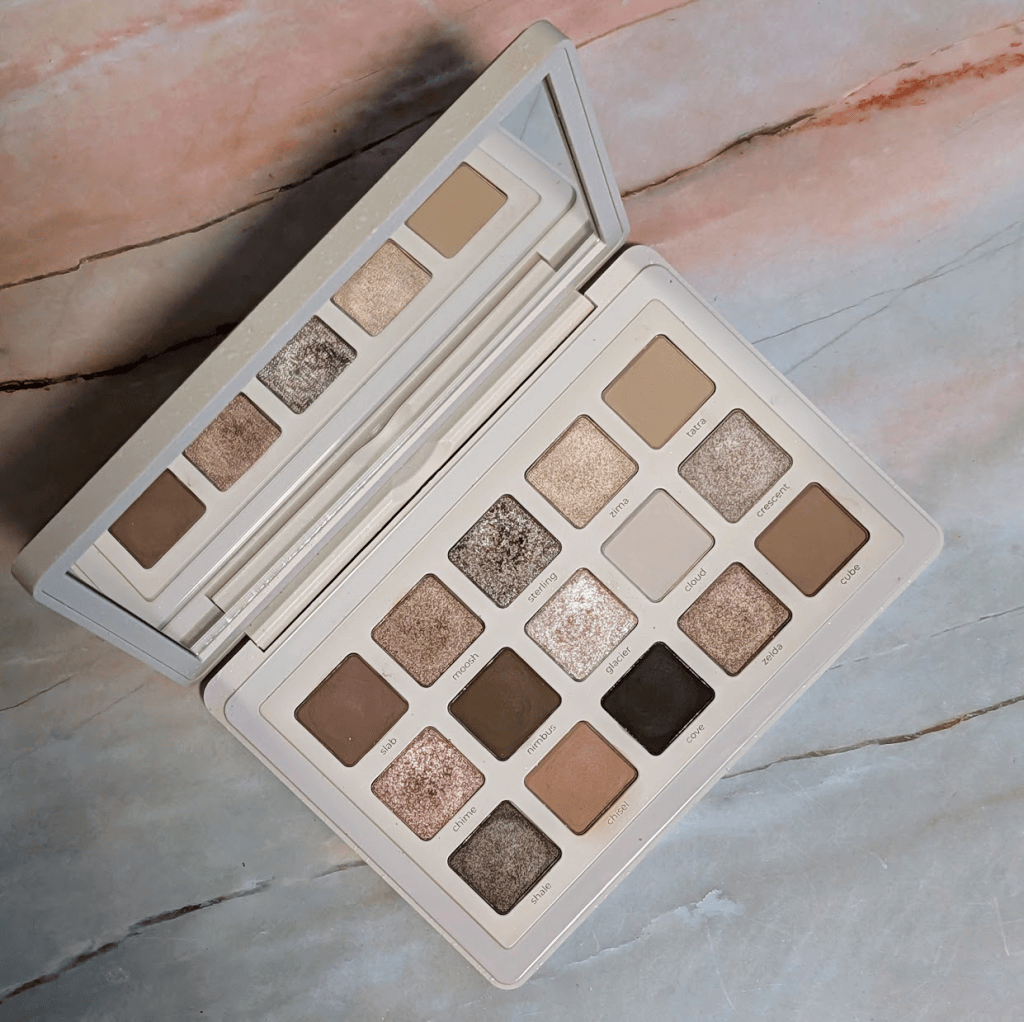
In this post, all links are affiliate links (thank you for your support!), but all opinions are my own and I bought all these products myself. Swatches are under a ring light to show true to color (photo #1) and then standard lighting to show the formula a little better (#2) for all the products.
I Need a Cool vs I Need a Tan

I’ve seen other people say this palette is too gray or ashy, and after actually wearing it, I completely understand what they mean. I think I’m pulling basically every ounce of warmth out of these shades and they’re still landing somewhere around neutral-to-cool on me. If you don’t normally make everything turn orange, I can absolutely see this looking much grayer on you than it does in my swatches so I wanted to warn everyone up front that this is, in fact, a (mostly) cool palette. 

I personally tend to veer towards pink, purple, berry, and navy types of shades when I go for a cool toned look. This palette is very specifically a gray, mushroom, silver, taupe version of cool, and I honestly  don’t own that many palettes that have these kinds of shades. I’ve really liked the looks I’ve been wearing with this palette even though it’s weirdly a bit out of my comfort zone. I’m already excited to wear this with berry blush when it gets colder, and it turns out these shades look great with a bright pink blush just like warmer shades do. 
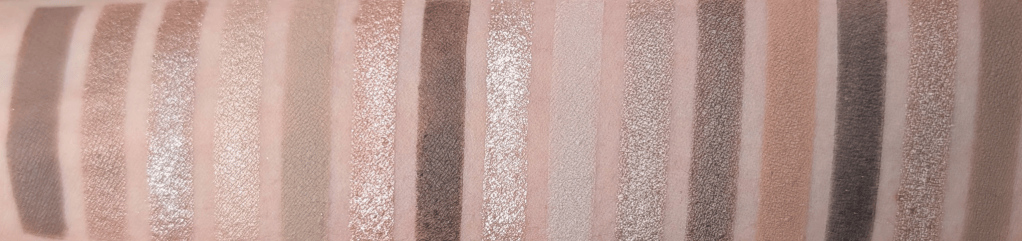
Natasha Denona I Need A Cool

Formula-wise, I’m still not the biggest Natasha Denona matte person. I know people LOVE these mattes, but they have a stick-to-it-ness that isn’t really my preference. Once I put them down, they want to stay exactly where I put them, and I prefer a silkier matte that I can move around more easily, like the mattes in the YSL quads. They’re still good mattes, but I think they really benefit from a natural hair brush and being used to working with this type of formula. 

The super sparkly shimmers and metallics, as usual, are stunning. They have a lot of dimension and just look blingy, for lack of a better word. They’re easy to use with a finger or a brush, and they wear really well on me. The smoother shimmers are exactly what you want for a sophisticated (meaning I had 30 seconds to get ready for this 7am meeting, and I don’t want it to look like I’m covered in glitter) type of look. 

A short detour to look at each of the shades individually:
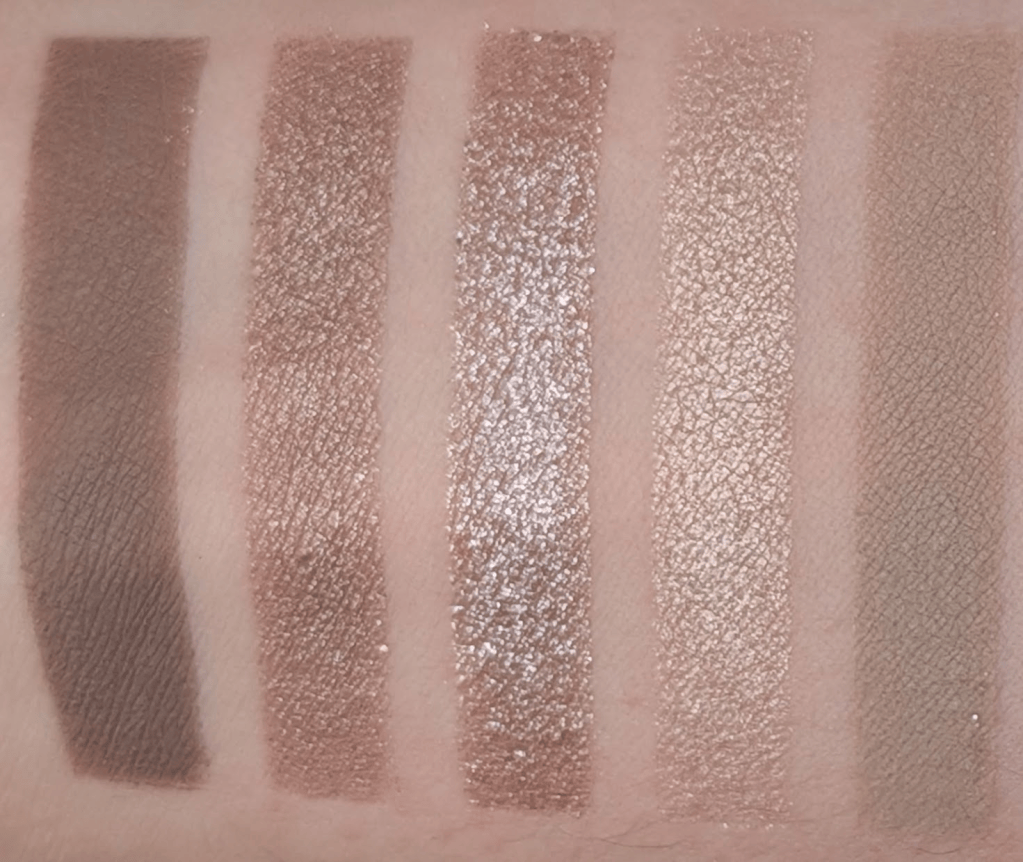
Slab, Moosh, Sterling, Zima, Tatra

Slab – This is my perfect midtone brown matte that doesn’t go even a little orange. It has a little gray-green thing going on if you look really closely, and it just works so well with my skin. I can wear this as a one and done matte look so easily. I wouldn’t say buy this palette for this shade, but I wouldn’t be mad if I could buy this as a single. 

Moosh – This is a smooth taupe shimmer that’s less sparkly, but easy to wear alone. It’s one of those neutral browns that always turns orange on me, except this one doesn’t.

Sterling – This is one of my favorites in the palette. It’s a taupey brown with a chunky silvery metallic reflect that I just want to pile on my eyes (and I have many times). Another one that I’d totally buy as a single. 

Zima – This is somehow the least special shade in here even though it’s not a matte. It’s a champagne shimmer that pulls a little gold on me, and I feel like I already own this shade 400 times. Spoilers – it’s also the only shade I found an actual dupe for in the Stone Cold Fox palette. 

Tatra – This is one of my favorite mattes in the palette. It’s a muted stone/khaki/beige transition shade that does what I always want a camel brown to do because Tatra doesn’t turn orange.  
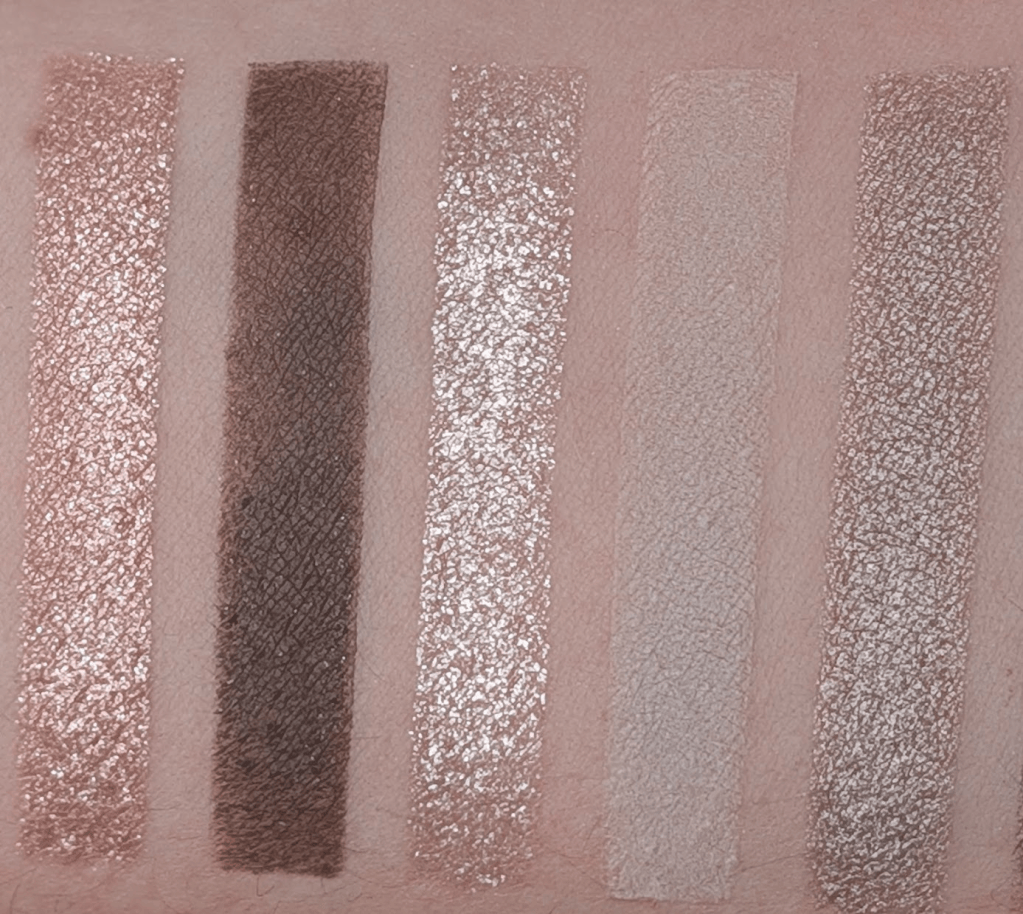
Chime, Nimbus, Glacier, Cloud, Crescent

Chime – I love this one. There’s a little pink in it, but it’s almost silver when I get it on my eyes. It’s mostly just really shiny and sparkly, and the silver reflect keeps it from going too peachy. 

Nimbus – This is the darkest brown matte in the palette, and it honestly swatches pretty badly. It works much better when I’m actually working with it, and I really like using this as a subtle liner because it doesn’t show up too strongly and I have room to build it up. 

Glacier – This is a very pale and icy sparkly shade. I like this much more as a topper or brightening shade than using it alone. This is also the shade that I get the most fallout with, so I have to be a little more careful. 

Cloud – This is a super pale mushroomy off-white matte. I thought I would use this a lot to blend things out, especially because it’s almost a little green, but I just really haven’t. This is also one of the shades that can make a look go from neutral to “wait why is this so gray?” pretty quickly.

Crescent – This is a really nice taupe brown metallic that doesn’t go orange. It’s pretty and the formula is very nice. 
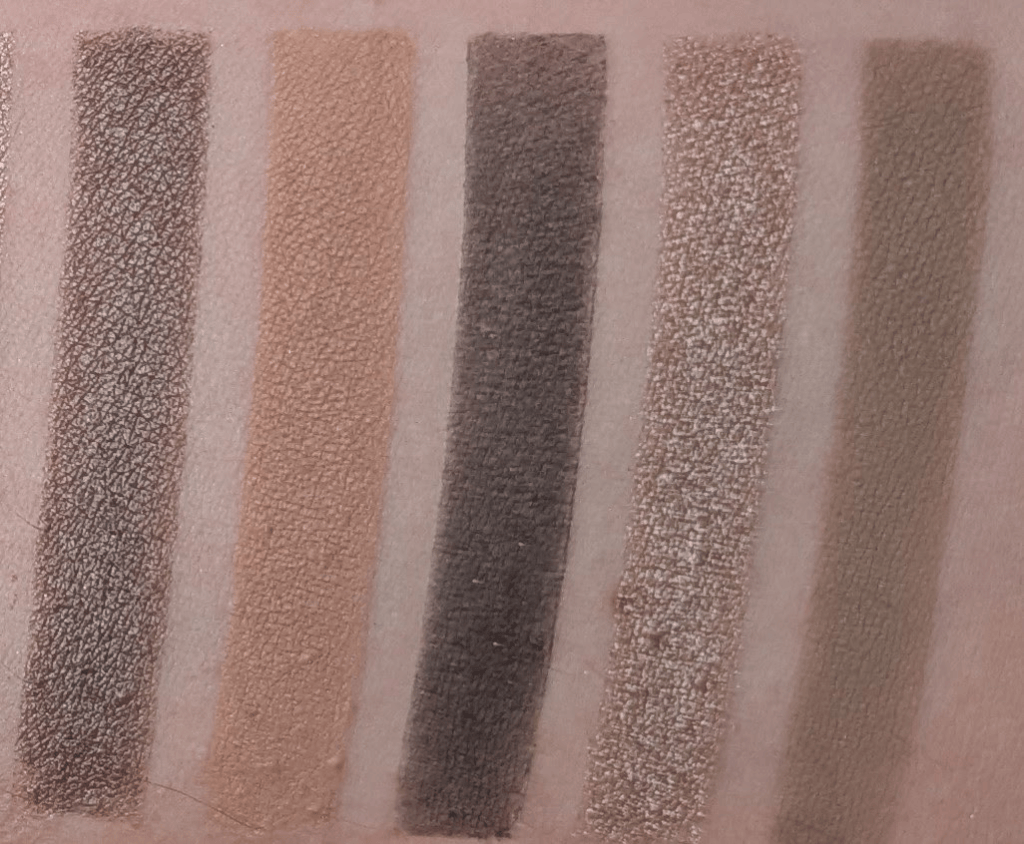
Shale, Chisel, Cove, Zelda, Cube

Shale – Similar general territory to Crescent but much deeper and browner, and I like Shale so much better, I really haven’t used Crescent. 

Chisel – This is the actually warm shade in the palette especially relative to everything else. I don’t even know that I would call it particularly warm if it were sitting somewhere else, but next to everything here it definitely is. I like having it for when I’ve accidentally gone too gray and want to pull things back a little without going too orange, but it still feels a little out of place. 

Cove – This is the deepest shade. It’s more of an almost black than an actual inky black, which is nice if you’re afraid of using a super pigmented black shadow. If you’re used to that though, this might be a little disappointing.

Zelda – A smooth taupe-brown shimmer (yes, another one!). It’s pretty, and I would happily wear by itself.

Cube – Another mid-tone taupe/brown. It’s deeper and browner than Tatra, but they’re close enough in what they do for me that if I were making this palette, I probably would have put something else here.

Most of the looks I’ve made are some variation of taupey brown with sparkle. Sometimes they’re more pink, sometimes more gray, sometimes a little khaki, sometimes very silver, but they’re all the same vibe. That doesn’t bother me when it’s so obvious that’s what you’re getting with this kind of palette. If you want to wear that kind of look every day, you’re gonna love this palette. 

And now, the real reason you’re here, comparison swatches! 

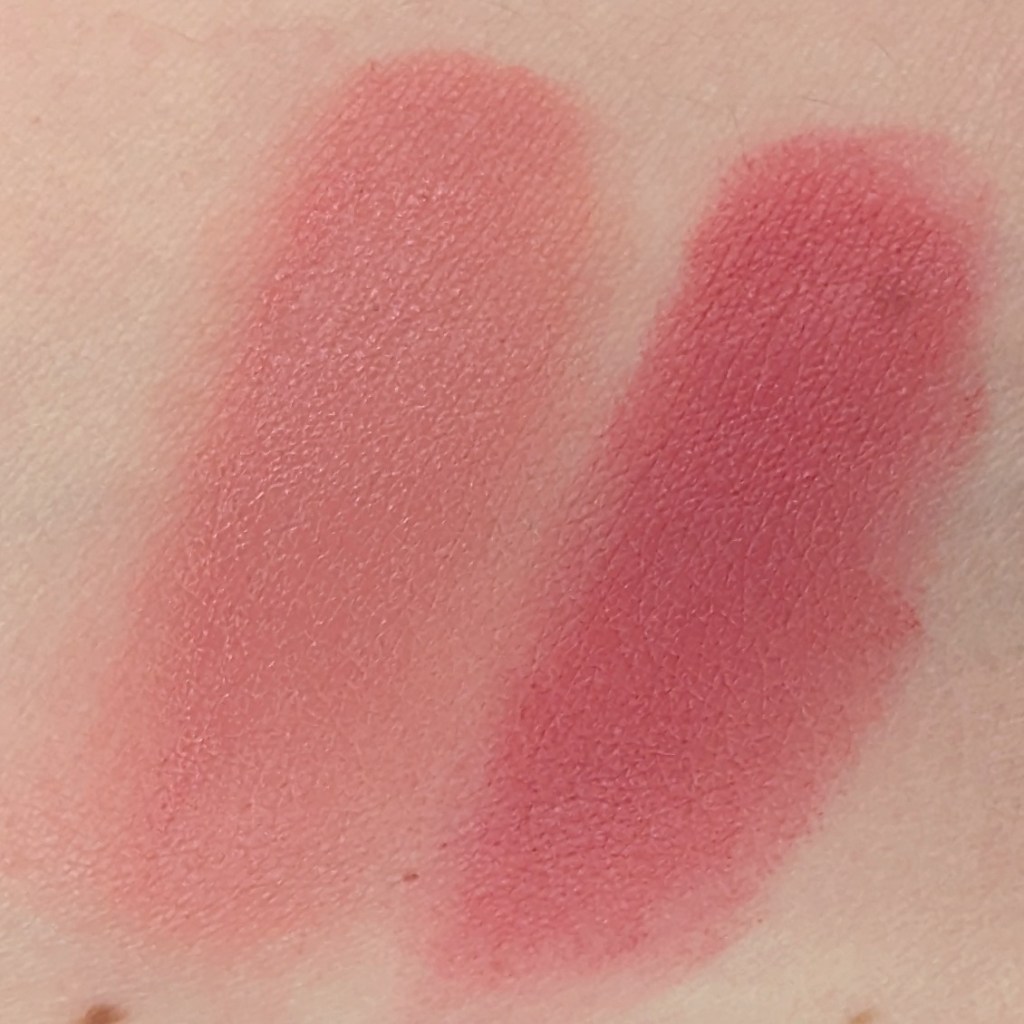
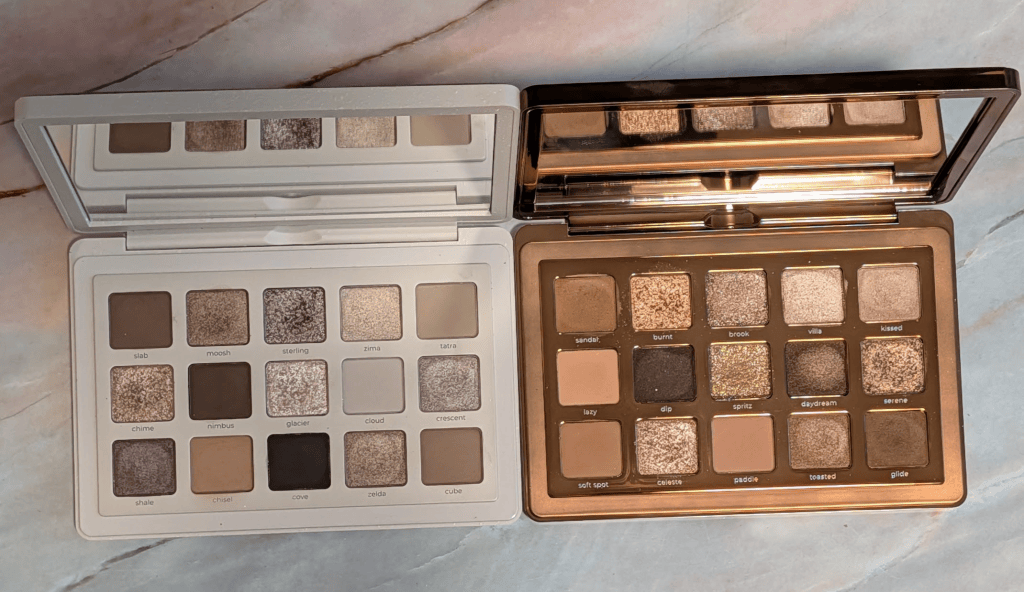
The Natasha comparison that makes the most sense to me is I Need a Nude, because I Need a Cool is basically what I wanted I Need a Nude to look like on me. I Need a Nude is really pretty, but so much of it ends up being really peachy on my skin. When I swatched all 15 shades next to each other, I Need a Nude was noticeably rosier and peachier vs the gray/taupe/mushroom tones in I Need a Cool.  
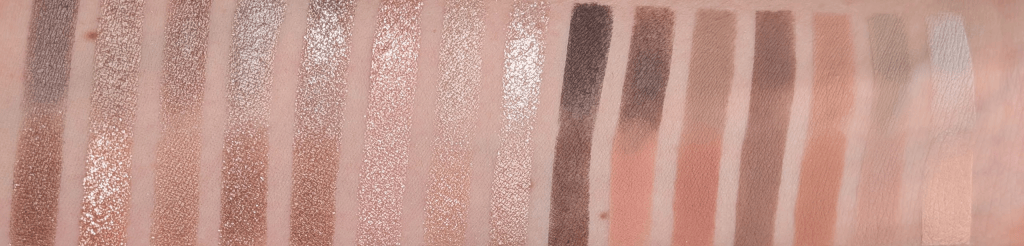
I Need a Cool on the top and I Need A Nude on the Bottom

If I Need a Nude already looks beautifully neutral on you, then I can absolutely see I Need A Cool being too grey for you. If I Need a Nude is orange on you, then I think I Need a Cool might be exactly what you’re looking for. 

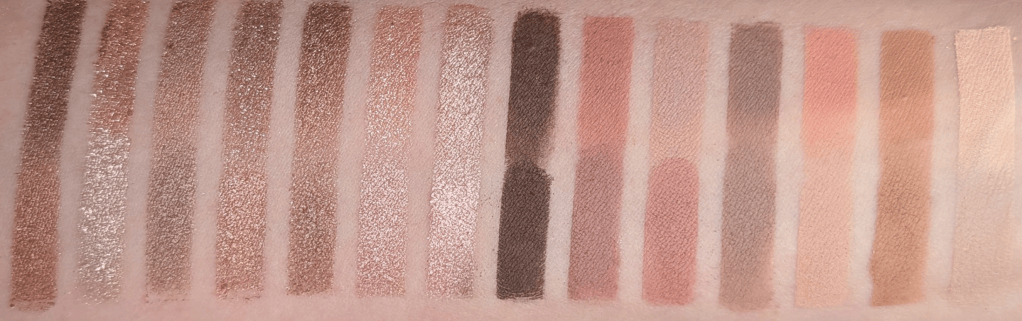
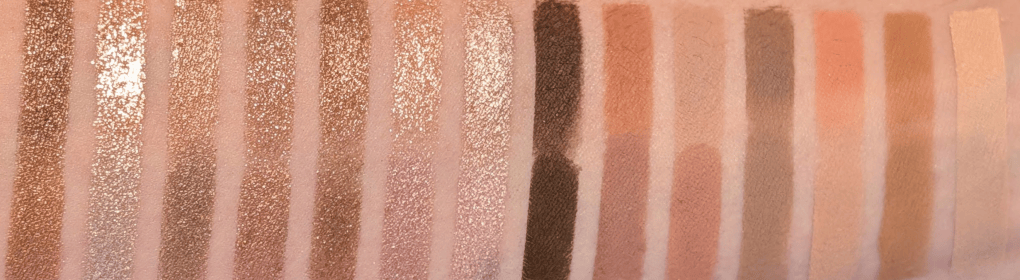
And then obviously there is Colourpop Stone Cold Fox. I matched 15 shades from the two palettes and when I swatched them all together, the overall color stories looked much closer than I expected. There aren’t 15 actual dupes, but I truly think you can get pretty close to both I Need a Nude and I Need a Cool with the shades in Stone Cold Fox. Even though they’re not exactly the same, they’re very very similar. And by they’re, I do really mean both I Need a Cool + I Need a Nude = Stone Cold Fox. 
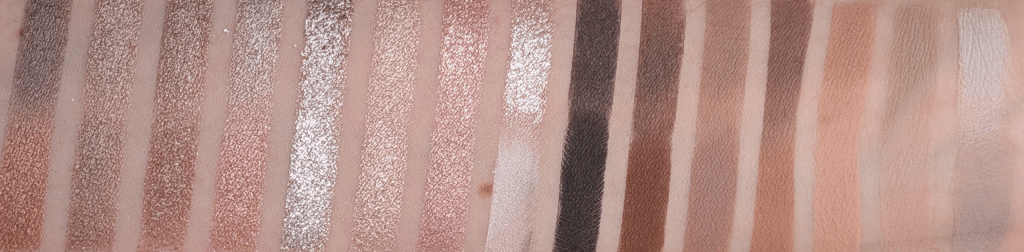
I Need a Cool on the top and Stone Cold Fox on the bottom
I Need a Nude on the Top and Stone Cold Fox on the bottom

I personally reach for I Need a Cool more than I Need a Nude and Stone Cold Fox, especially because I like the Natasha shimmers more and the I Need a Cool tones more. If I already had Stone Cold Fox and liked it, I definitely wouldn’t feel like I had to immediately buy I Need a Cool too. And if you’re looking at all of these gray-taupe-brown shades and have no idea whether this is something that could work for you, Stone Cold Fox is a much cheaper way to experiment. Especially because Stone Cold Fox is under $30 right now, and each Natasha Denona Palette is $72.

I used Ulta points to get I Need a Cool and I would happily use my points on it again. Actually, if I could go back in time, I just wouldn’t buy I Need a Tan and buy this instead. I knew I Need a Tan was probably going to be too warm when I bought it, but I wanted to review it anyway, and now I feel guilty every time I see it because I just don’t want to use it enough to even finish the review (I did post swatches in my Substack chat, please comment if you want me to find them!). With I Need a Cool, I keep wanting to use it and have to force myself to use other things I’m also testing. But of course, if you already have your perfect silvery taupes, mushroom browns and neutral mattes that never go orange, you may truly not need this. 

Ultimately, I do think this one is worth getting if you have also spent years wondering why every “neutral” brown palette looks orange on you. If my toddler hid this somewhere in my house and I couldn’t find it again (he would never, but hypothetically), I would buy another one. A lot of my other palettes, I wouldn’t miss. 

BK Beauty Brushes Review – Nikki La Rose N14, N15, N16, and N17

I finally picked up some of the Nikki La Rose brushes from BK Beauty a few months ago, and I’ve finally had them long enough to report back. I’m also hoping to get a bunch of reviews out before all the Black Friday sales really get into full swing (although some have already started, like BK Beauty!), so let me know if there’s anything you’re interested in! In this post, all links are affiliate links, but all opinions are my own, and I bought these myself. 

Nikki La Rose N14 Petite Precision Multitasker – This is a great little (but not too little) brush especially if you need to do some cleaning up at the end of your makeup routine. I love to use it to add extra concealer or powder where I need it. It works really well with liquids, creams, and powders although I find myself using this primarily for powder products. The tapered shape helps you get into those smaller areas like under your eyebrows, around your nose, inner corner, etc. without being so small that it takes forever to apply products. I actually like this brush better for concealer than the concealer brush (see below for more thoughts on that brush). This and the N15 are definitely my favorites from the collection.

Nikki La Rose N15 Precision Medium Powder – If I could only choose one of these brushes to buy, it would be this one. It’s the most unique to my brush collection, and I’ve been getting the most use out of it. It’s marketed as a powder brush but it actually works great for both powders and creams (especially things like bronzers and blushes). It picks up product really well and blends things out super easily. I really like the tapered angle of the brush for cheek products or for when I’m using it to powder all over my face but without wanting to literally get powder everywhere. If you’re someone who likes denser brushes for your cheek products without them being too dense, this is definitely a brush for you. I actually had all four of these brushes set aside to do this review so I could take pictures of them clean, and this one and the N14 are the two I’m most missing being able to use all the time even though I have so many brushes at this point.

Nikki La Rose N16 Pro Concealer – This is a duo-fiber brush that’s perfect for picking up and/or blending out cream products. It really is a great concealer brush if you’re looking for a quick and easy way to buff out concealer under your eyes especially if you’re looking for something that’s going to create more of a sheered out natural finish. I personally have really dark under eyes and need something that’s going to keep as much coverage as possible, whereas this is more about blending. Because of that, I’ve found that this is a great brush for cream and liquid eyeshadows, and I’ve been using it that way. It picks up something like the Merit Solo Shadows so easily, and I can get a super quick eyeshadow look with this brush.

Nikki La Rose N17 Multi-Pro Face – I thought I’d use this more than I do but I just never think to reach for it. When I do, I do really like it, but it’s the brush I’d least recommend of these four if you’re trying to choose. It’s really good for travel (which I’m just not doing much of right now) because it has a side for creams and a side for powders. My favorite way to use this brush is for cream blush and bronzer with the cream side and then flip it for powder bronzer and blush using the powder side which does make for a really quick and easy face of makeup. You can also use this for foundation, concealer, setting powder, basically anything! If you get the whole set, you won’t regret having this blush, but I do have other BK Beauty brushes I’d recommend before this one (check out my BK Beauty posts if you’re interested – Angie Hot and Flashy Travel Set, Core Line Extension, Core Brushes).

What other products would you like me to review? Let me know if there’s anything else you’d like to see here on LiftBakeLove, and thanks for reading! As always, some links may be affiliate links that support the blog, but all reviews/opinions are completely my own and unsponsored.

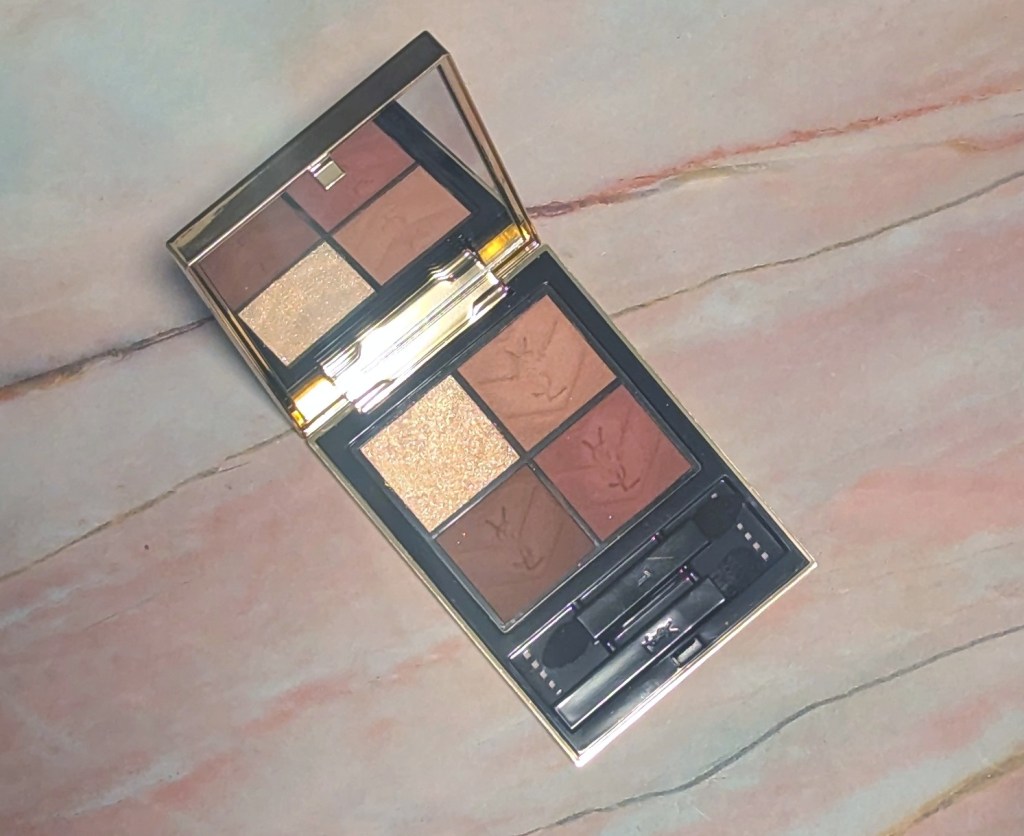
YSL Couture Mini Clutch in 200 Gueliz Dream – My favorite eyeshadow palette for my olive undertones

The Sephora sale still has a couple days left (and then there will be Black Friday and other holiday sales), and if there’s one thing I’d recommend getting while it’s on sale, it’s this palette. It’s described as having a neutral nude pearl, terracotta, beige and mid-brown. I think this really undersells the mauve quality of the terracotta shade and how special the topper is, so I wanted to do a full rundown of each shade and why I love this palette so much. Thank you so much for being here, and it would mean so much to me if you subscribe here for new posts. All links in this post are affiliate links, and if you choose to shop through them, thanks for supporting the blog!

For only four shades, this palette gives me a ton of different looks which is one of the reasons I think it’s worth it. I can use all four shades to make a more complex look or use each of them alone for a one and done. I can make something that pulls more brown, beige, pink, mauve, or pearl depending on which shades I use and where. No matter what you pair it with, it seems to work beautifully. The formula is also so easy to use and blend and longwearing. I’m honestly talking myself into trying another palette while typing this but I know this particular one is the one I would keep reaching for.

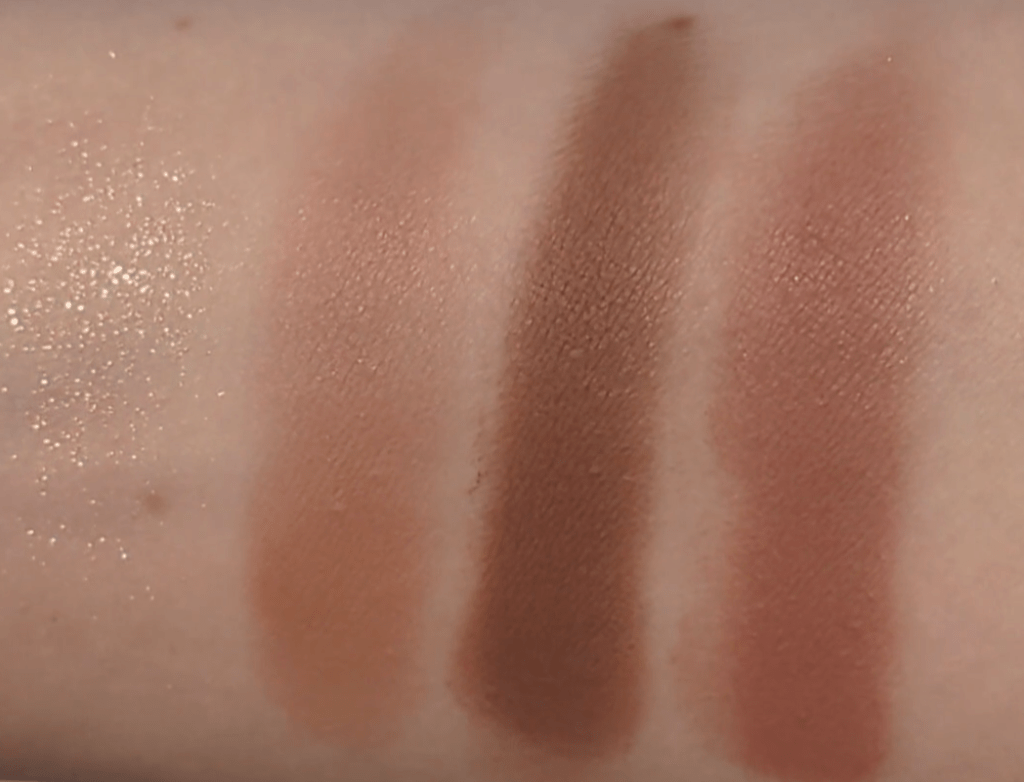
The upper left shade is such a pretty sparkly topper. It has a mostly gold shimmer in it but also has some tiny pink glitters, so I find it works really great no matter which of the mattes I pair it with. Pictures don’t do this justice – you really have to swatch it in person to get the effect of the sparkle. It definitely wouldn’t replace any of my single glitter shadows like the Hourglass Scattered Light or the Bodyography Glitter pigments, but it has just enough oomph for the kind of look I’m going for when I use this palette while still not being over the top. It doesn’t have a ton of pigment backing it so I don’t ever use this alone, but I love using it on top of the other shades or other matte shadows I have.

The upper right shade is a light brown beige that leans pink and never turns orange on me. I actually use this shade all the time as an easy one and done matte shadow look or to add some additional pink to an eye look to make it look better with whatever blush I’ve used that day. I also grab this palette for this and the lower right shade to help bring together a look with another palette because I always find I’ve ended up with a little too much orange to go with a pink or purple leaning blush. This shade helps solve that really quickly without going overboard into the pink direction since it’s still primarily beige.

The lower left shade is a perfect neutral dark brown that also never goes orange on me. I love using this for the outer corner or for a shadow liner. It’s just the right amount of depth that I can throw it on without thinking about it. I won’t accidentally make a look too smokey but it will still add the illusion I’m looking for. Like the other brown shade, it has just a touch of pink to it that helps it blend seamlessly with the other shades. It also means I can also use this to help me balance out an eye look I’m doing. That said, I can use it in a non mauvey/pink look, and it’ll still blend in great as a neutral brown.

The lower right shade is a more muted rusty terracotta matte shadow that leans mauve. I’m having trouble really describing this color, but it’s just so versatile for something that isn’t just a brown. It’s the perfect rusty color that I’m honestly always looking for in a blush, and I love using it all over as a base or to build up color in my crease. It goes so well with the types of colors I like wearing as someone with an olive undertone, and it never looks too red on me. I also use this to bring more rust (for lack of a better word) to an eye look whenever I need it.

This palette is $88, but especially if you can get it on sale, I think it’s incredibly worth it for the shades, the formula, and how well it works as a neutral palette on my olive skin. Let me know if there’s anything else you’d like to see here on LiftBakeLove, and thanks for reading! As always, some links may be affiliate links that support the blog, but all reviews/opinions are completely my own and unsponsored.

Best Leak-proof Travel Containers: My Updated Cadence Capsules Review

I wrote the post “My Favorite Travel Containers for Beauty Products” over 3 years ago, and I’m still absolutely in love with these containers. I wanted to do an update though because Cadence redesigned the capsules, and they’re even better now. Thank you so much for being here, and it would mean so much to me if you subscribe here for new posts. All links in this post are affiliate links, and if you choose to shop through them, thanks for supporting the blog!

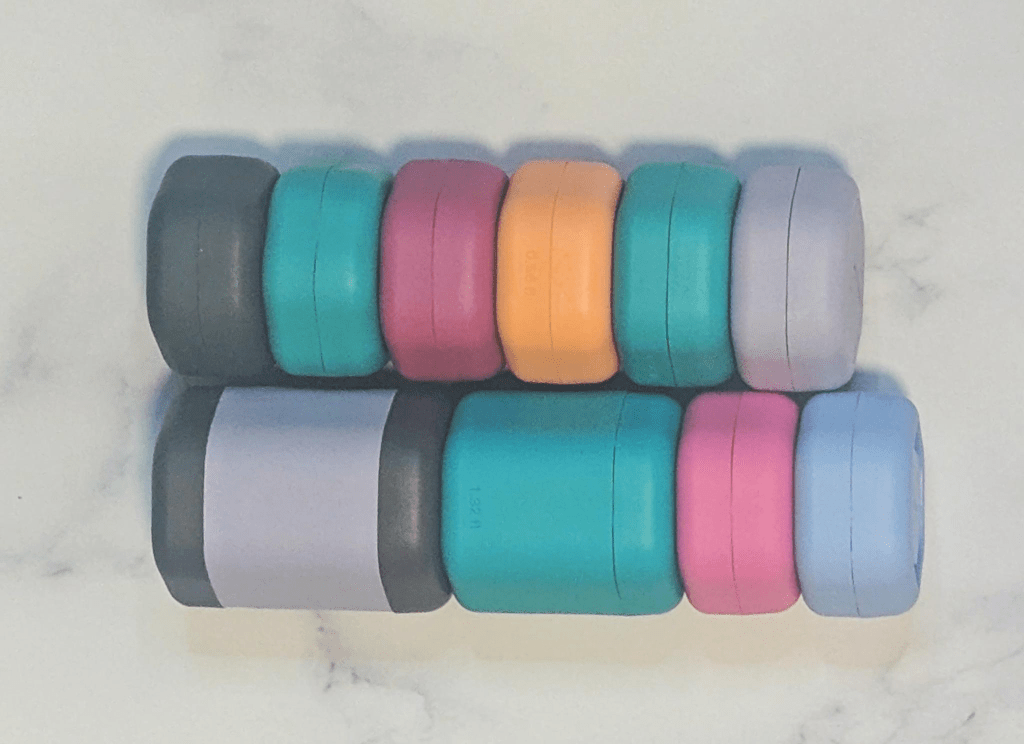
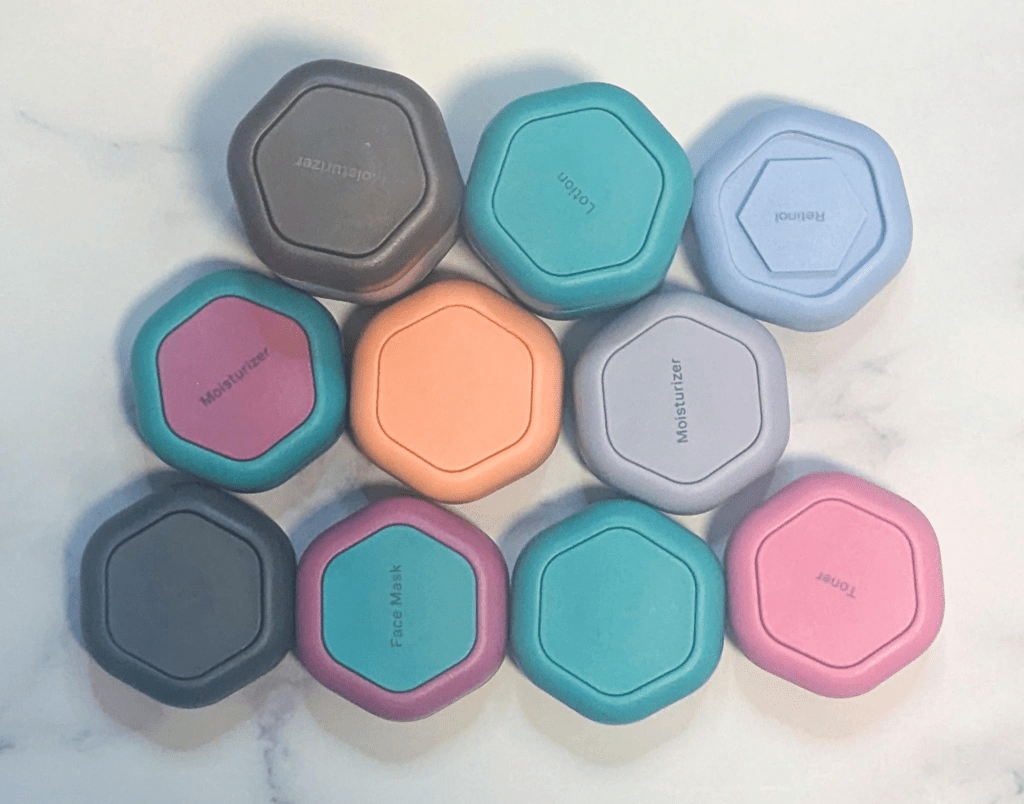
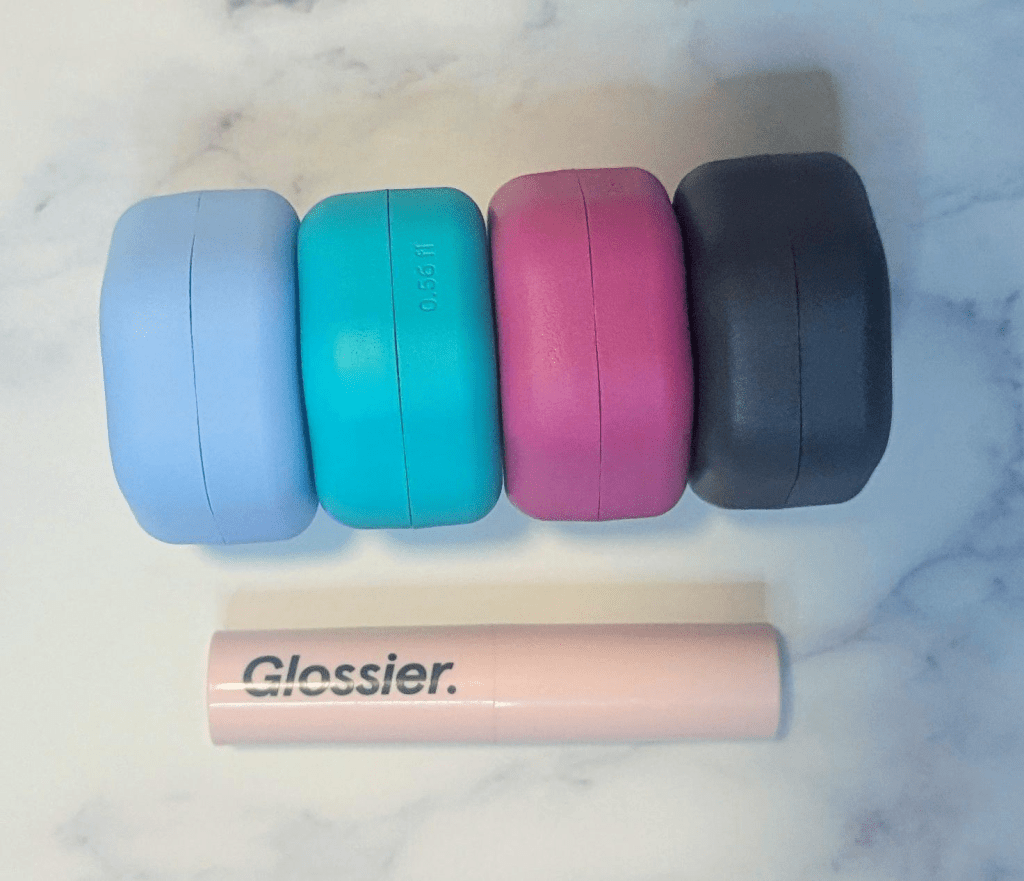
My current collection of the new capsules (I still love and use the old ones too!)

If you’re not familiar with Cadence Capsules, let me explain why I love them so much. I feel like I’ve tried a dozen different travel container brands/types, and they all have been really frustrated. My number one issue is leaking – there’s always that one thing that leaks all over your suitcase or purse. I’ve started putting containers in plastic bags (sometimes double bagged) because they leak so much, and that feels so incredibly wasteful to me. I’ve also had containers that never seem to get clean enough to reuse, so I end up throwing them away rather than use them again. Plus, some of them are way too small and definitely wouldn’t fit enough for a month long trip.

These honestly don’t leak – ever. I’m able to throw them in a bag and not have to worry about anything leaking or spilling. Even with the most watery toner, it was 100% leak-proof. I also love that they magnetize together so I’ll never lose them in the bottom of a suitcase. Because they have such a wide opening (more in the video below), these are incredibly easy to fill with products, and you don’t need a funnel, mini spatula, or spoon to do it. Over the years, I’ve washed and reused these containers so many times, and they look brand new. This is my favorite thing about these because I hate cleaning out those little plastic containers where you can barely get into them unless you want to spend forever with one of those straw cleaners. With these, I can wash them with a normal sponge, it takes a couple of minutes, and they are actually clean.

The labels are super easy to pop in and mix and match (as you can see here) or you can leave them unlabeled. The old labels work with these because they’re all magnetic which makes them even more flexible if you have a bunch of old labels lying around like I do.

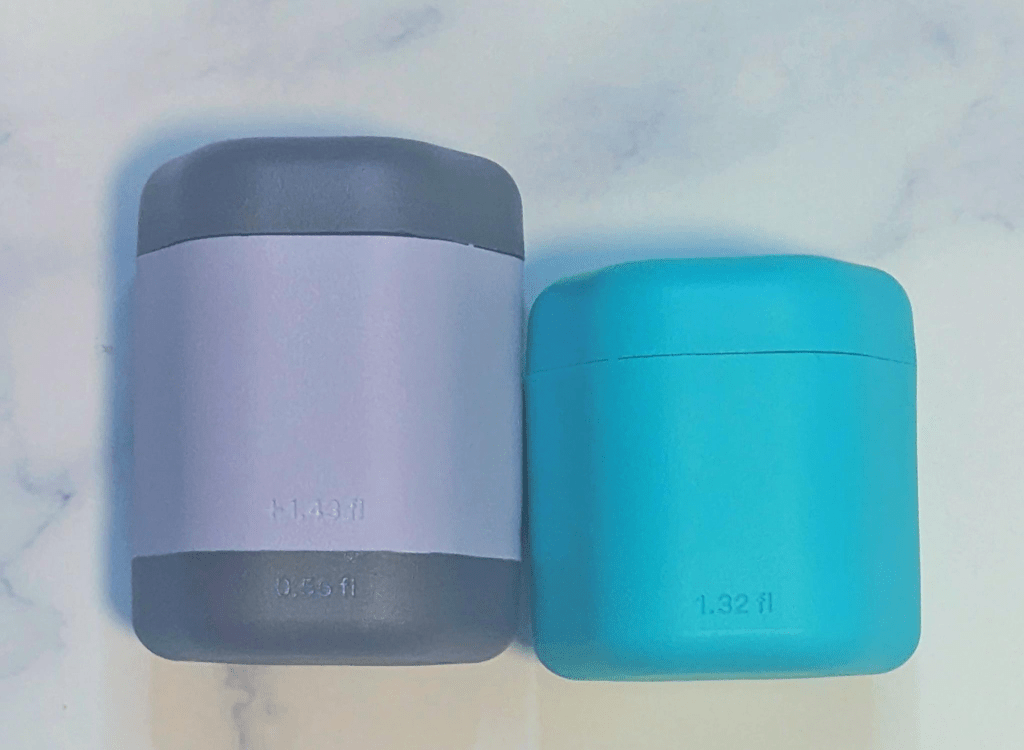
But the new design is even better because the new containers come in different sizes that you can easily swap in and out with the extenders. The small is 0.56 ounces, which is honestly more than what I need for most trips most of the time. This is now my most purchased sized because I love how I can fit so many of them into my travel bag and not have to give up any of my skincare products on a trip. Keep in mind that a standard foundation bottle (you know the ones that take at least a year to use up even if you use them every day) are an ounce so a half ounce of product is more than you think!

4 smalls compared to a Glossier Ultralip so you can see just how compact they are

The medium is 1.32 ounces, which I would use for body lotion and oil. If I was to go on a longer trip and need shampoo and conditioner, I’d definitely reach for these. Because I typically reached for the smalls, I actually only have one medium and otherwise I got the extenders so I can turn my smalls into mediums only when I need them. The extender adds 1.43 ounces to the other sizes, and I’d much rather add an extender than be stuck with a capsule that’s too big. I love that the extenders are so easy to use, and they’re still entirely leakproof. I don’t own any larges (which is a medium plus an extender) but if you did need a 2.75 ounce container for a long trip, it’s a great option.

A small with the extender vs a medium – the medium is a bit smaller but I love the flexibility of the extender!

You can also easily swap the tiles to change the labels on the capsules. I also will use the old labels with the new capsules, and that works totally fine for me even though they’re not technically made for each other. I also love how many colors they come in so if I don’t have a specific label already, I can usually just remember which color goes with which product. You can buy the labels (called tiles) separately if you want to and sometimes they run promotions where you can write whatever you want on the labels.

What’s your favorite thing to have when you travel? Thanks for reading, and let me know what you’d like to see next in the comments!

My two favorite blushes from the Finding Ferdinand x Kackie Reviews Beauty Apres Ski Collection are still in stock!

I’m so thankful to have gotten the latest collaboration between Kackie Reviews Beauty and Finding Ferdinand in PR. It’s called Après Ski, and I absolutely would have purchased these myself if I hadn’t received them. I loved the beige blushes (purchased by me) they came out with last year, and I’m thrilled to have these new shades that work so perfectly with my preference for pink, mauve, and purple tones. I’ll be doing a full review of the collection once Finding Ferdinand releases the hex codes for them so you can buy them, but I noticed my two favorite blushes were still in stock so wanted to share why I love them. Thank you so much for being here, and it would mean so much to me if you subscribe here for new posts. All links in this post are affiliate links, and if you choose to shop through them, thanks for supporting the blog!

Sunrise and High Noon

Sunrise is a light neutral pink that’s been my go to when I have no idea what blush I want to use. It looks so natural on me and works well with so many different eye and lip colors. I appreciate that it doesn’t lean too warm and so doesn’t turn orange or peachy on me. It’s also beigey enough to work with brown eye looks (which I find has been weirdly hard for me to match with pink blushes lately for me). It’s my no brainer, every day blush that I just know will always look great.

High Noon is a medium pink with berry undertones that works so well on my olive skin. It packs more of a punch than Sunrise and so I gravitate towards it when I want something I can throw on super quick without needing to build it up at all. This shade is also just purple enough to cool a look down when I need to. I love how it gives me that “cold girl” look without having to go all the way purple, and how it brings together a look with my brighter lipsticks.

These shades also layer together beautifully if I want to create a more dimensional effect. I’m honestly so excited to keep wearing High Noon into spring because I think it’ll work so well for warmer weather looks.

I recommend using a pretty densely packed brush like the BK Beauty 106 because it’s quite a stiff formula in the pot even though it blends out so seamlessly on the skin. The formula is super blendable (I think because there’s quite a bit of marula oil in these), easy to layer, and very buildable. They do dry down on the skin but they still have a dewy, hydrated finish that just looks really nice. These are a bit more matte than the original formula, which I’m actually really happy about because they last even longer. You can also hopefully see in the swatch photo that they’re pretty blurring despite maintaining their hydrated quality. I just find these so easy to use that I find myself gravitating towards them every day.

Let me know if there’s anything else you’d like to see here on LiftBakeLove, and thanks for reading! As always, some links may be affiliate links that support the blog, but all reviews/opinions are completely my own and unsponsored.

BK Beauty Brushes Review – Angie Hot & Flashy Travel Set TA101, TA501, TA502, TA506, TA507

Back with another BK Beauty brush review – this time the newish Angie Hot & Flashy Travel Set! I wanted enough time to test out the set (though I have some of the full sizes of these already) as usual so you can get a more thorough review. As always, thank you so much for being here, and it would mean so much to me if you subscribe for new posts – I have lots of product reviews coming up, like the Kackie x Finding Ferdinand blushes, the Makeup by Mario Ethereal Eyes Palette, Urban Decay Space Rider Palette, the Givenchy Prisme Libre Powder, the Gucci Bronzer, and so much more that I’ve ended up with over 2023 and didn’t review yet. In this post, all links are affiliate links, but all opinions are my own, and I bought these myself. 

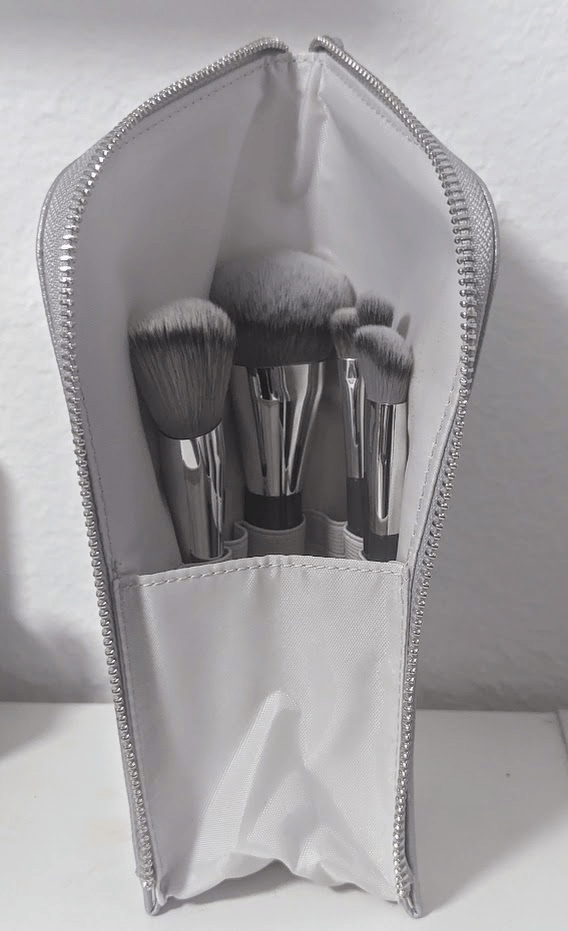
The Angie Hot & Flashy Travel Pouch – I am so excited to have this for travel because I never know what to do with my brushes once I get to where I’m staying and tend either use a kitchen cup or just have them all in a bag. But because this bag stands up by itself, you can use it as a cup to hold all your brushes and has plenty of room for eyeliners, mascara, lip liners, eyebrow pencils, and anything else that stands up. There’s also a ton of slots for brushes and makeup (way more than for the 5 brushes the set comes with).

Travel 101 Contoured Foundation – This brush is the perfect shape for so many things – foundation, bronzer, blush, highlighter. Because of the angle and the shape, it works so quickly for anything I’m doing. Even though it’s quite large, I still find I can be precise with it with the added bonus of blending super quickly. This is my favorite brush for cream bronzer and blush in particular, and I find myself using it over any other brush I have so much that I’m super excited to have this travel sized version in addition to my full sized one. I also will use the top edge for cream highlighter in a pinch. The density is perfect and doesn’t “eat up” too much product. It’s one of the first brushes I would rebuy now if I lost my collection, and that’s saying so much since I have such a large collection of brushes.

Travel Angie Hot & Flashy A501 Lid Shader – The is one of the two brushes I don’t have the full size of (the other is the angled brush), and since the full size is only $16, I wish I had gotten it earlier. As a one and done eyeshadow look lover, this brush has been perfect for packing on and blending one shadow all over the lid. It works great with both mattes and shimmers, and I can totally see why they included this in the travel set. It’s definitely the brush I would choose if I could only choose one because it’s so easy to make a one shadow look with. But if I was going to add one more eyeshadow brush, it would be the next one.

Travel Angie Hot & Flashy A502 Crease Shader– The full size version of this is one of my favorite crease brushes I love how this is so small and so fluffy at the same time! I honestly can’t count the number of crease brushes I have at this point, but this one is still special. It’s perfect for actually defining the crease (vs moving shadow around). Because it’s small, I can use it for the outer corner, inner corner, under my eyes – basically anywhere I want to place and blend shadow. It’s so soft so it doesn’t scratch, and it’s just a joy to use.

Travel Angie Hot & Flashy A506 Concealer – This is hands down my favorite concealer brush of all time, and I’m so glad I have a mini version of it now. It’s designed to mimic the shape of your fingertip, and I find that it makes it like I’m blending out with my finger but without losing any coverage. This makes it especially great for concealer under my eyes where I really want to keep the coverage but want a super seamless blend. Because of the shape, it’s also really easy to get into harder to reach spots or smaller areas so it also works great for spot concealing given how precise you can get with it.

Travel Angie Hot & Flashy 507 Angled Blush –  I have a bunch of angled brushes that I never use (I’ve reviewed a few on here before even), and this is the first one I actually have enjoyed using. I wish I had bought the full size before if I’m honest, because it’s one of my most used powder blush and bronzer brushes since I’ve gotten it. The shape and density of the bristles is just right, and I think it’s because of the doming they added (according to the website). If you’ve never gotten angled brushes to work for you, I recommend this one!

What other products would you like me to review? Let me know if there’s anything else you’d like to see here on LiftBakeLove, and thanks for reading! As always, some links may be affiliate links that support the blog, but all reviews/opinions are completely my own and unsponsored.